Product photography tips
Product photography usually involves taking a photo of a single item, with the photo shot so as to focus the viewer's attention on that item, and make the item look at its best. If you have a business selling products, you want to sell something on ebay, or you just want to try product photography for fun, this article will give you some tips on getting good results.

This article covers the basics of product photography, and is a good guide for getting started. For more tips check out the other articles:
- Product Photography Tips 2
- Product Photography Tips 3
- Product photography on the cheap with only one light - Part one and Part two.
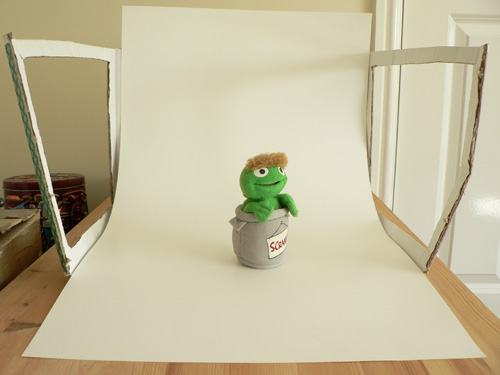
Products look best isolated with a plain background, usually white or black. Set up an area where you can photograph your product, for example a table against a wall. For a seamless background (i.e. one where there isn't a visible transition between the horizontal surface the product is placed on and the background), you can use a sheet of card. Bend the card round, with part up against the wall or some other support, while the rest is horizontal and placed under the subject.
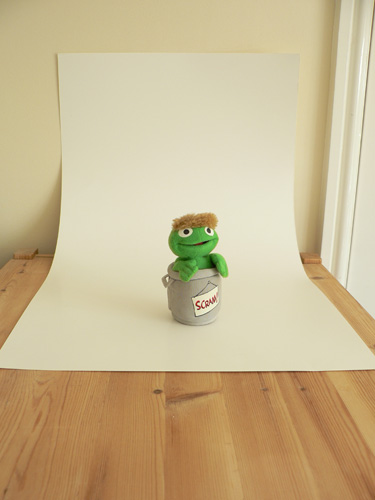
You can also use a cardboard box with two sides removed as a support for the seamless card background.
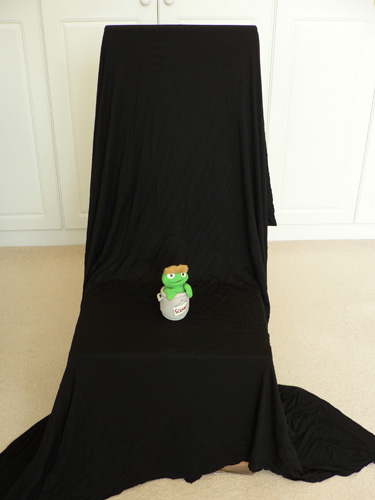
Cloth will also work as a seamless backdrop, though you will need something to support the cloth. Draping the cloth over the back of a chair should work reasonably well, or you can purchase a background stand with clamps to hang the cloth from.
Product Photography Lighting
For lighting your subject, natural light will work well, but if you have a couple of lights it will allow you more control over the lighting. Adjustable lamps can be purchased quite cheaply, or more expensive flash units can be used. The main benefit of using flash units is that their output (power) can easily be adjusted. They do not run hot either compared to standard lamps. (See Off-Camera Flash on the Cheap for information on cheap flash solutions and how to use off camera flash with cameras that have no flash shoe).
Standard lamps can have their output adjusted by placing layers of diffusion (tissue paper works well) between the lamp and the subject. Don't place the tissue paper too near the hot lamps though as you risk burning yourself.
If lighting your subject with flash, you need some way for your camera to trigger the flash units. Some flash units can be triggered automatically by the pop-up flash on your camera, while others may need to be connected directly to the camera via a sync cord. You can also purchase radio triggers that allow your flash to be triggered wirelessly by your camera.
Flashes or lamps should be diffused to soften shadows. There are specialist umbrellas made for this purpose. Shoot thru umbrellas are made of a thin material that diffuses the flash as it passes through the umbrella, and are positioned pointing towards the subject. Reflective umbrellas meanwhile are positioned pointing away from the subject. They have a reflective surface on the inside that you point the flash at, the flash then bounces off back towards the subject.
Softboxes work in a similar way to shoot thru umbrellas, and there are a wide variety of other accessories you can use to create diffused lighting. Don't think you need expensive accessories though - flash bounced from a piece of white card will work well as a diffused light source.
If you are wanting a white background, position your product a reasonable distance in front of the background. Then point one of your lights at the background, while using the other light to light your subject.
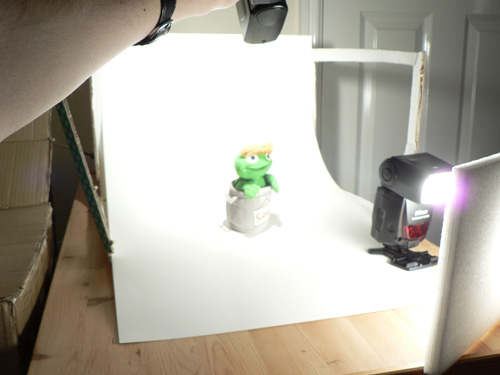
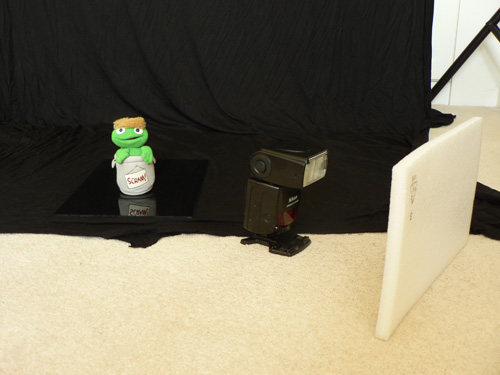
As you can see in the photo above I pointed one flash at a piece of white foam, which then bounced the light back towards the subject. By bouncing the light from the larger piece of foam, this spreads the light out over a larger area and reduces harsh shadows.
You can also see for the photo that I handheld the flash pointing at the background. You can use a stand to hold your flash in place, but hand holding is the quick way. If you wanted to photograph a number of objects with the same lighting then I would recommend investing in a cheap tripod or lightstand to hold the flashes in place.
The setup above yields the following photo (note this is straight out of camera with no adjustments, the 'product' can easily be darkened without affecting the rest of the image):

After a couple of adjustments (repositioning the subject in the frame and darkening with a curves adjustment):

Camera settings for product photography
Use a small aperture, e.g. f/8 to get as much of your product into focus as possible. As discussed above, if you are using flash, use the fastest shutter speed your camera will allow while still syncing normally with flash (usually around 1/200s - 1/250s). Use manual exposure, and if using flash, set the flash unit(s) to manual mode as well.
If you are working with lamps or natural light, adjust your shutter speed for the correct exposure. If using flash, adjust the flash power for the correct exposure. When using black or white backgrounds, this will often fool the camera's exposure meter. So rely on the image you can see on the camera's LCD for exposure, not what the camera's exposure meter suggests.
Although not necessary, I would also recommend using a tripod to keep the camera steady. If your camera supports it, you can use LiveView for focusing manually, and get your point of sharpest focus exactly where you want it.
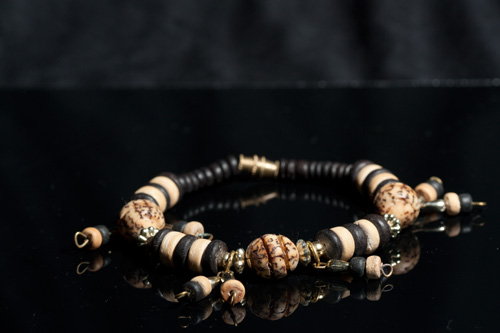
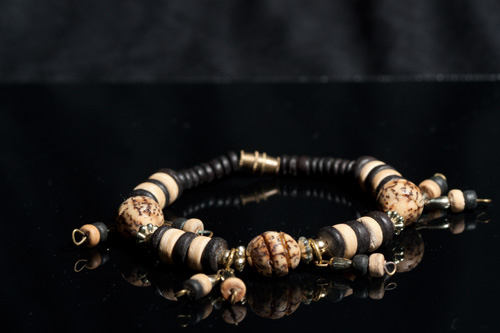
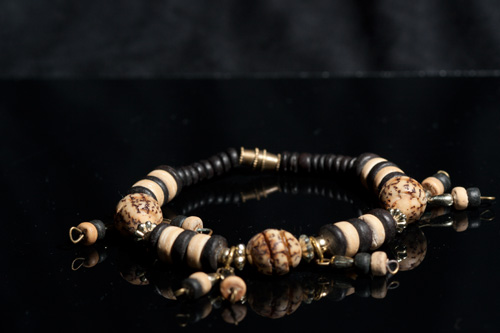
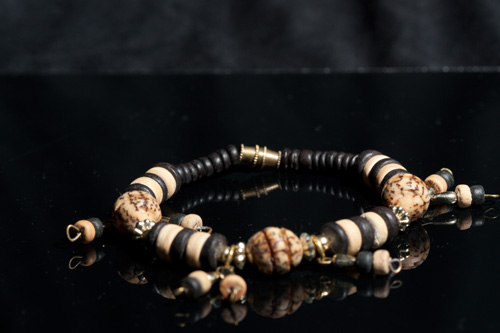
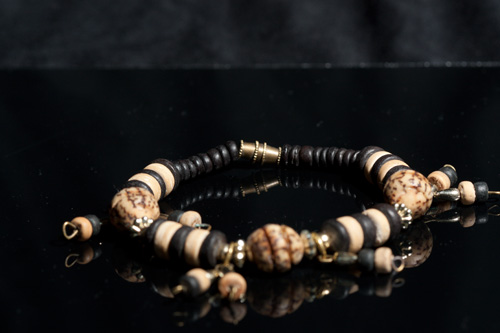
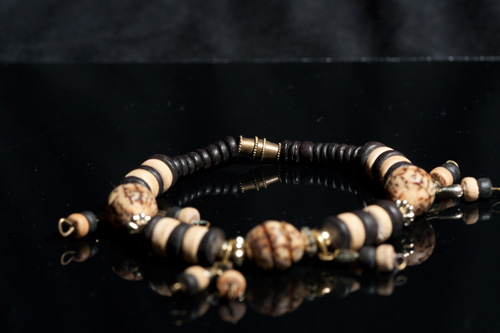
Creating reflections and shooting products with black backgrounds
If you would like to get a reflection under your subject, a piece of plastic, polished stone, or tile will work well. You can use glass, but this will usually result in a double reflection as both the top and bottom of the glass pane reflect the subject.

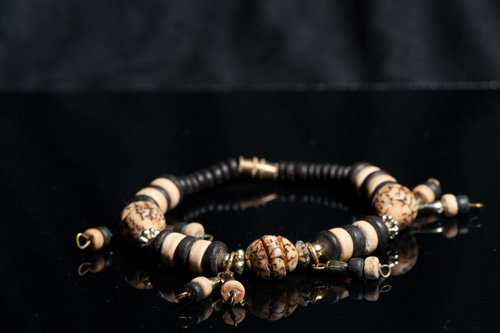
The above photo was taken on a piece of black perspex with a black cloth used for the background, and flash bounced from a piece of white foam to light the subject.
You may notice that you can see the folds in the background cloth in the photo. For photos where the background is meant to be solid black, it is best to use artificial light and put as much distance between your subject and the background as possible. Be careful to light your subject and not the background.
Use the fastest shutter speed you can, this helps reduce the amount of ambient light that contributes to the exposure. If you are using flash, you want to set your camera to the Flash Sync Speed. This is the fastest that your camera can trigger the shutter when you are using flash, and is normally around 1/200s - 1/250s.
Still, you may find that your background is not completely black. Likewise, when trying to photograph a subject on a white background, you may find that the background is not completely white. Luckily, we can fix this relatively easily with image editing software such as Photoshop.
Making backgrounds go solid white or black in Photoshop or similar software
Open up the product photo you want to adjust and then either choose a 'Levels' adjustment or 'Curves' adjustment.
Using Levels to adjust the background brightness
The Levels adjustment shows a graph of the different tones in the image, from black on the left to white at the right. There are a lot of dark tones in my image with the black background. I want these to be completely black, so I move the black slider up past the dark tones. Now all the tones to the left of the black slider are solid black.
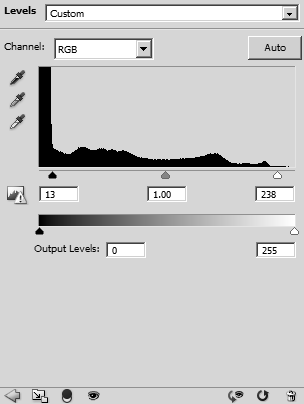
I also adjusted the white slider slightly to brighten the light tones.
If I wanted to make a white background go solid white, the process would be similar. You'd have a peak of bright tones at the right of the levels graph. Grab the white point and move it so it is positioned before this peak to turn those tones solid white.
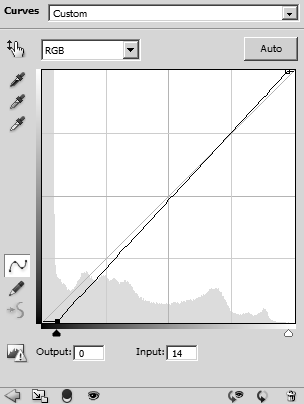
Using Curves to adjust the background brightness
The curves adjustment is quite similar to levels, in that it shows a graph of the tones in the image from black on the left to white on the right. To make the background darker, grab the bottom left corner of the tone curve and move it to the right until it is to the right of the peak of dark tones that should be black.
Similar to the levels adjustment, I have also adjusted the white point slightly to brighten the light tones.
Again, if you have an image with a nearly white background you want to make solid white, you just move the top right corner of the curve to the left until the background turns solid white.
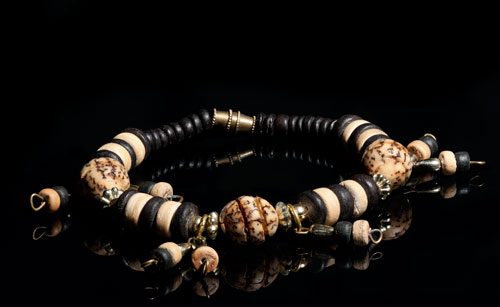
Making the reflection fade out
The reflection can be made to fade out by using image editing software such as Photoshop. Use a gradient that fades from the background color into transparent, and place this over the reflection. For this image, I used a gradient that fades from black to transparent.

Getting all of the product in focus
In some cases, for example, when photographing jewelry, you may want all of the item to be focus. Depending on the size of the object, and the angle you want to photograph it at, this can sometimes be impossible with a normal lens.
This is where tilt-shift lenses can be very useful. A tilt-shift lens allows you to tilt the focal plane so that it is aligned with the object you want to photograph, even when the object is at an angle compared to the camera's sensor. Unfortunately tilt-shift lenses are quite expensive, but thankfully there is another trick you can use to get all of an object in focus.
The trick is to take multiple photos of the object, starting with focusing at the front of the object, and then gradually adjusting the focus backwards until the focus is at the back of the object.
After taking the photos, these can be combined in software that takes the in focus area of each image and blends them together into a single photo. Photoshop CC, Helicon Focus, and CombineZP (free) are all popular software that can perform this 'focus stacking'. The final photo below has also had some other Photoshop work done - dust on the plastic surface and the background were painted black and a curves adjustment to darken the background was applied.
When taking the photos for a focus stack, you will need to use a tripod to keep the camera position relative to the product constant. Use manual settings for everything on the camera to keep the exposure and color constant. And if using flash, make sure the flash position and power are kept constant across the images as well.
Take a range of shots
When taking product shots, you will probably want more than one shot of the product. Once you have everything set up correctly, you can easily rotate your product to get photos of it from different angles. Also get some detail shots of the product by focusing in on a small section of the product.
I hope these tips have been helpful. When you've mastered these techniques you might want to try some of the other tips outlined in the other product photography articles listed at the top of the page. If you have any questions feel free to leave a comment below or send me a message, and I'll do my best to help.


What was the power of the flash in both the cases of photograph with white and B&W backagrounds.
Sorry, I don’t have any record of the flash power. Likely it would have been something like 1/32 for the white background and 1/64 for the black background.
It’s not very important really as different flashes will have different amounts of light output at those settings. And the brightness will depend on how close to the subject the flash is placed, whether you’re bouncing it, diffusing it, etc.
You just need to adjust the flash power and camera settings until you get the result you want. If it’s too bright then reduce the flash power or close down the aperture or decrease the ISO. And the reverse if the image is too dark.
It’s good to know that you should use a small aperture when taking photos of products. My brother is wanting to start a toy business and he was wondering how he could take pictures of his products. I’ll tell him that he should use a small aperture when taking photos.
Thanks for sharing informative article. I really like this post.
Thansk for sharing informative article.