Lens filter tips & tricks for great photos
Applying digital filters to photos, particularly photos taken using a phone, is extremely popular. You can achieve many effects in modern software that previously required photographers to use a physical filter in front of the camera's lens.
However, this doesn't mean you should dismiss the use of physical filters. Some effects can't be replicated in software. And even if the effect can be duplicated, it still won't give quite the same result. In this article we'll look at some creative reasons why you should give physical filters a try.
Use a neutral density filter to blur movement
A neutral density filter is a neutral gray colored filter that cuts down on the amount of light that your camera receives. This allows you to use longer exposures, which mean that anything moving in the frame during the exposure will be blurred.
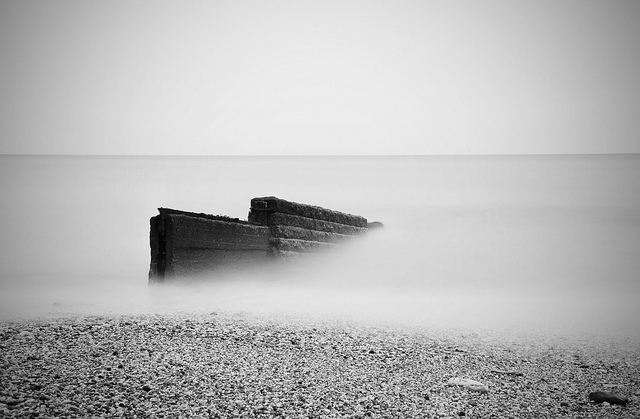
Long exposure Seascape by Darren Shilson on Flickr (licensed CC-BY)
There are quite a few creative ways you can use this technique:
- Capturing a static landscape or city scene with blurred clouds moving across the sky overhead.
- Turning moving water into a silky stream, or even creating a mist like effect.
- Photographing a static person or object in a city with blurred people and traffic moving around them.
- Getting rid of people from a scene - with a really long exposure moving people will just blur away into nothingness. If you look at very early photographs of town and city scenes you'll notice that they often appear almost deserted, because the early photographic processes required very long exposure times.
- Landscape photography where grass and trees blowing in the wind blur, creating a very painterly effect.
- Purposefully moving the camera during the exposure can create an image that looks more like an abstract painting than a photograph.
For most of these techniques you'll need a good tripod to keep your camera steady. This ensures that only anything moving within the frame will become blurred, while everything else stays nice and sharp, creating a strong contrast between the moving and the static.
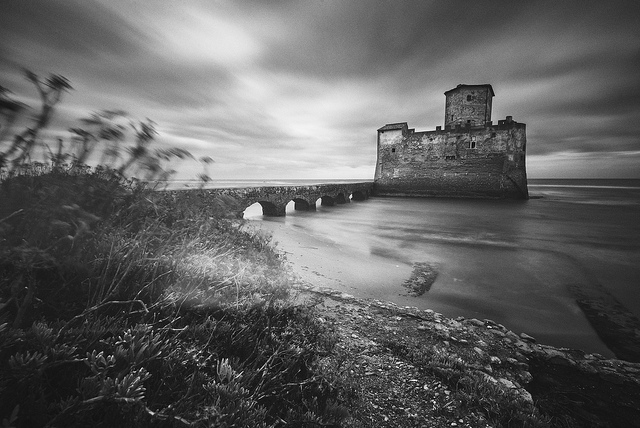
Lowa by Daniel Zedda on Flickr (licensed CC-BY)
The amount of blur you'll get depends on how long the exposure is and how fast the movement is. And in turn, the maximum length of the exposure depends on the light levels and how strong the neutral density filter is. They are available in a range of strengths, from 1 stop to 10 stops (1 stop is a halving of the amount of light, see Photography Basics – Exposure for a description of how stops are used to measure exposure). You can even stack neutral density filters for stronger effects.
Use a vari-ND for shallow DoF with flash or in bright light
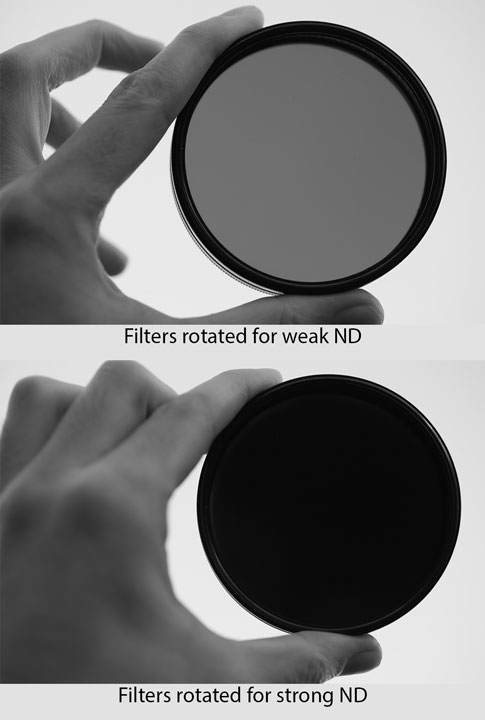
A variable neutral density filter works in a similar way to a standard neutral density filter, in that it cuts down the amount of light the camera receives. Unlike a standard ND filter though, they feature a ring you can turn that affects the filter's strength. So you have the equivalent of a range of neutral density filters of different strengths, but all in a single filter.

Tiffen Variable ND Filter - note how the ring can be turned to adjust the filter strength
They can be particularly useful if you want to photograph a subject using a very shallow depth of field in bright light or using flash. To obtain a shallow depth of field, you need to use a wide aperture setting, e.g. f/1.8. This lets a lot of light into the camera. And with a brightly lit scene, you will need a relatively fast shutter speed to obtain an image that is not over-exposed.

Leanna by Robert Bejil on Flickr (licensed CC-BY) - photographed using a large aperture and flash with ND filter used to bring the exposure down
The issue with this is that the required shutter speed may be too fast. If you want to use flash in your photo, then the maximum shutter speed most cameras will sync flash correctly at is around 1/200 - 1/250s. If the required shutter speed to avoid over-exposure is faster than that, then the flash won't work properly. (The flash could fire with less power, it may not work at all, or it might only light up a slit of the image).
Another common reason for needing slower shutter speeds is when shooting video. You typically want your shutter speed to be double your frame rate, so a 30FPS video clip would want a 1/60s shutter speed. But if the light is too bright for this shutter speed, what can you do?
The answer is simple - add a neutral density filter to cut down on the amount of light. A vari-ND filter is perfect as it lets you easily tweak and adjust the amount of light reduction until you get the exposure you're looking for.
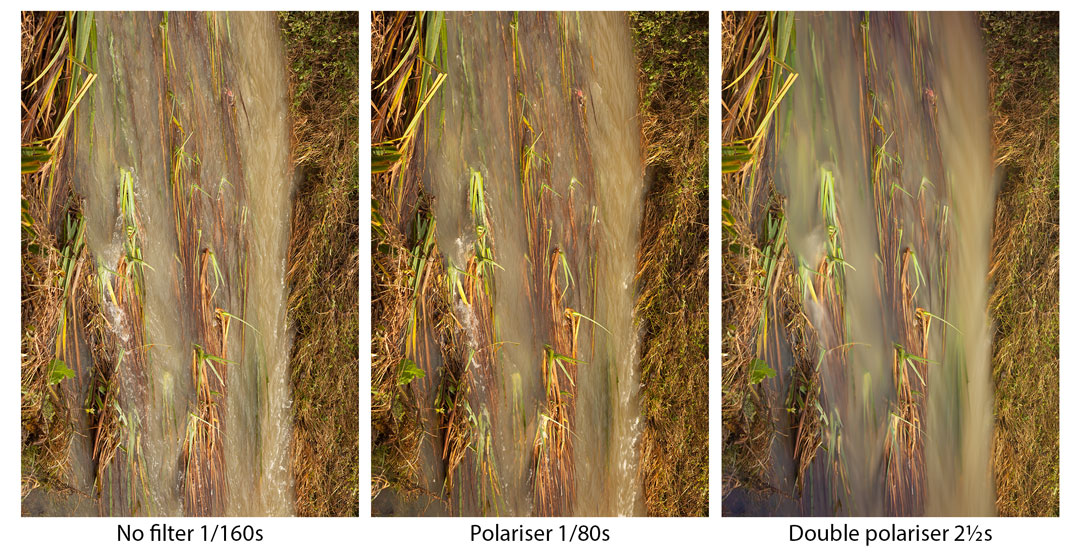
Make your own vari-ND
You can create your own variable neutral density filter quite easily by stacking two polarizing filters together. For this to work you need a circular polarizing filter, which you attach to your camera's lens. Then on top of this screw in a linear polarizer. (Both linear and circular polarizers can be found for sale online easily). Then adjust the polarizers to dial in the amount of light reduction you want.
It's not a real substitute for a proper variable neutral density filter - stacking the two filters creates a very deep filter that can cause vignetting. And you're more likely to have image quality issues when stacking two filters (particularly if you opt for cheap polarizing filters). You'll also find that the darkening effect can be quite uneven at wide angle focal lengths, but the same is true for dedicated vari-ND filters.
The same effect can also be achieved with two circular polarizing filters, but you'll need to reverse-mount the second circular polarizing filter. This makes the whole filter stack even larger since you have to add a reversing ring between the two filters.
Still, it can be worth experimenting with, especially if you already have a polarizing filter.
Remove reflections with a polarizer
A lot of photographers seem to think that a polarizer is just used for creating a deeper blue sky and enhancing saturation in landscape images. And so there's no point using one as the same thing can be done in software.
However, the real reason for using a polarizer is to reduce or enhance reflections. This doesn't just apply to removing reflections from water or glass (though that can be very useful). But it applies to anything reflective. Landscape photographers, for example, often use a polarizer for removing reflections from grass and leaves.
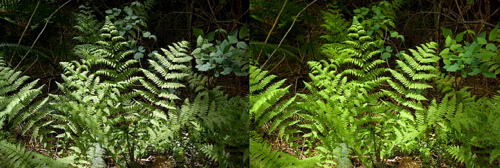
Effect of a circular polarizer on fern leaves by David J Laporte on Flickr (licensed CC-BY)
Affect the color with a Gold 'n' Blue polarizer
A gold and blue (or sometimes called yellow and blue) polarizer works in a similar way to a standard polarizer, but the polarized reflections become tinted gold or blue, depending on how you adjust the filter. It can be a great way to add some color to an otherwise relatively dull scene.
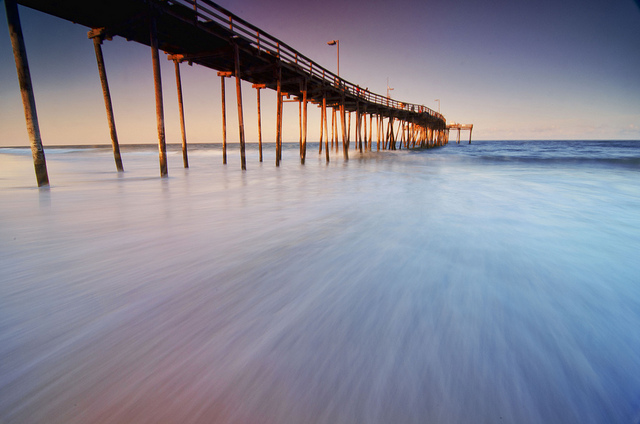
Avon Pier, Hatteras Island, North Carolina by Andrew Michael Smith on Flickr (licensed CC-BY-ND)
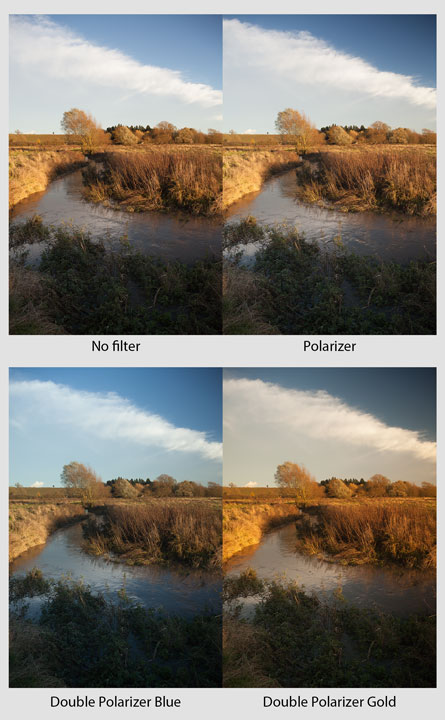
Just like the vari-ND filter, this is also something you can create yourself from two polarizing filters. By mounting a circular polarizing filter, with another circular polarizing filter on top, you can achieve the gold and blue polarization. You need to be aware of the possibility of vignetting due to the stacked filters, but it is an easy and relatively cheap way to get the same effect as the much more expensive gold and blue polarizer.
Make clear plastic colorful with cross polarization
I actually have a whole article on this effect here: Cross Polarization Photography. But to give a quick overview, cross polarization is a technique where you use a polarized light source and a polarizer on your camera's lens. Doing this reveals the stress patterns in plastic, which show up as bright bands of color.
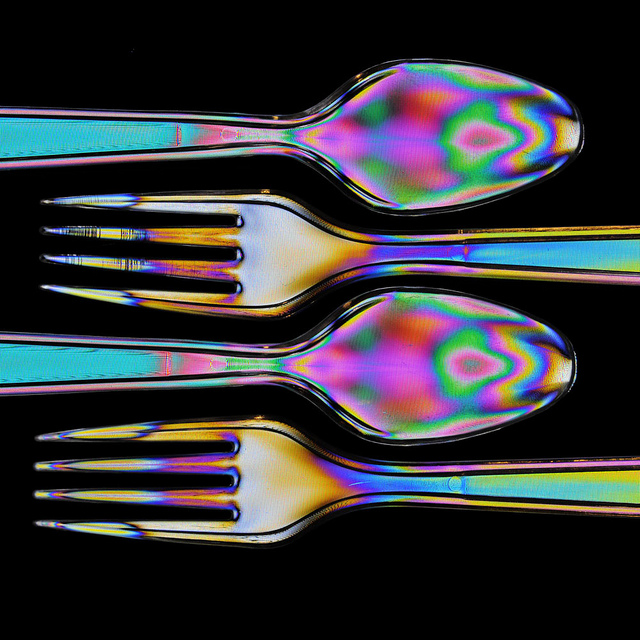
photoelasticity by Evan on Flickr (licensed CC-BY-ND)
An LCD monitor can be used as a polarized light source, so you don't need any expensive specialist equipment. The images you can create with this technique reveal clear plastic objects in a very different way to how we normally see them.
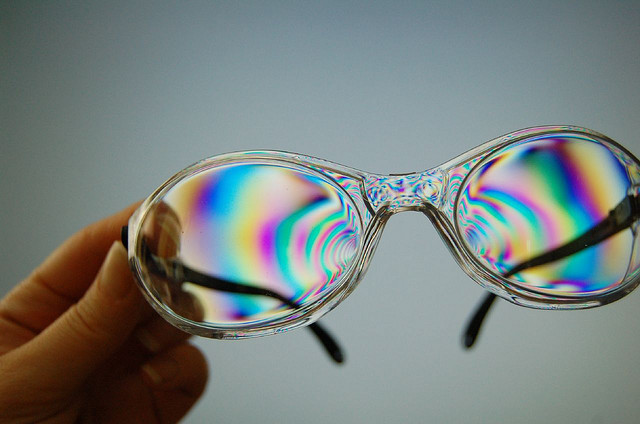
Lab Goggles by ilovebutter on Flickr (licensed CC-BY)
Selectively darken part of the scene
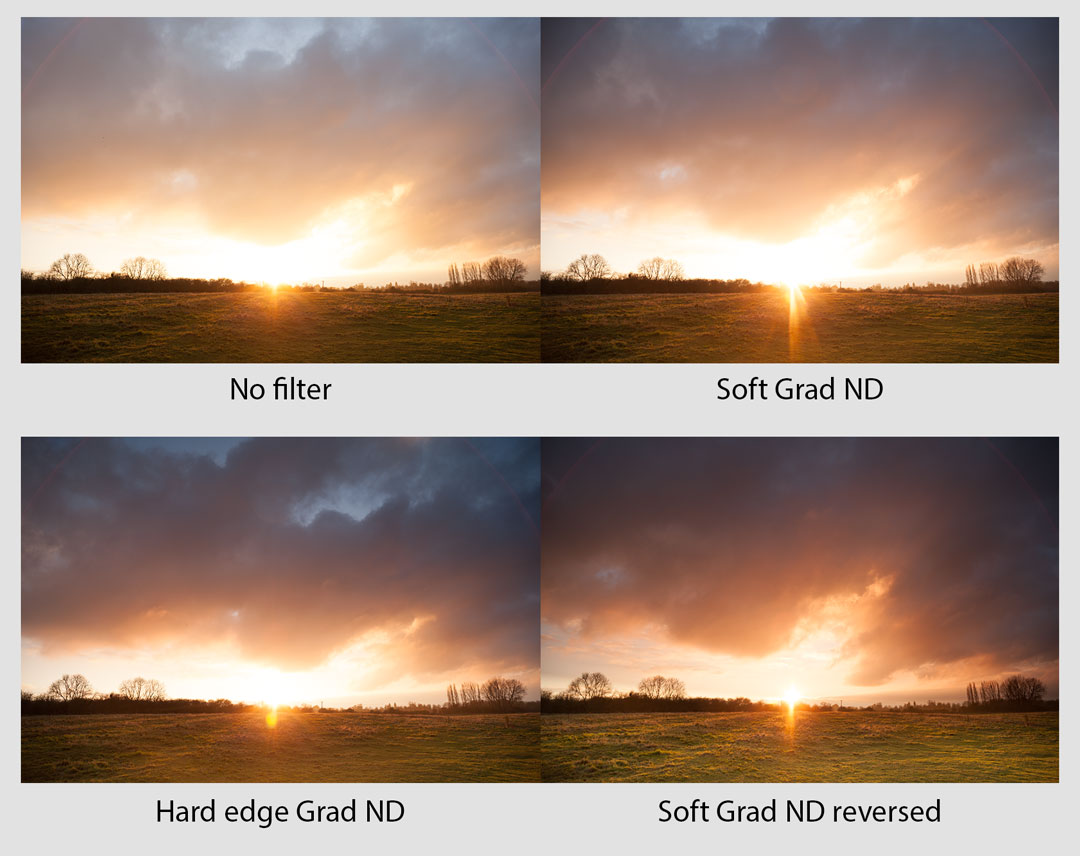
A split or graduated neutral density filter is a filter where half the filter is clear, and the other part darker. This is often used in landscape photography, the dark section being placed over the sky to darken it.

However, you can also use these filters the other way round, so that rather than darkening the sky, you darken the foreground instead. A hard edged split neutral density filter can be used to turn the entire landscape black, like a silhouette. Or a soft edge graduated neutral density filter can be used to just darken the closest foreground slightly, and draw the eye into the image.
Another unorthodox technique is to use a soft graduation split neutral density filter, but to flip it upside down and place the dark edge of the filter on the horizon. This leaves the area below the horizon with no filter over it, and the top part with the dark area of the filter that starts to fade towards the top of the image. Since you place the filter very close to the lens, the edge of the filter is not visible in the final image.
This technique works quite well when the sun is near the horizon. You can actually buy reverse graduated filters, however for some reason they are a lot more expensive than standard graduated filters. If you already have a graduated neutral density filter, using this technique gives a similar result for free.
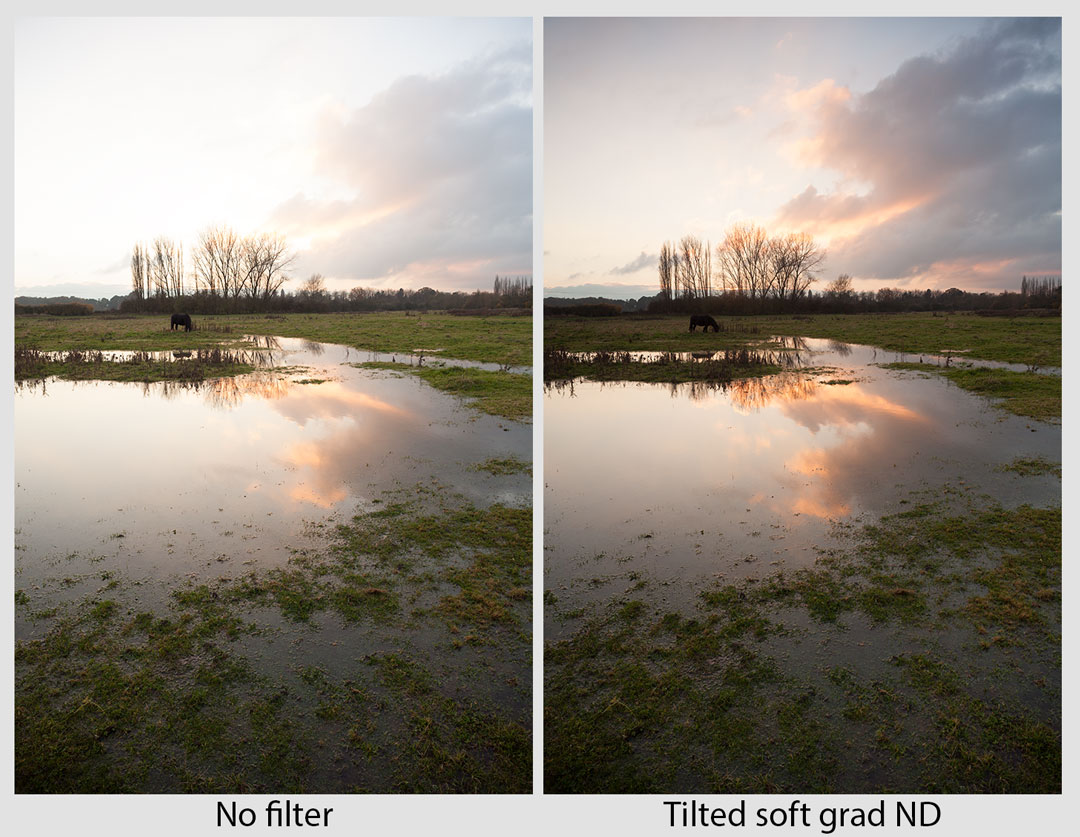
Don't forget that you can tilt these filters too - you don't need to position them so they are always straight. If you have an image where one half of the sky is darker than the other, then don't be afraid to tilt the filter to affect one side more than the other.
Turn points of light into stars
Photos taken using star filters are often thought of as being quite kitsch and cheesy, but this is not always the case. A star filter works by turning points of light, which includes reflective highlights, and transforming them into star shaped points of light.
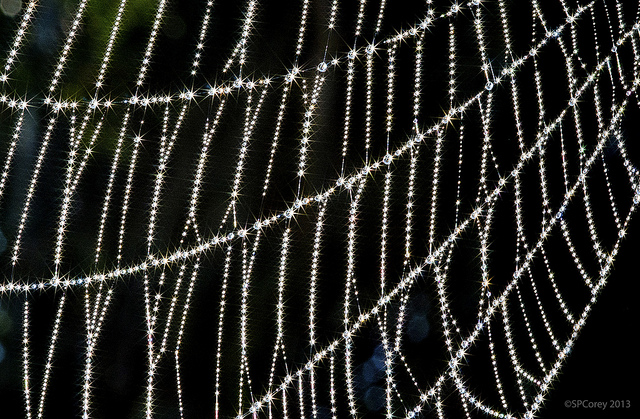
Webs as Decor by Steve Corey on Flickr (licensed CC-BY-ND)
They can be excellent for adding a sparkling look to an image. They can also work well when photographing people with lights around them, such as performing musicians. You do need to be quite selective in their use, particularly when there are multiple points of light in the frame. Otherwise you can end up with the stars overwhelming the rest of the image.
They are available in lots of different versions. You'll find there are differences in how large the created stars are, how many points the stars have, and how strong the effect is. Some filters feature a rotating ring, so you can easily adjust the effect.

Tiffen 6 point star filter
Soften and smooth
A soft filter is used to reduce microcontrast in an image without actually blurring away image detail. It can also give a subtle glow around bright areas of the image. The traditional use is for portraiture, where the filter smooths out imperfections in skin. But that doesn't mean you can't use them for other types of photography too.

Any time you want to create an image with a soft and dreamy feel, a soft filter can be a great choice. Like many other filters, there are a wide variety of different types available, varying in how strong the effect is, and how the softness is achieved. You can read more about them in this article: How to achieve a soft-focus dreamy look.
Capture the world as you don't see it
Although humans can't see near-infrared light, camera sensors can. By using an infrared filter on your camera you can block visible light so the camera only captures near-infrared light. This results in otherwordly images where grass and foliage appears very bright, and sky and water appear very dark.
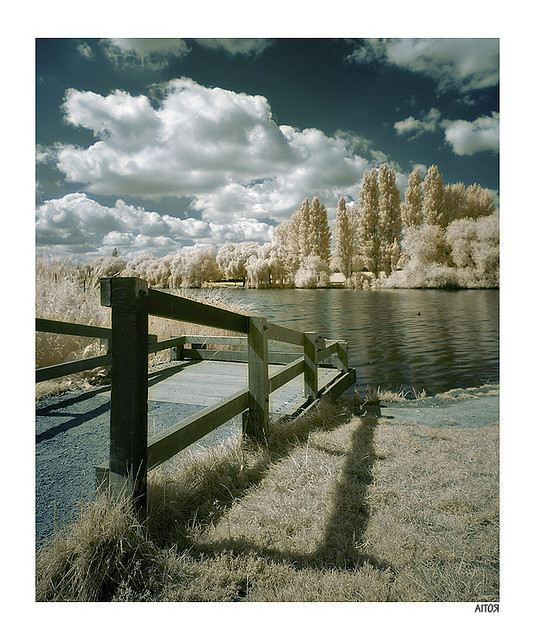
lake_ir_col by Aitor Escauriaza on Flickr (licensed CC-BY)
Not all cameras are suitable for infrared photography though. All cameras have a built-in filter covering the image sensor that blocks infrared light. In some camera models this filter is not too strong and will still let a bit of infrared through, while in other models this filter works too well to make them suitable for infrared photography. You can check your camera's sensitivity to infrared light using the TV remote test. This, and more about infrared photography are described in this article: An Introduction To Infrared (IR) Photography.
Exposure times will be quite long, so you'll need a tripod to keep your camera steady. It is possible to have a camera converted to remove the internal IR blocking filter, which results in much more 'normal' exposure times. But this is relatively expensive, so it is best to experiment with a standard camera first to ensure you really like the results before paying out for a full conversion.
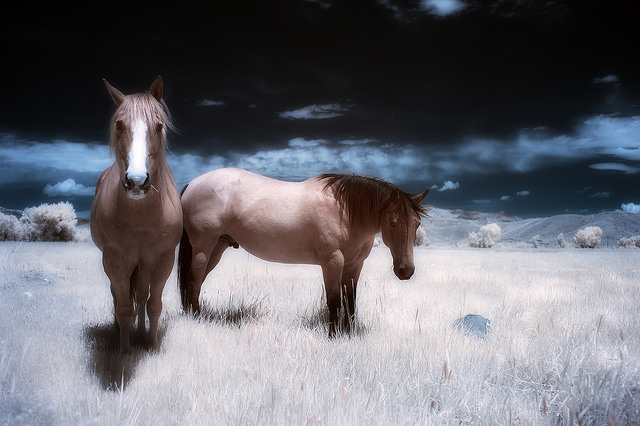
the guys by greg westfall on Flickr (licensed CC-BY)
So, as you can see, there are quite a few creative ways that various filters can be used with your camera. Have a play with some filters, experiment with your photography, and enjoy it!


Amazing amazing article. Thank you for sharing all your knowledge!