How to build and use a Macro Photography Studio
Macro photography in a studio setting can be quite rewarding. You have much more control over the scene, being able to easily modify the lighting, background, and move around your subject without anything getting in the way.

(Based on the image Studio In The RAW: High Key Set-up by Alan Antiporda on flickr, licensed CC-BY)
When I say 'studio setting', I am not talking about a full blown photography studio. I just mean indoors, in a controlled environment. With macro and close-up photography, the top of a small table can be your studio!
Because you will be photographing small subjects, you only need a small space. Similarly, the size of everything else associated with studio photography is much reduced. This makes setting up a macro photography studio inexpensive, and easy to pack away when not needed.
Macro & Close-up Photography Studio setup
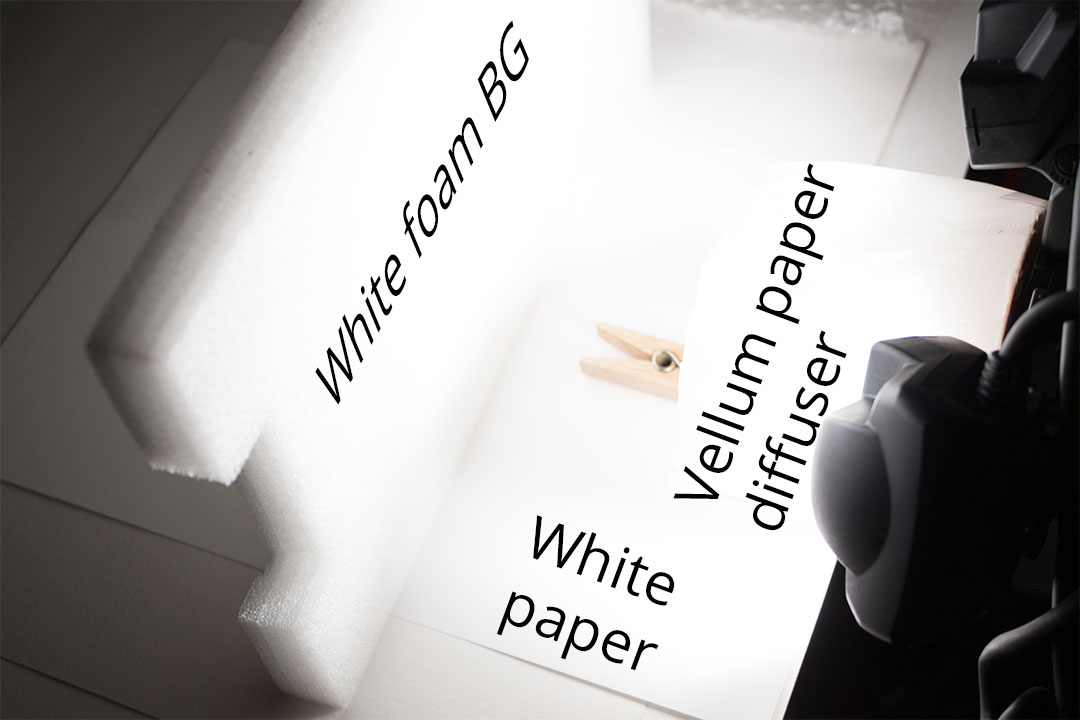
One simple solution for a close-up photography studio is a sheet of white paper that your subject rests on, with a small piece of white foamcore (or similar material) as the background.
I often use this setup for photographing moths I find in the house during the summer. In the daytime they tend to be quite sleepy, and with a bit of work can be coaxed from their resting place onto a piece of paper. I then place the paper near a window (the light helps for focusing), and put a piece of white foam behind the moth. Sometimes I might need to trim down the paper the moth is resting on.
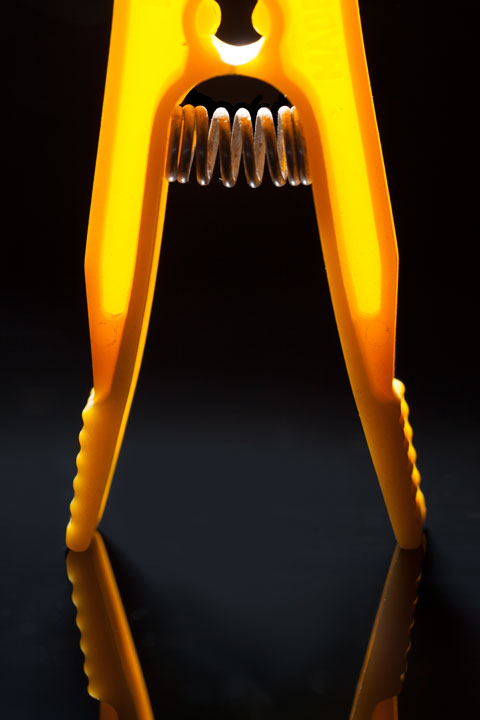
Example macro studio set-up, with a clothes peg standing in for the moth as I couldn't find any moths at the time of writing.
I use a macro twin flash, with one flash head pointed down at the moth and the other pointed up more at the background. This gives a nice studio portrait in a studio only a few inches big.
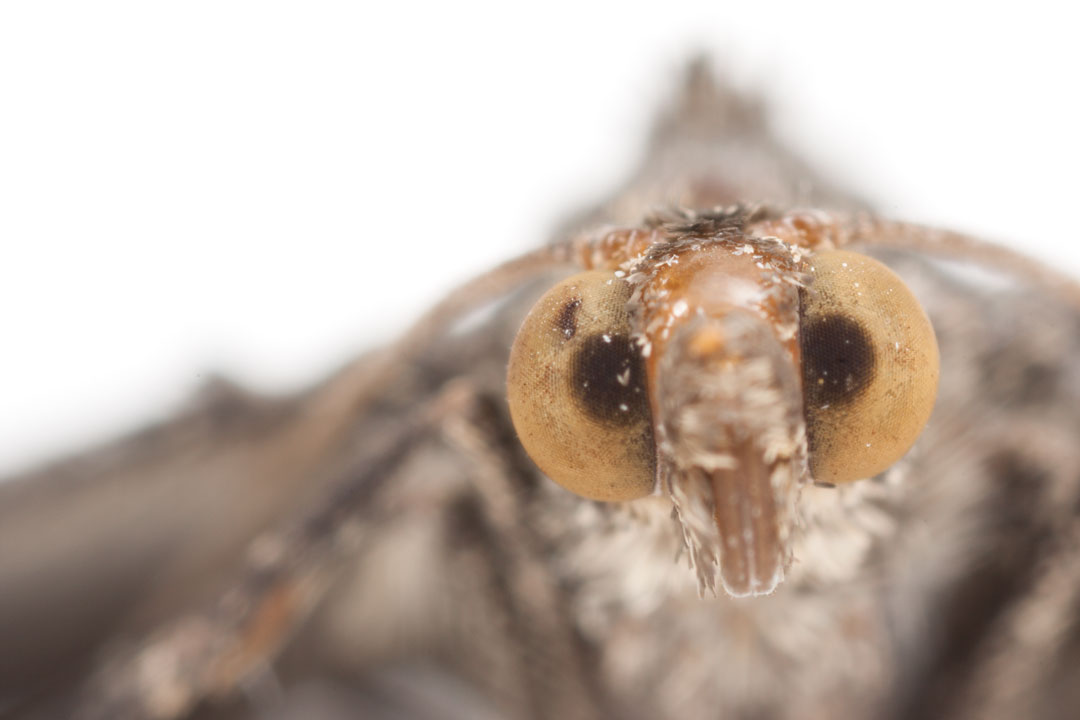
Example of a moth portrait using a setup similar to the above macro studio example
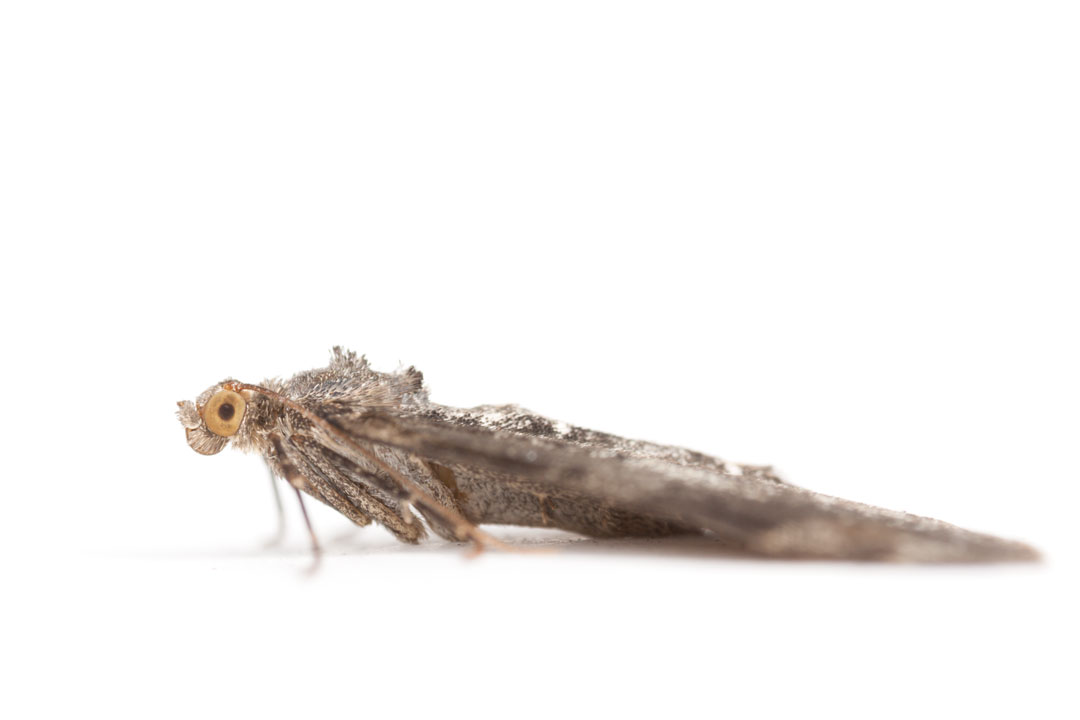
Full length insect portraits don't require a large working space
Another idea is to use a white piece of card bent against a wall to create what is known as an infinity curve. This is where there is no visible join between the horizontal surface and vertical background.
You can also buy small pop-up photography lighting tents. These have a hole at one side that allows you to see the subject. The other sides are made of semi-transparent material that will diffuse any light that passes through it, making for soft, even lighting.
Don't want a white background or white surface? With close-up and macro photography, a standard letter sized sheet of card or paper can often be used for the studio background or flooring. So you have have a wide range of colors and tones available very cheaply.
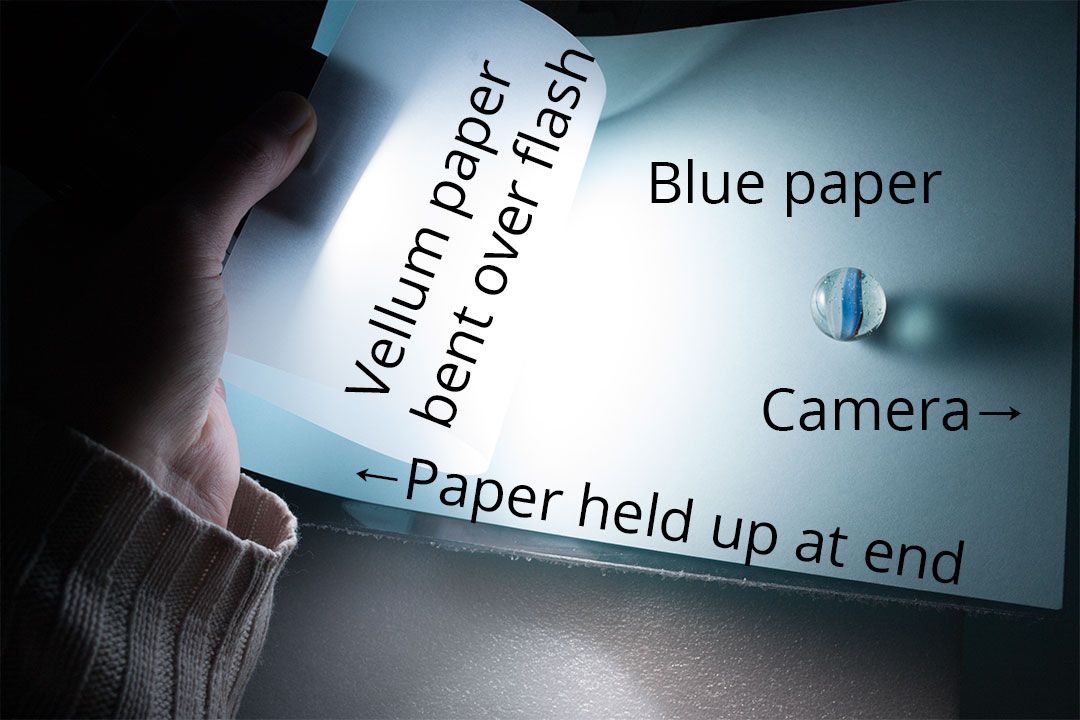
Macro studio setup shot used for photographing a marble. Blue paper was used, and held up at the end in a curve to create a seamless background. A flash with vellum paper bent over the front to diffuse the light was held above and behind the marble to backlight it.

Marble macro studio photo taken using the above setup. (Image was flipped upside down).
For a reflective surface under the subject you can use glossy card, or for a better reflection use glass or acrylic. I prefer acrylic as both the top and bottom surfaces of the glass can give reflections, resulting in a double reflection.
Lighting for your Macro Studio
While they can be used, there is no requirement for large studio strobes. A couple of speedlights or even standard gooseneck lamps will allow you to easily control the lighting on your subject. Even natural light can work very well, though it does not give as much control over the light as artificial light sources.
Ikea Jansjo gooseneck lampNo large expensive diffusers are needed for soft lighting. Any partially transparent paper will be fine, I find Vellum paper works quite well. You might find that you don't need (or want) any diffusion at all. The closer your light sources are to your subject, the softer the light will become.
Continuous lighting will give you the best preview of how your shot will turn out. If using continuous lighting with more than one lamp, make sure that the bulbs both have the same color temperature. If one gives cooler (bluer) or warmer (more orange) light than the other, then the resulting image will be very difficult to correct to a neutral white.
Similarly, if using lamps then be aware of the effect that daylight will have on the image. Few bulbs are truly daylight balanced. If the image is being lit by a combination of artificial light and daylight you may have color balance issues caused by the different color temperatures of the light sources.
When photographing with lamps, your exposure times will likely be quite long, e.g. one second. Hand-holding the camera is out of the question, so a tripod is essential. You may be able to get away with a small table-top tripod. But ideally you should use a good solid tripod. It will come in handy for other photography too.
Similarly, you need to avoid possible camera shake when triggering the shutter if you are working with continuous lighting from lamps. There are two ways you can do this. The first is to invest in a remote shutter release, so you don't need to actually touch the camera to fire it.
The second method is to simply use the camera's self timer. Setting a 2s delay gives the camera enough time to recover from any vibrations caused by pressing the shutter button before it takes the photo.
If you decide to go with speedlight flashes rather than continuous lighting you can use a much faster shutter speed. So you don't need to worry so much about camera shake. You might find a tripod is still useful though to keep the camera locked on a certain composition, or for techniques such as focus stacking.
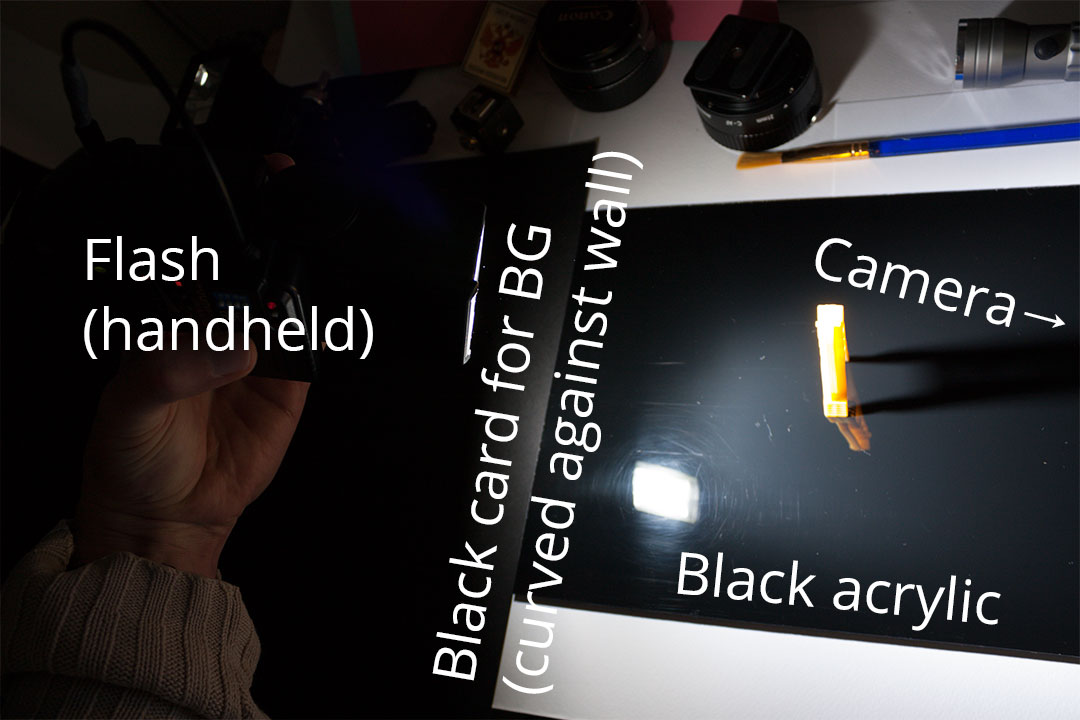
Example macro studio setup for clothes peg photo. The peg was placed on a sheet of black acrylic, which gives a reflection. The background was a black sheet of card (I used a big piece just because that was what I had to hand, a small piece would work fine). Lighting was provided by a bare flash above and behind the peg, to give a backlit image.
Using flash means a fast shutter speed can be used, which cuts down any ambient lighting. By ensuring that the flash does not hit the background, it makes it easy to achieve a pure black background. The acrylic surface was 'cleaned' to remove dust and marks in Photoshop.
Another lighting idea, which is a variation on continuous lighting, is to use light painting. For this technique you get your shot set up, then turn off the lights and close the curtains so that the studio is dark. Using a light source such as a small torch, you then 'paint' the subject with light from the torch. The effect this gives can be quite unlike other lighting techniques.
Lighting the Background
An issue that you may come across is that your subject may be well lit, but your background dark. This is likely to happen when you have your light(s) much closer to the subject than the background. The easiest solution to this is to add an additional light pointing at the background. If you're using a semi-transparent background, you might find you can place the light source behind the background to light it.
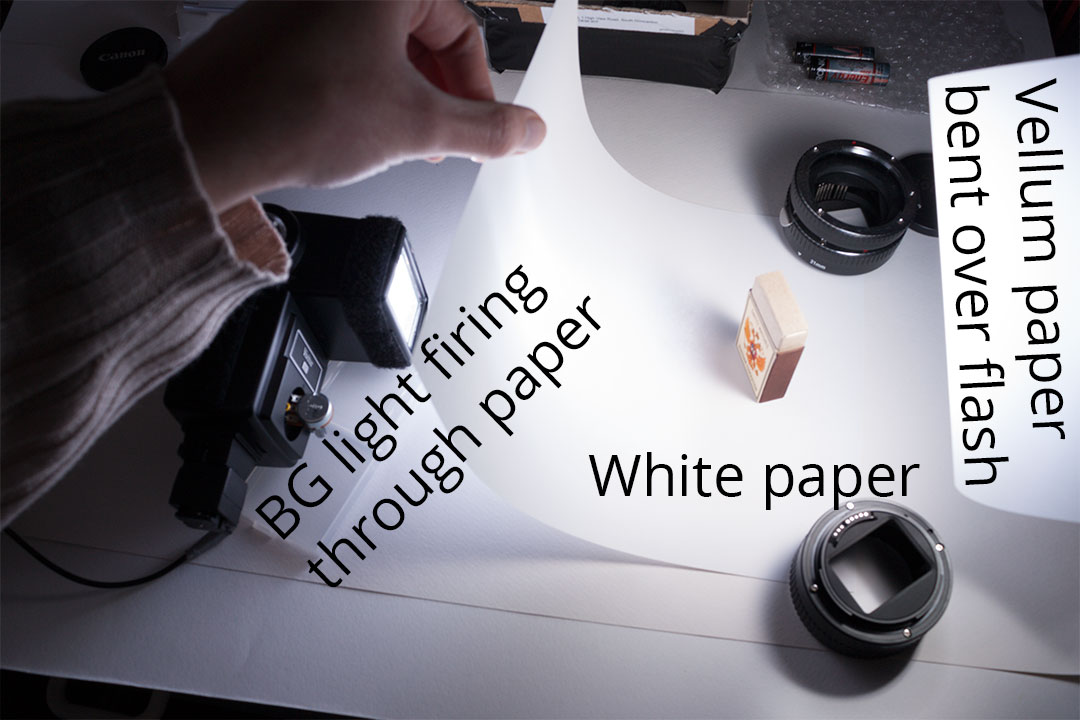
Using a white piece of paper and bending it to create a white seamless background for a macro studio photograph. A flash behind the paper was fired through the back of the bent paper to light the background. Another flash with a piece of vellum paper bent over the front of the flash to act as a diffuser was used to light the front of the matchbox.

Close-up photo of a matchbox taken using the above macro studio set
Another solution is to move the light(s) further away from the subject, until they are roughly the same distance from the background and subject. Or alternatively, you can move your subject nearer the background.
If you want a dark background, then just do the opposite. Make sure your lights are close to your subject and far away from the background.
Holding items that won't stand up
For some subjects you may want to photograph them standing up, rather than lying flat on a surface. The way to do this is dependent on the object being photographed. For flowers you can try using a flexible arm with a small clamp on one end and a larger clamp on the other end. The large clamp clamps to a solid surface, such as the table edge, while the small clamp clamps the flower's stem to hold it in place.
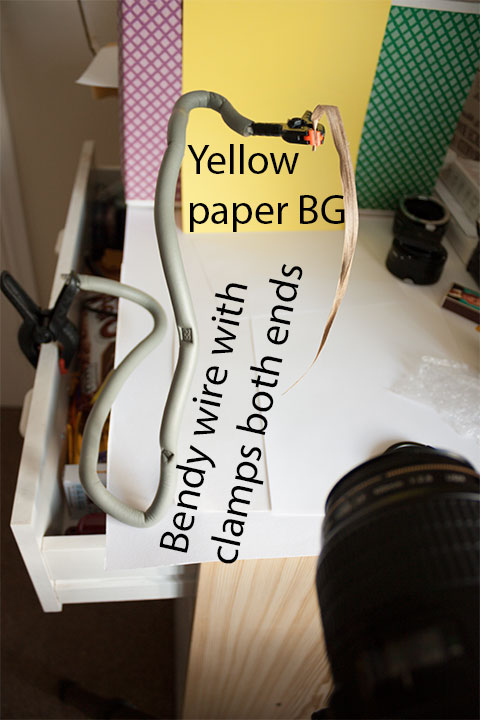
No flowers around at the moment, but a piece of dead grass makes a suitable macro subject. A bendable piece of wire with a large clamp on one end and small clamp on the other end (DIY plamp) was used to hold the grass. A piece of yellow paper was rested against a box to act as the background.
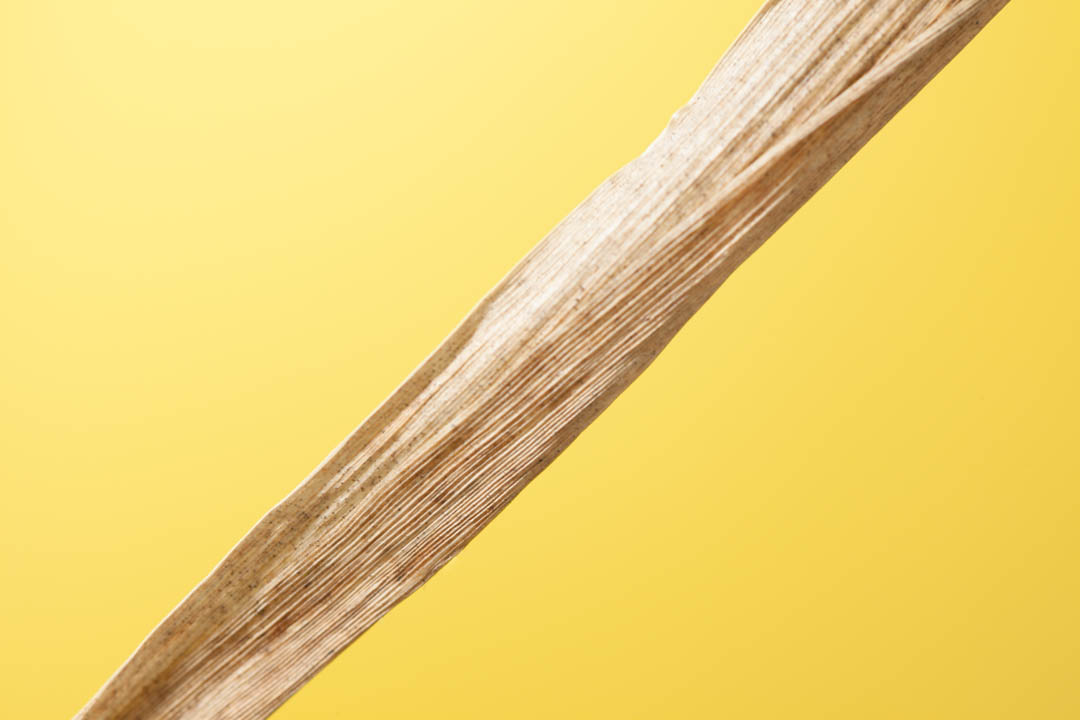
A 5s exposure was used, and a speedlight flash manually triggered to the side of the grass to bring out the texture. The flash was then manually fired again while pointing at the background, to light the background.
For some subjects you can use a special type of wax. You might find it referred to as positioning wax, jeweler's wax, holding wax, or tacky wax. You stick the wax to your surface and use it to hold the subject up. It is often used in jewelery photography to help position rings.
 Tacky Wax
Another idea that will work with some subjects is to use fishing line. The subject will need somewhere that the line can be securely tied around. Or, depending on the weight, you might be able to just tape the fishing line to the back of the subject.
Typically you want to secure one end of the line to something solid below your subject, and the other end to something solid above. This will stop the object spinning round on the end of a loose wire. The wire will then need to be removed in image editing software. But fishing line is quite thin, so this is not usually too difficult.
I hope this article and the examples have given you some ideas on how you can set up your own close-up and macro photography studio very easily and cheaply. Experimenting with a macro studio can be done without any difficult work of moving heavy lights or background stands. So why not create a few of your own setups and give it a try?


You didn’t mention what range of lens to use. Do you use a shorter lens and it’s the lightin close enough to not leave a shadow?
Good question. It doesn’t matter too much what the focal length of the lens is.
The shorter the focal length, the less working distance you’ll get, and so the closer to the subject you’ll have to place your lighting to avoid it being shadowed by the camera / lens. However, when working with a small ‘macro studio’ it is normally very easy to put your lighting very close to your subject.
The focal lengths I use for macro are nearly always between 50mm and 100mm.
Thank you; that’s what I thought.
I was looking into the Canon EF 100mm F/2.8L IS USM Macro
I’m doing indoor photography of jewelry pieces and I need very close up and shadow on jewelry is the worst because there’s a mirror effect. The shadow is bad, but the reflection of the camera in the shiny jewelry is worse!
Thanks again!