How to use light painting for flower photography
There are two main types of light painting photography, both of which involve using small torches or lights. In one type you capture the light coming straight out of the torches, and draw the light in mid-air with the torches. With the other type you shine your torches on your subject, so that only certain parts of it are illuminated.
It is this second type of light painting photography that I will concentrate on this article. By using a small torch, such as an LED torch or maglite, you can paint light onto your subject.
This gives us quite precise control of which parts of our photo are bright, and which parts are in shadow. In case you didn't guess already, painting with light requires a dark room (or you can do it outside at night), and a slow shutter speed.
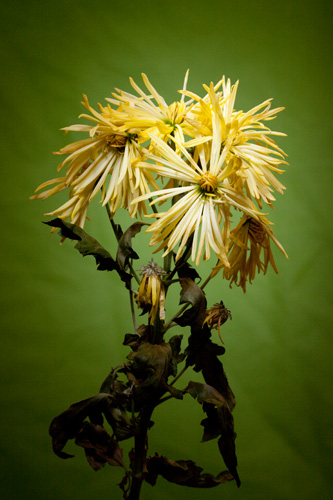
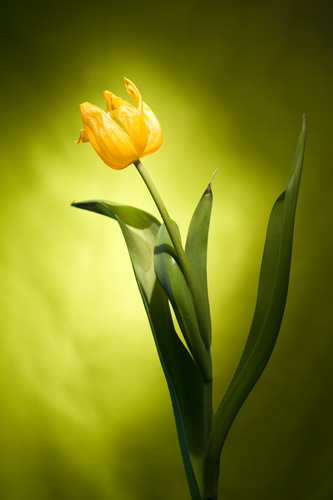
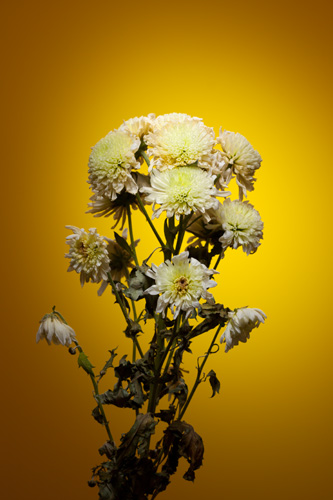
I'm using old cut flowers for my subjects, but fresh cut flowers, and dried flowers all work equally well for this technique.
You will need some way of positioning the flowers and holding them up. If they have long stalks, you can put them in a vase or jar. Alternatively, you can use a clamp to hold the bottom of the stalk in place. Or you can stick the stalk into some oasis (florist's foam).
For a background, if you don't shine any light on the background at all, then it will appear black in the final photo. I generally prefer to have a colored background. Material can make a good background, for example bed-sheets, blankets, etc.
Try to keep the background at least one meter behind your subject. This makes any creases in the background material more out of focus, and so not as harsh in the photo. Sheets of card or paper can also make a good background.
Position your camera on a tripod (or something solid), and set it to manual exposure mode. Use a long shot shutter speed, I would recommend at least 4 seconds. An aperture of f/8 I find works well. Set the ISO speed to the lowest available (usually ISO 100).
Focus the camera on the flower, and then lock the focus (put the camera or lens into manual focus mode). It is a good idea to have the lights on / curtains open when focusing to help you / the camera be able to focus correctly on the flower. After focusing you can turn the lights off / close the curtains ready for taking the photo.
When we trigger the camera's shutter, we don't want there to be any camera shake, so use a remote shutter release or the camera's self timer mode.
Get your torch switched on and ready to use, then trigger the camera's shutter. Use the torch to paint light onto the areas of the flower you want to draw attention to, while avoiding the other areas. Remember that the longer you hold the torch over a specific spot, the brighter that area will be in the photo.
I like to light the top of the flowers and a bit on the front of the flowers. Then I move the torch up and down while pointing it at the background to create a highlight on the background.
Because you can't see the final image building up as you shine the torch around, light painting involves quite a bit of trial and error. Look at the photo on the camera's LCD, and evaluate the image. If some areas are too bright, hold the torch over that area for less time in the next image. If some areas are too dark, shine the torch on that area for longer in the next image.
Is the highlight on the background too high or low? Try and correct the positioning of the torch beam in the next image. After a few tries you should get an image you're happy with.
One potential problem you need to be aware of, is if the flower moves at all during the exposure. If the flower moves then you will get black 'shadows' around the edges of the petals. The 'shadows' show where the flower was while the background was being lit.
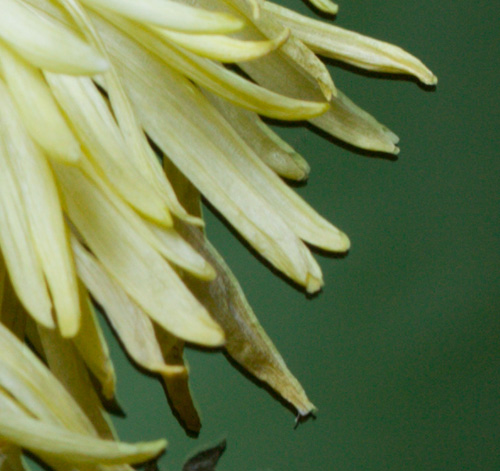
So don't move around too much during the exposure as it is quite easy to create a small breeze that will move flower petals.
There are lots of different variations you can try when light painting flowers:
- Strength, direction, and location of light
- Color of background
- How bright the background is, and where a highlight (if any) is placed
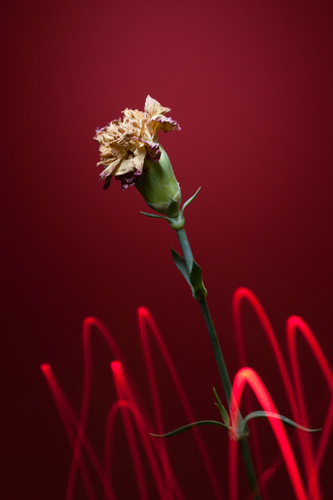
You can also try light painting the flower combined with light painting in the air. For this example the flower and background were painted with light, then a red LED torch was pointed towards the camera and moved up and down around the bottom of the stem:
One of the good things about light painting is that you don't need any fancy equipment, just a torch, camera, and something to keep the camera steady. So why not give it a try and see what you can come up with?


I have been trying this technique and love my results. I am new to manual mode cameras so it is trial and error. I took one picture that I can not stop looking at, I am amazed that I did it. Thanks for the information, I have been using a black background however think I may try using color and see what I get. Thanks again
Hi Bonnie
Thanks for the feedback, glad you’re enjoying the technique. Like most things in photography, experimenting and playing around with the technique can be fun and also yield some great photos.
I should probably try it again as it’s been a long time since I did any light painting.
Cheers
Dave