Avoid these 5 problems with your photos
There are some common problems that often affect photos taken by new photographers, and even experienced pros make these mistakes some of the time. In this article we'll look at a 5 of the most common problems, and how we can avoid them.
Wrong White balance
Different types of lighting have different color casts. You don't normally notice these differences, because your eyes automatically compensate. However, your camera does not automatically compensate. Even though most camera's feature an auto white balance mode, this is often not very reliable in more extreme lighting situations.
Tungsten lighting (often used in street lighting) has a strong yellow cast. Fluorescent lighting, on the other hand, often has a strong green cast. If you take a portrait photo under fluorescent lighting, your subject will look like they are seasick or a little green alien.
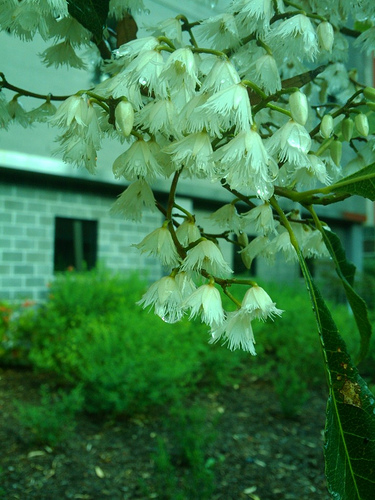
the rain has stopped by >littleyiye< on flickr (licensed CC-BY) - wrong white balance chosen purposefully to give a green cast
Thankfully, this problem is solved quite easily. Just remember to set the white balance setting on your camera so that it matches the lighting type you are shooting under.
If you forget to set the white balance in camera, it can be fixed later on the computer as well. If you are shooting RAW, then you can adjust the white balance setting during the RAW conversion process. If you are shooting JPEG, you can use a curves adjustment to remove the color cast.
Lack of Contrast
Contrast refers to the difference in brightness of the tones across an image. A low contrast image looks flat and washed out, while a high contrast image looks punchy.
Low contrast photos are often obtained when shooting through windows. Lens flare can also cause a low contrast photo. And flat lighting can be another problem. Sometimes a low contrast photo will be the look you are going for, e.g. if you are capturing the pastel shades of fields at sunrise. But most photos look better if they have a good contrast.
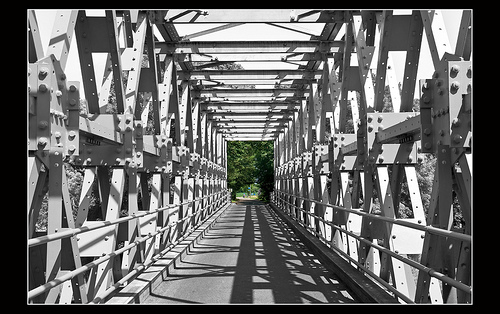
Bridge over troubled water (Explore) by Bert Kaufmann on flickr (licensed CC-BY) - nice contrast between beams and shadows and also good use of color contrast with the trees
To prevent veiling flare giving a low contrast image, use a lens hood (or your hand) to shade the lens from the sun. Try not to shoot into the sun as well.
Shooting through windows, use a rubber lens hood and press the hood right up against the glass. This reduces reflections on the inside of the window that can reduce contrast.
For increasing the contrast of an existing photo, I would suggest using the Levels or Curves tools that are available in most image editing software.
Bad lighting
Bad lighting is not something that is always easy to fix, but there are often some things you can do to improve the situation. Examples of bad lighting are shooting a portrait under the bright midday sun - the strong sunlight will cause harsh shadows on your subject's face.
To fix this, you can move your subject into a shaded area. Or have them turn so that the sun is not causing their facial features to cast shadows. You may need to use a reflector or a bit of fill flash to brighten their face and re-introduce a bit of shadow. (Shadow is important, but for portraits you want soft shadows, not harsh hard edged shadows).

Peek-a-boo by Andrew Stawarz on flickr (licensed CC-BY-ND) - reflector used to fill in shadows for nice lighting
Another example of bad lighting for a portrait is flat, frontal lighting. This is what you often get when using your camera's pop-up flash. You want your lighting to have some direction to it, and to cast nice soft shadows. Using an external off-camera flash and bouncing it from a wall or ceiling can help avoid this problem.
Using a piece of white card as a reflector to one side of your subject can also work well. This bounces some of the light from the pop-up flash back onto the side of your subject, giving some direction to the light.
No emotion
Photos with no emotion in them can look very boring, and are unlikely to warrant a second look. But how can you photograph an abstract thing such as emotion? For portrait photography, this means the expression on your subject's face. For architectural and landscape photography, it relies more on the lighting and angle of the photo.
"The eyes are the window to the soul" is a famous phrase, and this is particularly true for portrait photography (both people and animals). Make sure that your subject's eyes are captured and in focus. Engage with your subject(s), and try to get them to feel relaxed about being photographed. A forced smile in a photo is quite obvious, while a real smile will evoke an emotion from the viewer.

«My name is Iazua. Do you want to play with me?» by Tambako the Jaguar on flickr (licensed CC-BY-ND) - pose and the eyes carry the emotion
For other types of photography, your subject will have no emotion in and of itself, but it should evoke an emotion in you that want to try and capture. You need to capture the photograph in such a way that this emotion is conveyed to the viewer.
For example, if a place feels harsh and uninviting, photograph it at midday when there will be harsh shadows, or on a gloomy day with large storm clouds visible overhead. On the other hand, if feels warm and inviting, photograph it near sunrise or sunset, and try to avoid including hard edged shapes and lines within the composition.
Bad Composition
Bad composition is a common problem, and one that can often (though not always) be easily fixed. The classic example is the portrait photo where the person has a lamp post coming out of the top of their head. Just have your subject move so that the lamp post is no longer included in the image.
Another example is where part of your subject is cut off at the edge of the frame. If you intentionally composed a tight crop, then good, but if you were just being sloppy and cut off half of Uncle Fred in the family group portrait, then you need to take a little more care.
There are many compositional guidelines you can use to help you improve your photography, but I would say the most basic, and one of the most important, is to simplify. If you are including something within your image, and it doesn't add anything to the image (or even worse, distracts the viewer's attention away from your subject), then try and remove it.
anthony & the johnsons:knockin' on heaven's door by visualpanic on flickr (licensed CC-BY) - nice simple composition
Distracting elements can be removed from an image by moving your subject, moving yourself, using a different perspective or angle, or moving the distraction itself.
With all the tips above, there will be some situations where not following the tip results in a better photograph. All the tips should just be taken as general guidelines. They say "Rules were made to be broken", but when breaking a photographic rule you should be doing it for a reason, not just because you don't know any better.


