Daylight Long Exposure Photography Tips
Long exposure photography allows you to capture movement in a still photo, rather than just freezing a moment in time. You can capture silky smooth moving water, or clouds blurring as they move across the sky. Even blurred trails left by people as they move about.
In low light conditions, long exposure photography is quite easy. There's not much light, so exposure times will necessarily be long. But in daytime there is lots of light, and getting a shutter speed slow enough to blur anything but very fast movement can be almost impossible.
Using an ND filter
The answer to the problem is to use a neutral density (ND) filter in front of your camera's lens. An ND filter is a neutral gray colored filter that reduces the amount of light your camera receives, thus allowing you to use a slower shutter speed.
Neutral density filters are available in a range of different strengths. The most common are 1, 2, and 3 stops. One stop equates to a halving of the light let through, which means you can use a shutter speed half of what you'd normally need without a neutral density filter. A two stop ND filter only lets a quarter of the light through, while a 3 stop lets only an eighth through.
ND filters are labeled in various ways - they may be labeled in the number of stops they reduce light by e.g. 1 stop, 2 stops, 3 stops. Or by the fraction of light they let through, e.g. x2, x4, x8. Or by their optical density, e.g. ND 0.3, ND 0.6, ND 0.9.
For long exposure photography in daylight though, a 3 stop reduction is usually not enough. You're more likely to need a 6 stop / x64 / ND 1.8 filter or a 10 stop / x1000 / ND 3.0 filter, or a combination of both. Exactly how strong a filter is needed depends on how long an exposure you want, how bright the ambient light level is, and your camera / lens.
If you're shooting in the middle of the day in bright sunlight and want an exposure longer than a couple of minutes, you'll likely need 16 stops of exposure reduction, or more. If you're taking a photo at twilight however, the light levels are much less, and a 6 stop ND filter may be more than good enough for a multi-minute exposure.
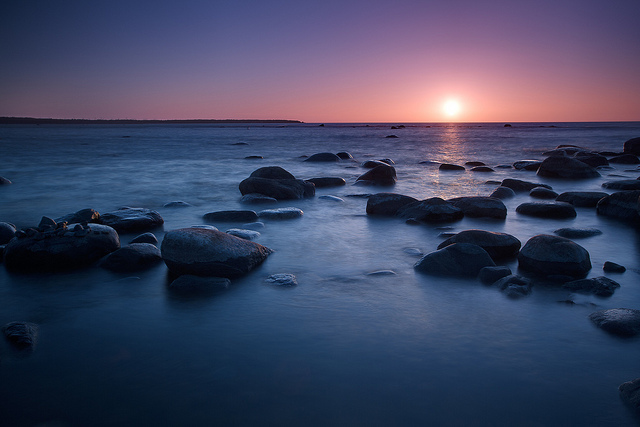
Sun goes down by Kain Kalju on Flickr (licensed CC-BY)
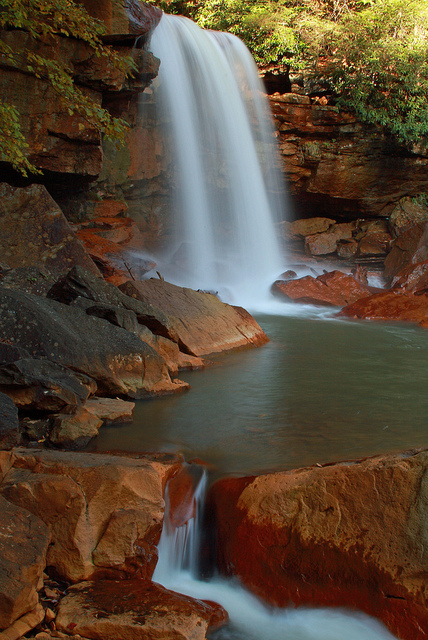
If you're photographing a waterfall in a forest and only want a few seconds exposure, a 3 stop filter may give the exposure reduction you need.

Layered Falls by Neil Williamson on Flickr (licensed CC-BY-SA)
Beware that some ND filters may be stronger than their claimed rating, while others may be weaker. It is worth testing any ND filter you pruchase to check if it is the correct strength. You can do this by setting your camera to manual exposure mode, taking a standard image with the ND, then adjust the exposure (ISO and or shutter speed) by the same amount of stops that the ND filter claims to reduce light by, add the ND filter and take another shot.
If the image taken with the ND filter is the same brightness as the image without the ND, then the filter is rated correctly. If it is brighter, then the filter is not as strong as it should be. If it is darker, then it is stronger than rated.
Of course, you need to be sure that the lighting is the same for both images. If you take one image when the sun's out and the other when it's behind a cloud, then the brightness difference between the images won't be down to the filter.
If you shot both images in RAW format, then you can use exposure compensation when converting the RAWs to bring both exposures to the same level. From the amount of compensation required you can work out the actual strength of the ND filter.
For example, if you used a 6 stop filter, but the resulting image was brighter than the image with no filter. If half a stop of negative exposure compensation in the RAW convertor brings the exposure in line with the image shot without a filter, then the true strength of the filter must 5½ stops.
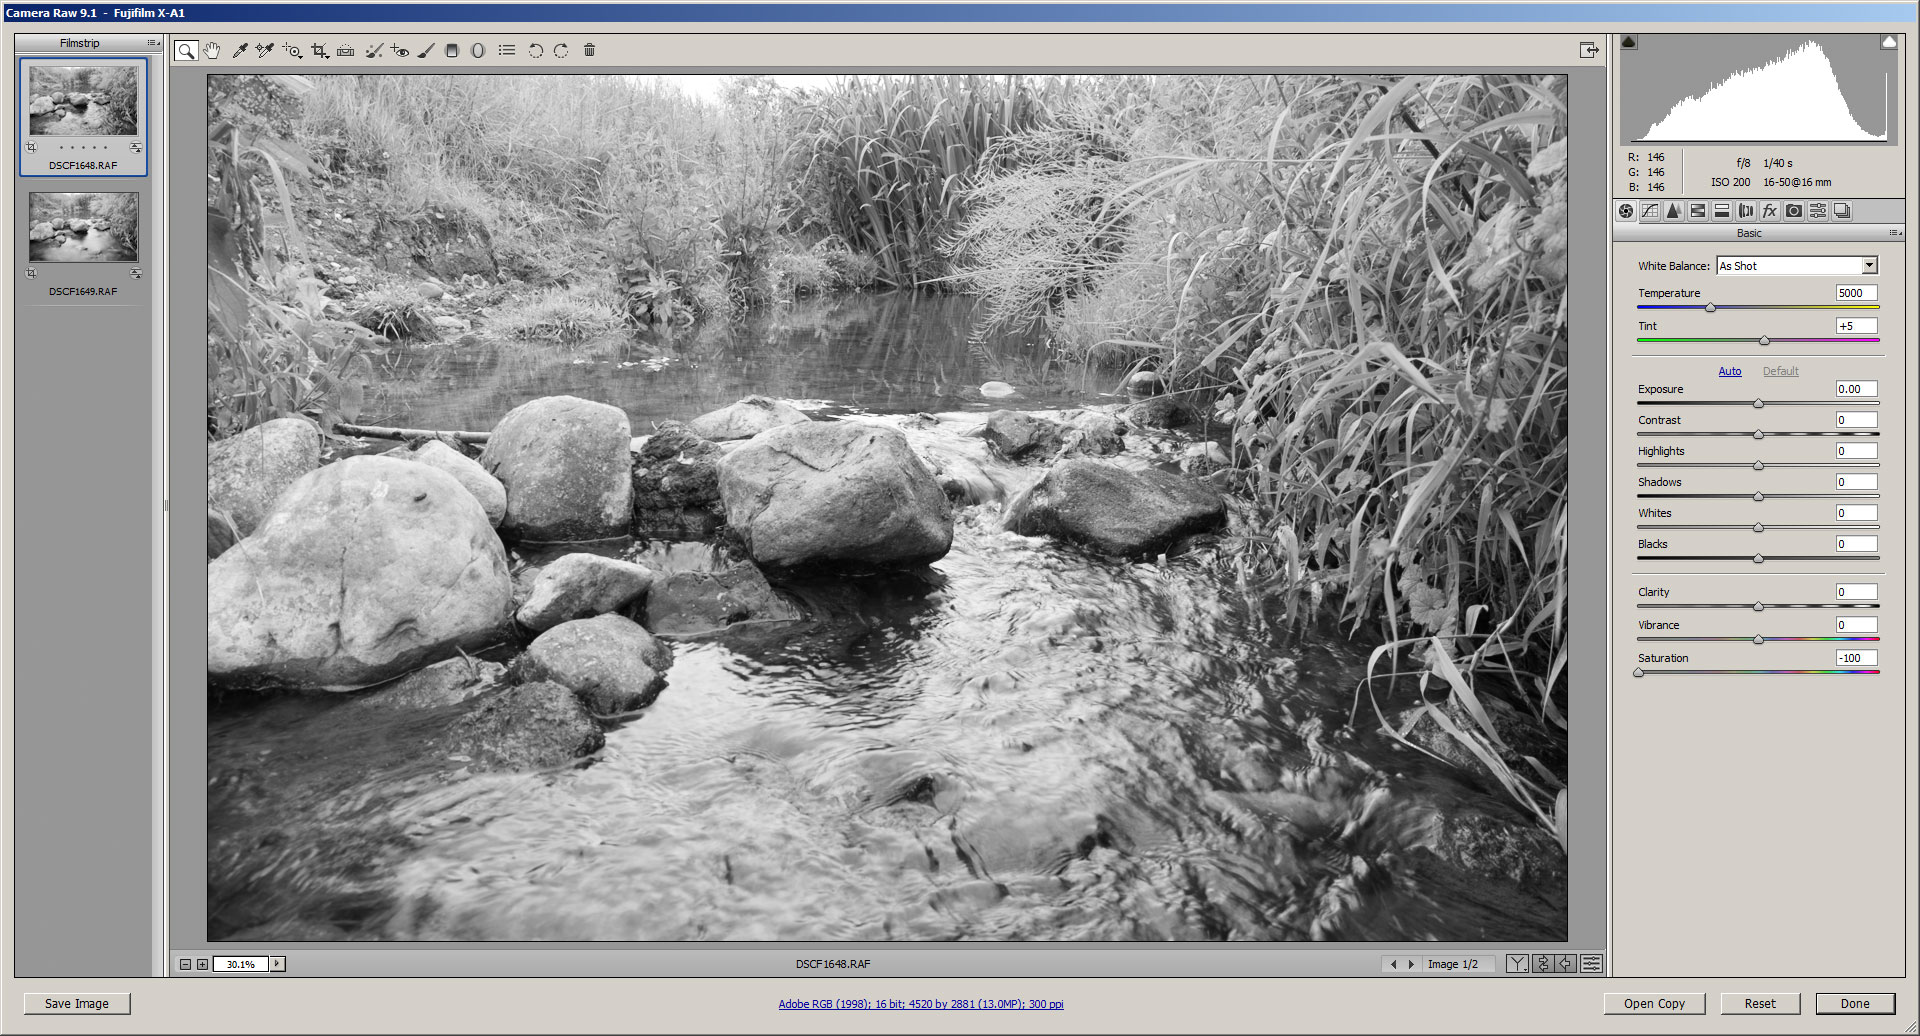
Base exposure taken without ND filter
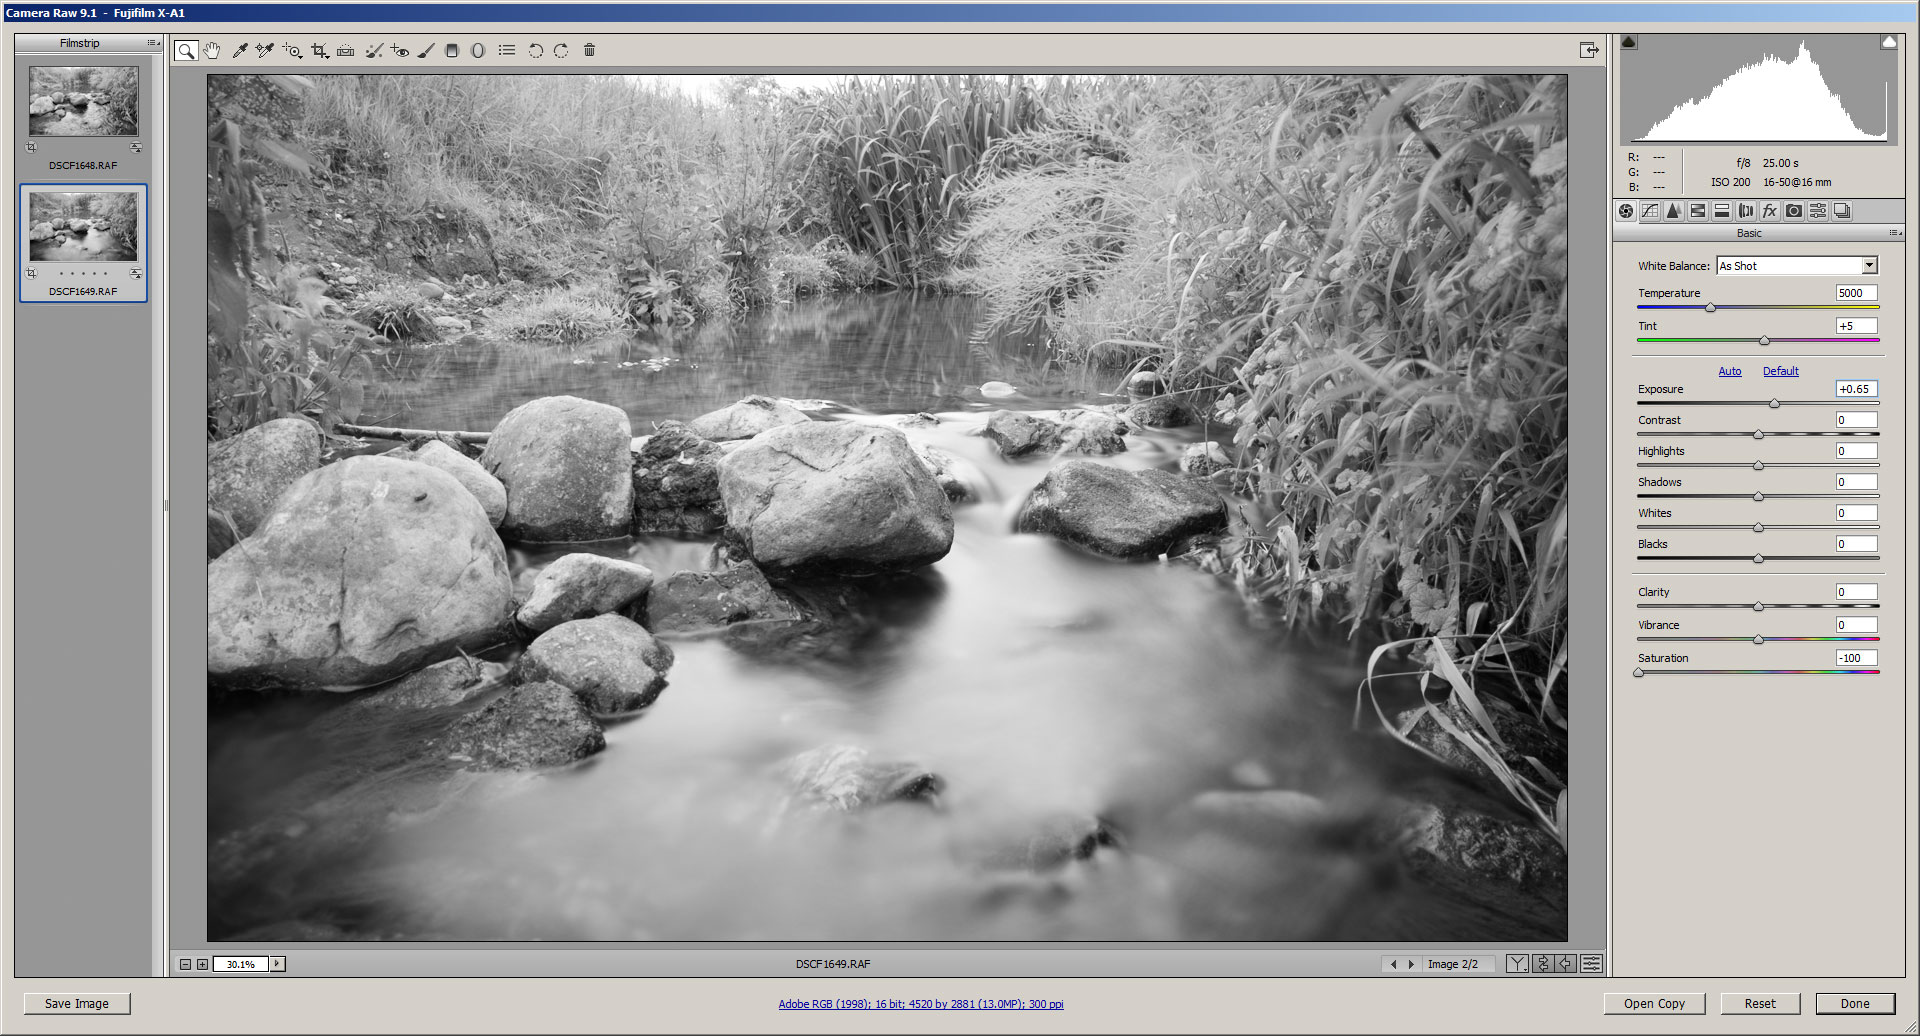
Image taken with a 10 stop ND filter and shutter speed reduced 10 stops from the base exposure. The resulting exposure is darker than the base exposure. To get the exposure to match the base exposure +0.66 of exposure compensation has had to be applied in the RAW converter. This indicates the ND filter has an actual strength of 10 2/3 stops.
Some ND filters impart a strong color cast to the image, though this is not usually a big problem. We'll look at this later in the article. What can be a bigger problem though is ND filters that don't block infrared light. This is often a problem with plastic ND filters.
How big a problem infrared light leakage is depends on your camera and how strong the ND filter is. If you have a camera with a weak built-in infrared blocking filter, and you are using a strong ND filter that does not block infrared, you can end up with an image that has a strong infrared influence.
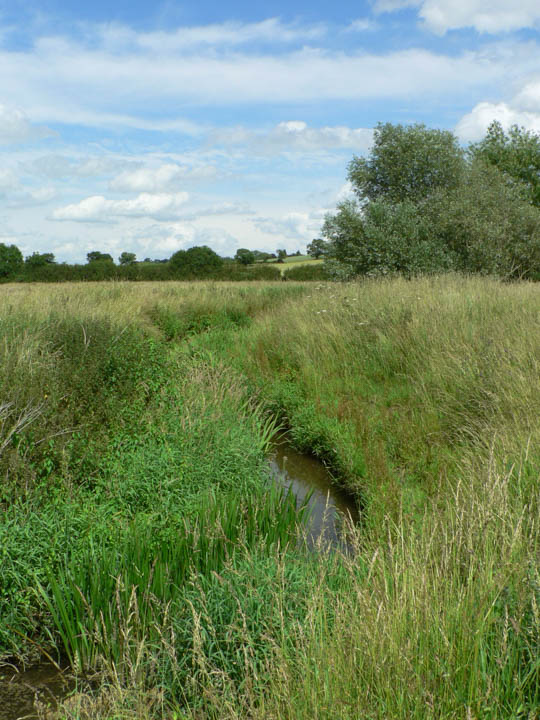
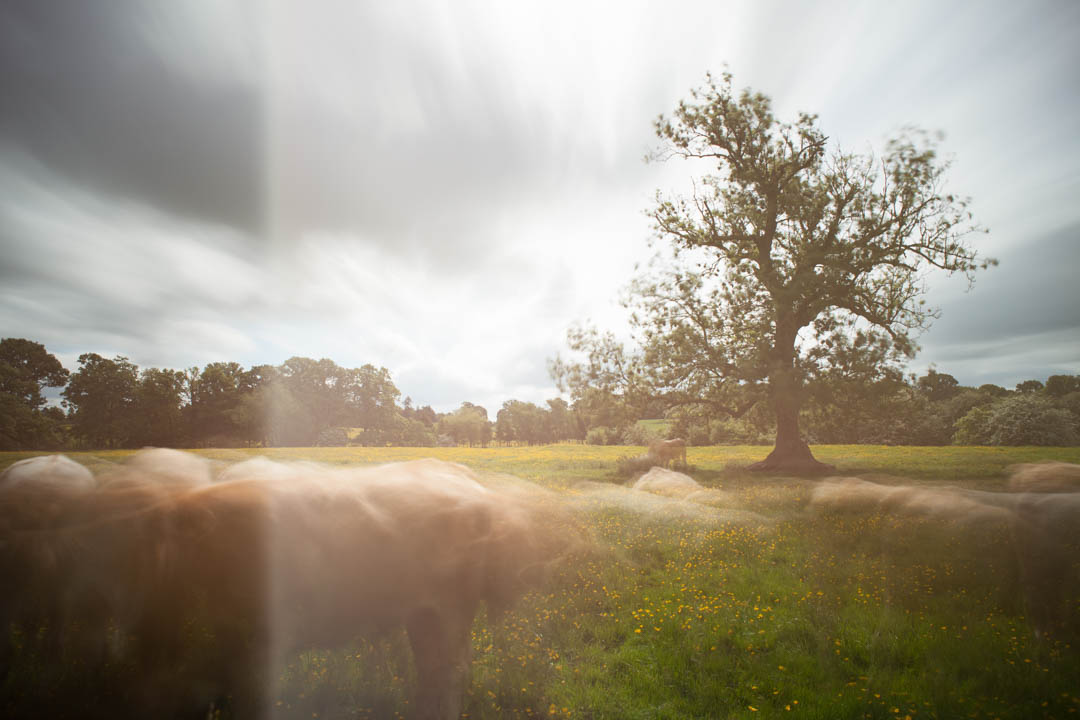
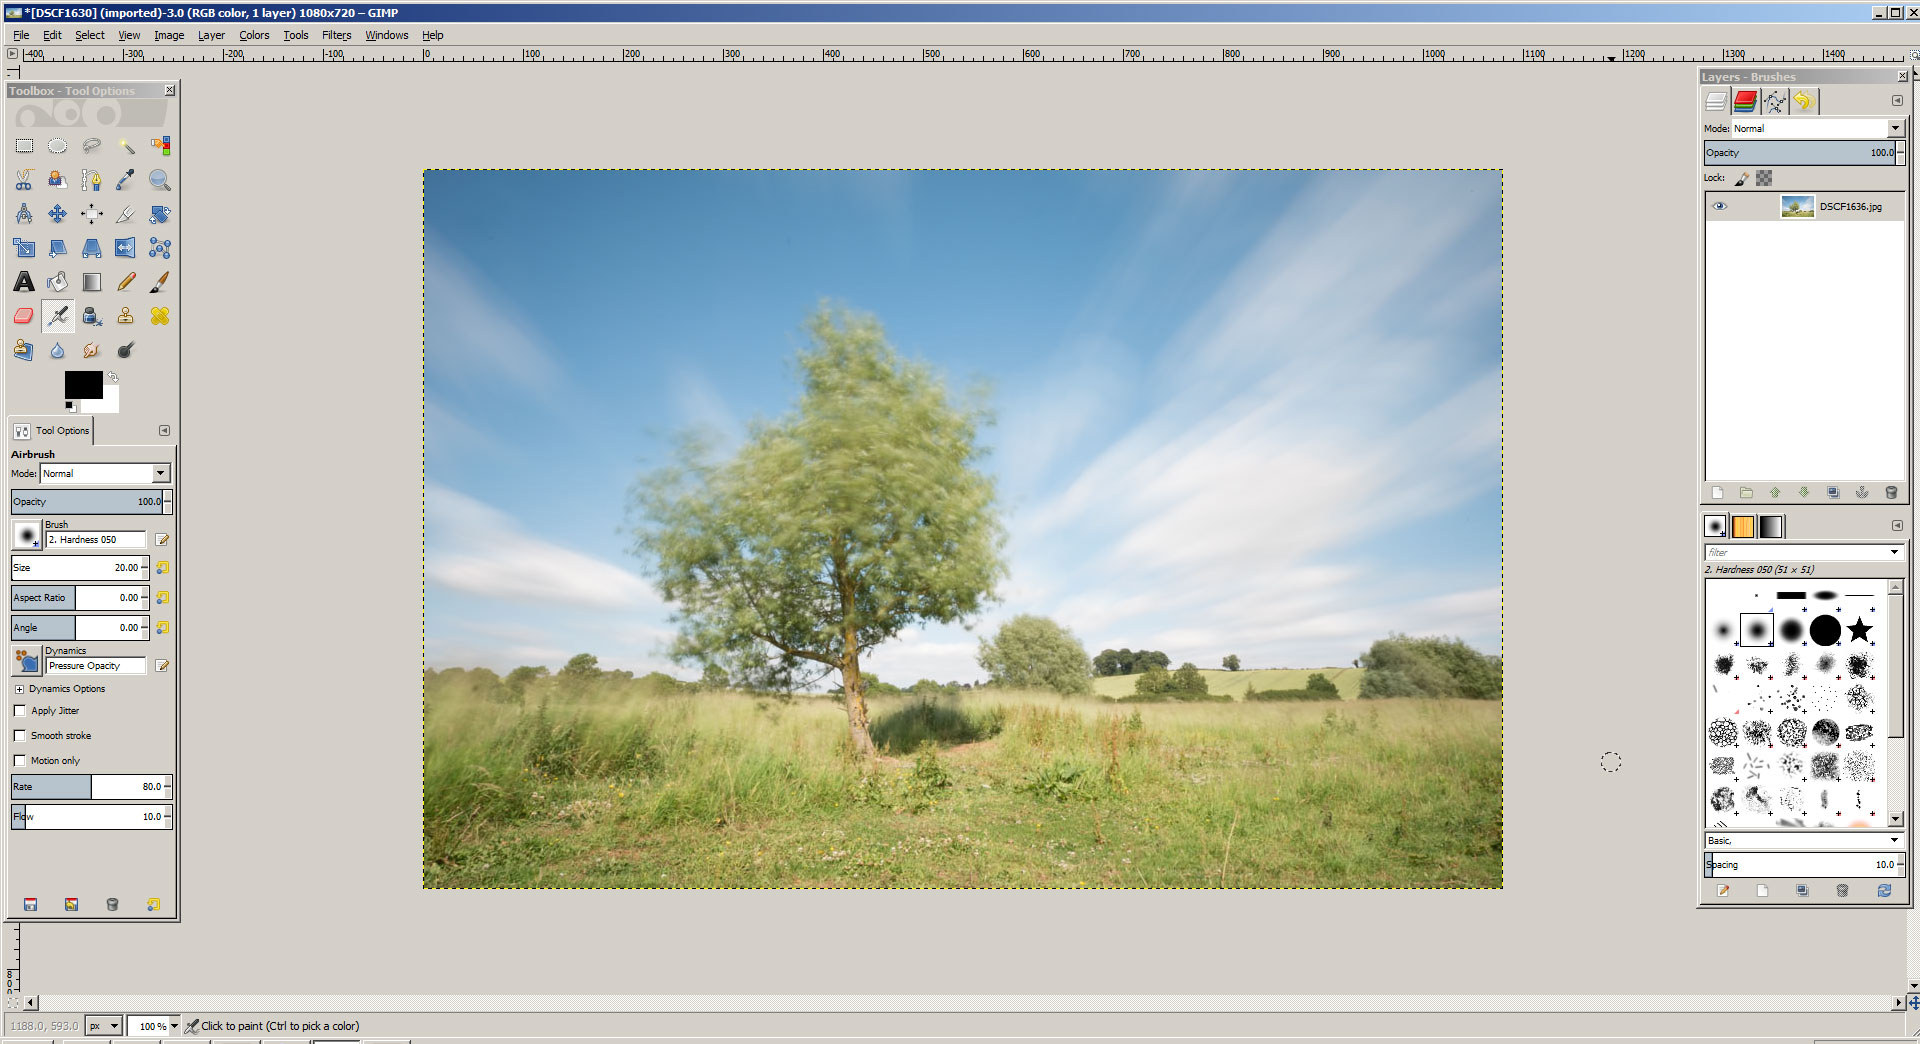
Standard short exposure on a camera with a relatively weak built-in IR hot mirror
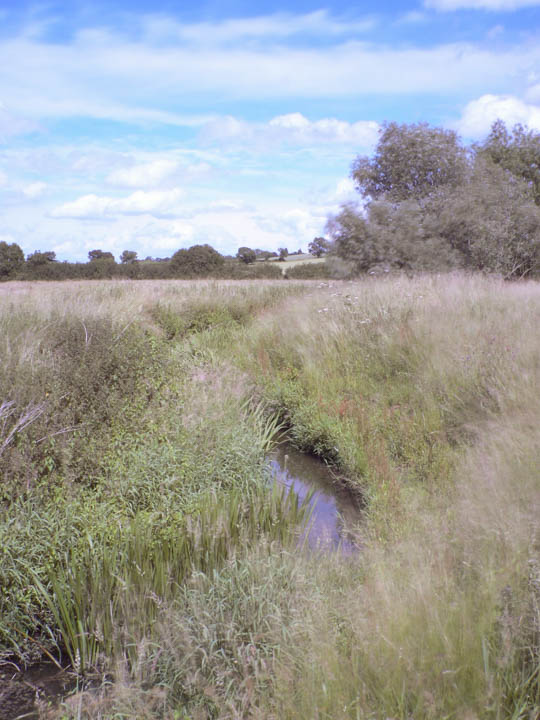
Long exposure on the same camera, using ND filters that don't reduce infrared light as much as they reduce visible light. The grass and foliage is much brighter due to the IR influence.
This can mean foliage appearing brighter than it should, chromatic aberration style artifacts, image softness, and a strong color cast. The exact effects depend on your camera and lens. While not a problem with most cameras and ND filters, if you want to be sure to avoid any problem with infrared contamination, you can purchase ND filters that are specially designed to block infrared light.

Tiffen's APEX long exposure ND filters are designed to eliminate all IR light
You may be tempted to purchase a variable neutral density for long exposure photography. However, you need to be aware that these don't work well on wide angle lenses. The filter will cause a strong X pattern in the center of the image if used on a wide angle lens. But they can be a good choice if not using a wide angle lens (so long as you use a good quality filter).
Using camera settings
Remember that as well as using a neutral density filter to allow using a slow shutter speed without overexposing the image, you also have two camera settings you can use - aperture and ISO. Using the lowest ISO setting your camera offers will allow you longer shutter speeds as well as giving a noise-free image.
Note, however, that some cameras offer artificial low ISOs. With these the camera over-exposes the image by 1 stop and then pulls the exposure back by 1 stop. This reduces the dynamic range of the resulting image, and you could find that you end up with an image where highlights are blown out, compared to using a 1 stop stronger ND filter and shooting at the camera's native ISO.
Most of the time shooting at an artificial low ISO is not problematic, but it is worth being aware of the potential problem if you're photographing a particularly contrasty scene. Usually an artificial low ISO is indicated by being labeled as something like LO-1 rather ISO 50. You can always check your camera manual to make sure.
The aperture setting can also be used to reduce the light levels. If you normally shoot at f/8, by stopping down to f/22 you can gain a 3 stop reduction in light, all without using any ND filters at all. Shooting at such small apertures does slightly soften an image at the pixel level due to diffraction. However, if you're shooting a natural scene, almost everything will have some amount of blur from the wind blowing it anyway.
Long exposure of Douglas Falls, West Virginia by Frank Kovalchek on Flickr (licensed CC-BY)
Overexposing
You can use the same trick that the artificial low ISO of some cameras use. You can shoot in RAW format and purposefully overexpose your photo. You don't want to overexpose by too much, or you'll loose highlight detail. Most cameras offer around half to one stop of extra highlight detail in a RAW file compared to a JPEG.
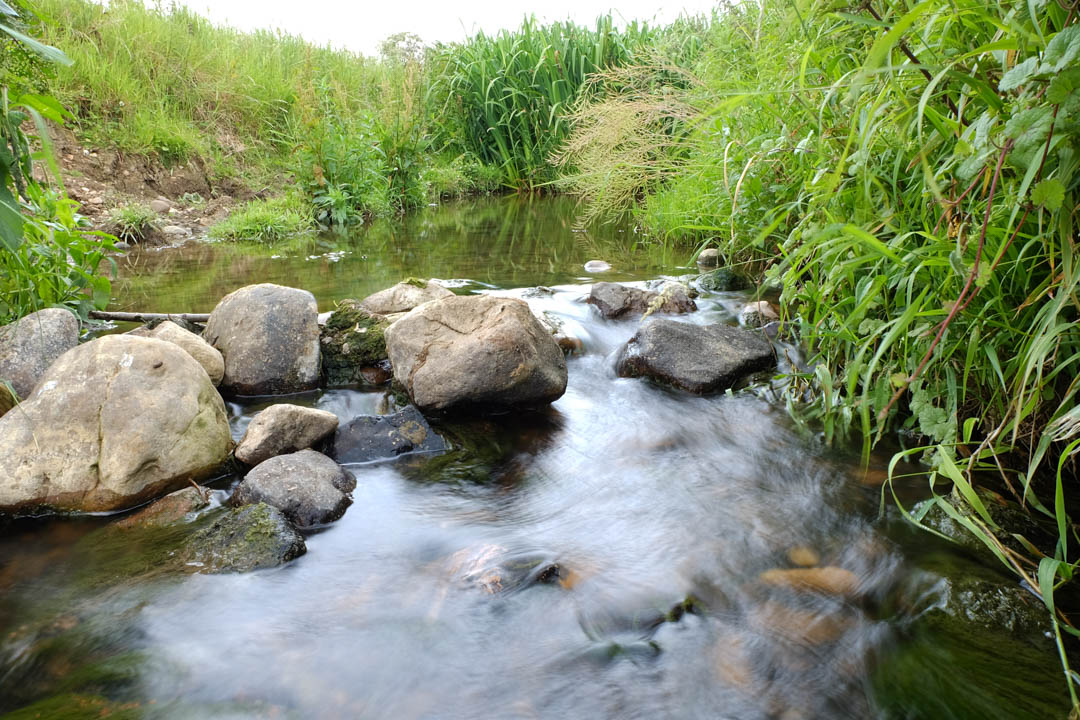
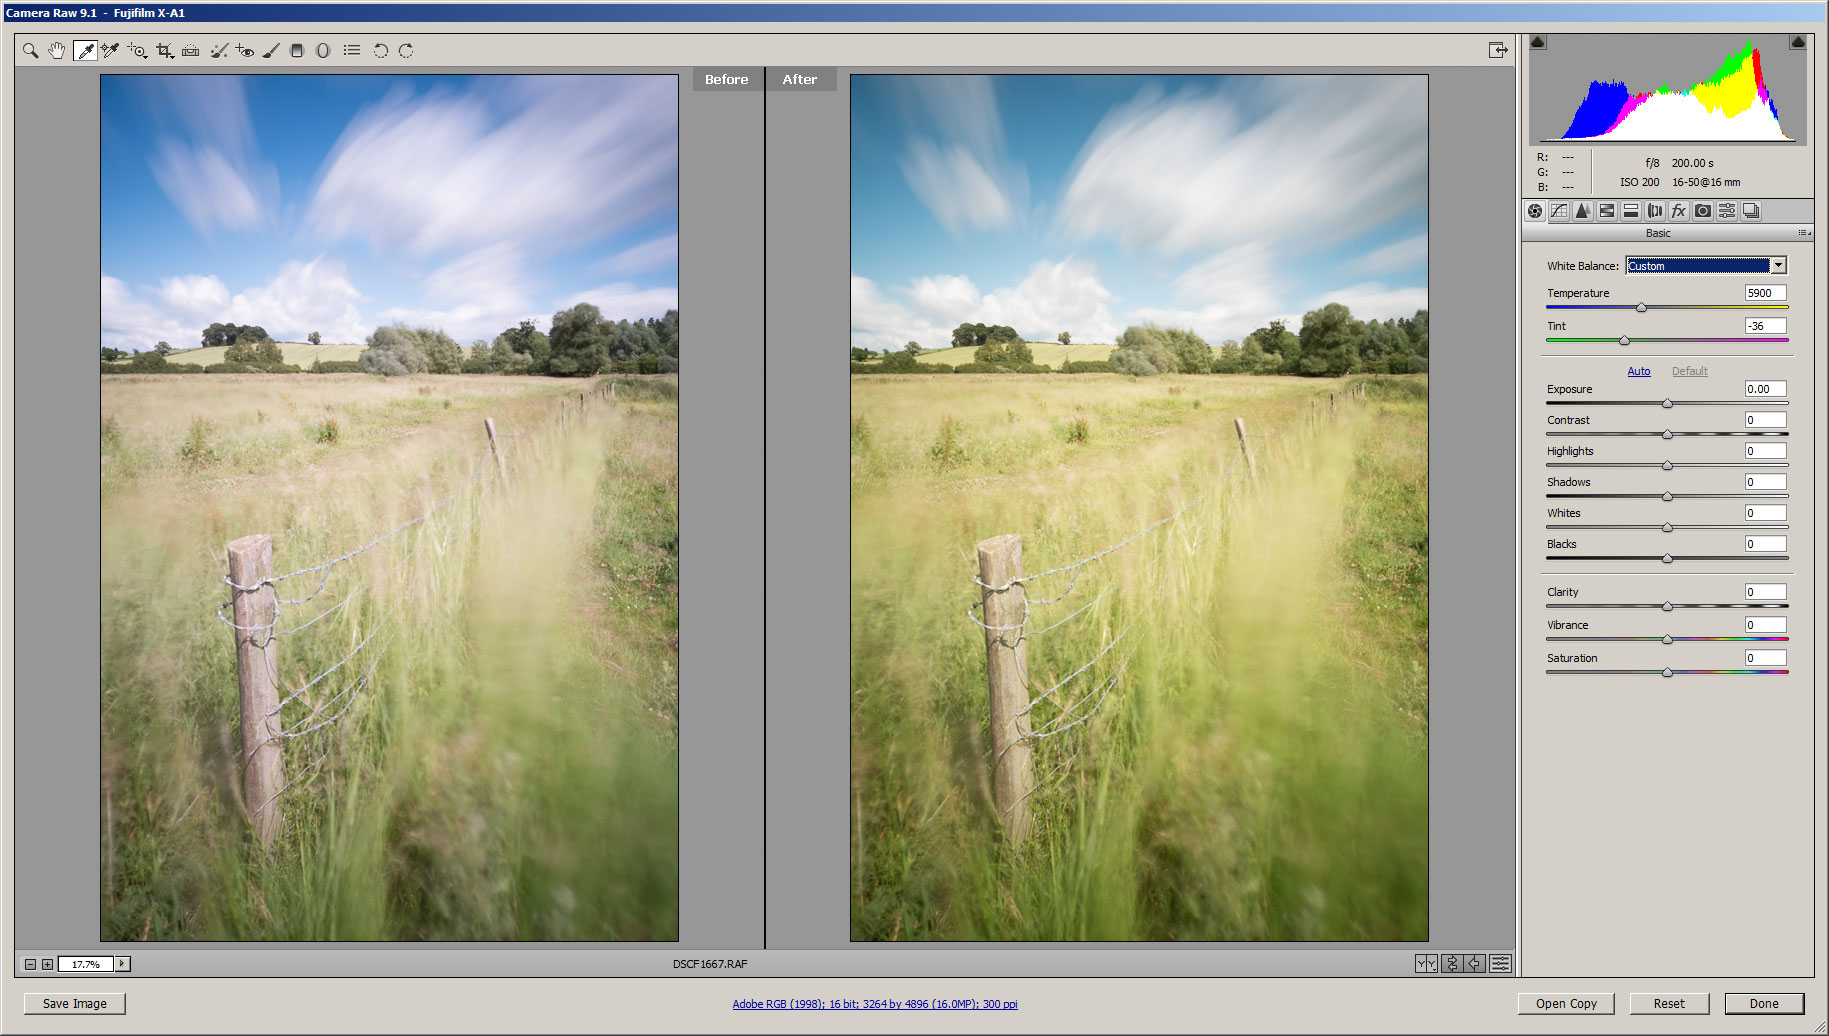
Image taken at ISO 100 with a camera that has a minimum ISO of 200, but offers an artificial low ISO of 100
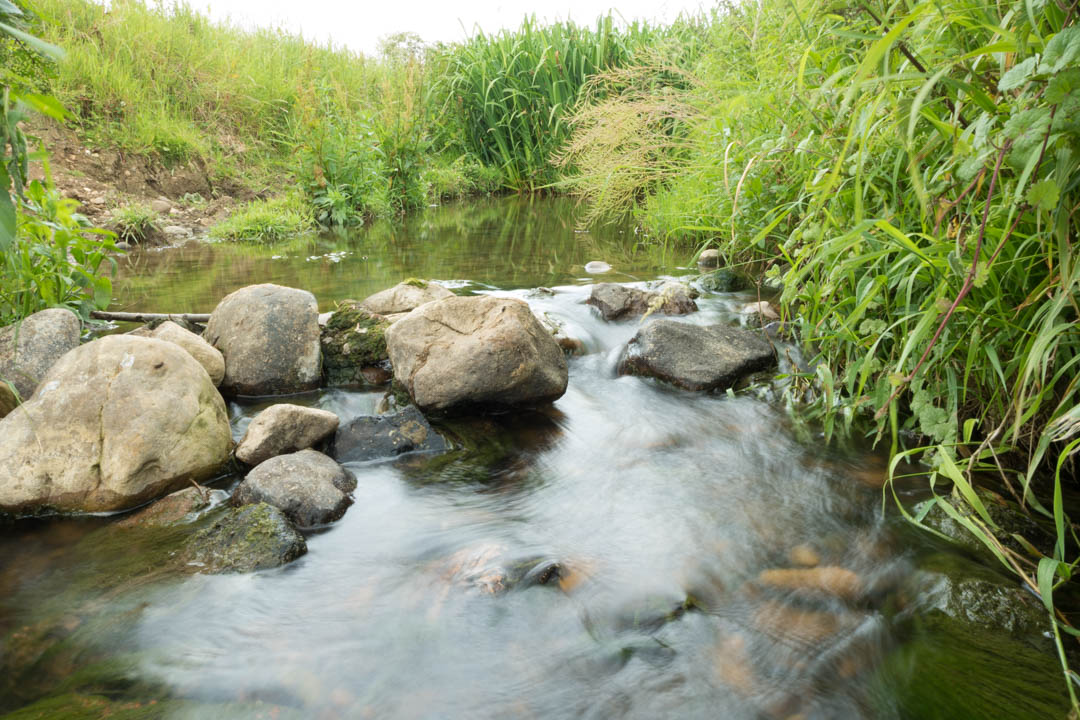
Image taken in RAW mode at the camera's minimum ISO of 200. The image was overexposed by 1 stop (so the same aperture and shutter speed as the ISO 100 image). Then exposure was pulled back 1 stop when converting the RAW.
When converting the RAW file, you then pull back the exposure to give a properly exposed image. This also has a bonus effect of minimizing any image noise.
Avoiding light leaks
When taking long exposures during daylight, light leaks can be a problem. Because the light is quite bright during the daytime, over a long exposure just a tiny light leak that lets through hardly any light can become problematic. You need to ensure that everything is light tight.
If you're using a DSLR, the first thing to check is the viewfinder. Most DSLRs are sold with a viewfinder cover. This slips over the camera's viewfinder to block it up, so no light can enter the camera through the viewfinder. Depending on your camera model, you may need to remove the padded cup piece that normally slots over the viewfinder to fit the cover.
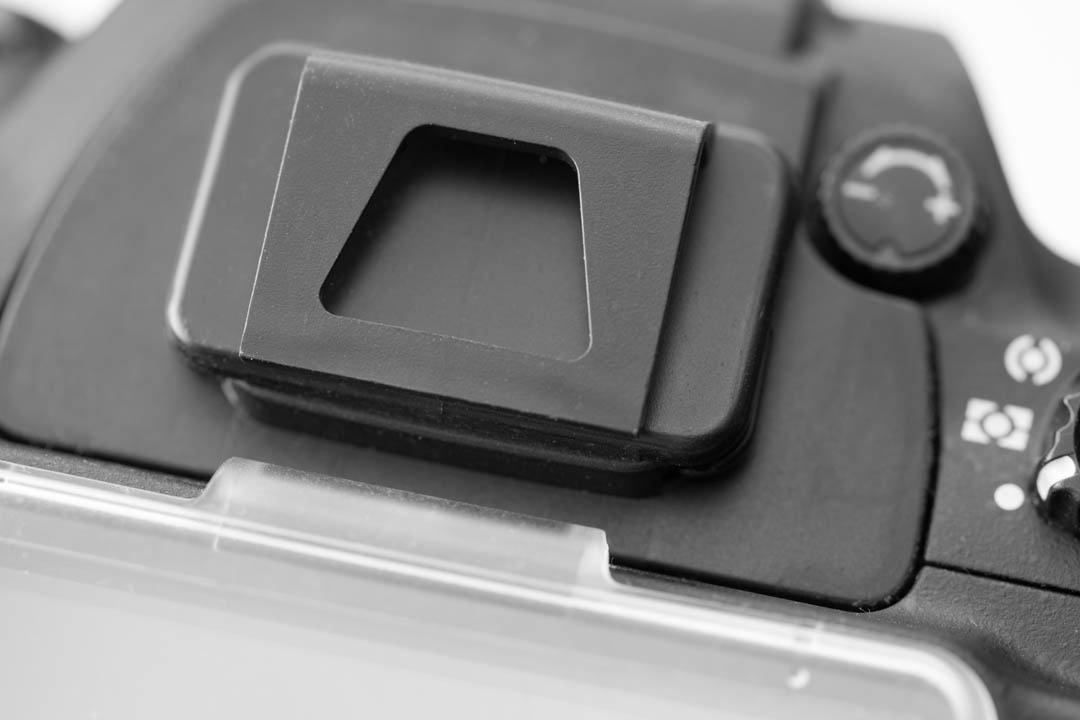
Cap fitted to block the viewfinder on a DSLR
If you're using an adapted lens with your camera, you may get a light leak between the adapter and the camera, or between the adapter and the lens. Covering the whole area over with gaffer tape is a fix, but you're better off doing long exposure daylight photography with lenses designed for your camera system, which don't require an adapter to work.
Example of an image affected by a light leak from using an adapted lens
Screw thread ND filters can be screwed onto the front of a lens reasonably tightly (though don't tighten too much!) to avoid any chance of a light leak between the filter and the lens. Slot type ND filters are slightly more difficult.
Typically slot type strong ND filters will have a gasket around the edge, which forms a light tight seal when slotted correctly into the filter holder's slot nearest the lens. If you have a slot type ND filter lacking a gasket, you can add one yourself. Find some sticky backed thin black foam, then cut some strips and stick around the edge of your filter.

The Lee Big Stopper is a slot type ND filter, with a foam gasket near the edge that forms a light tight seal with the filter holder to prevent light leaks
Shooting process
You'll want your camera set up on a tripod. Don't add any filters to the camera at this point. Setup your composition with the camera, focus, and then ensure focus is locked in place. I suggest switching the lens / camera to manual focus after focusing. But setting the camera to use back button AF instead of a half press of the shutter button will also work.
Set your camera in manual exposure mode. Set your aperture to f/8 and ISO to the lowest setting (typically ISO 100). Adjust the shutter speed until the camera indicates a correct exposure. Take a photo, at the moment the shutter speed will be quite fast.
Check the histogram of the resulting exposure. If the image has a good exposure (no important details overexposed), then you can move on to the next step. Otherwise adjust the shutter speed and take another shot, repeating until you get an image with a good exposure.
This now gives us our base exposure. Let's say, for example, this might be f/8 ISO 100, 1/200s. From this we can work out how many stops we need to reduce the exposure by to achieve the exposure time we want.
Let's say we wanted a 3 minute exposure. That would be a 15 1/8 stop reduction in light:
| Reduction in stops | Shutter speed |
|---|---|
| 0 | 1/200s |
| 1 | 1/100s |
| 2 | 1/50s |
| 3 | 1/25s |
| 4 | 1/13s |
| 5 | 1/6s |
| 6 | 0.3s |
| 7 | 0.6s |
| 8 | 1.3s |
| 9 | 2.5s |
| 10 | 5s |
| 11 | 10s |
| 12 | 20s |
| 13 | 40s |
| 14 | 80s |
| 15 | 160s |
| 15 1/8 | 180s |
To achieve this 15 1/8 stop reduction, we might decide to use a 10 stop neutral density filter, stacked with a 3 stop neutral density filter, and to stop our aperture down by 2 stops to f/16. The remaining 1/8 stop we might achieve by slightly over-exposing the image, and pulling back the exposure in RAW conversion.
With this information, we can now add the necessary filters to the lens, and adjust the camera settings accordingly. Almost all cameras top out at 30s exposure, so we will need to use bulb mode and time the exposure manually.
Some cameras have bulb mode as a separate exposure mode. Others have it as the final shutter speed option after 30s. To use bulb mode you will require a remote cable release for your camera. You press the shutter down on the release to start the exposure, then still holding it down, push it forward to lock it down. The camera will expose for as long as the shutter button is pressed / locked down.
Many cameras will show you the exposure time counting up, either on a top LCD or on the rear screen. Some remote shutter releases also have an LCD screen that displays a timer counting up the exposure time. As a last resort, you can always use a watch or clock on your phone to time the exposure.
When the exposure is due to finish, push down the shutter button on the remote release cable, pull the button back to unlock it, then release the button to finish the exposure.
Composition
You might not think that the length of an exposure would affect the way you compose an image, but it can. Things moving during the exposure turn into a long blur in the direction they are moving, and so you need to take this into account when composing your image.
For example, clouds blowing across the sky can create converging lines if you shoot straight into the wind or in the same direction as the wind. Whereas if you shoot at a right angle to the wind, they will create horizontal blurs across the sky.
Envisaging the final result can be difficult, but does get easier with more experience. Just remember to take into account the direction of movement when composing your image.
Noise reduction
Depending on how long an exposure you take, a problem you may come up against is brightly colored pixels appearing randomly scattered over the image.
Personally I haven't found noise to be much of a problem for 3-4 minute exposures. But it does become more problematic with exposure times of 10 minutes and longer. How much of a problem it is for you will depend on your camera model and how long your long exposures are.
One solution to this problem is to turn on your camera's long exposure noise reduction setting (not to be confused with high ISO noise reduction). With this turned on, your camera takes another frame after each long exposure photo. The second frame has the same exposure time as the actual image, but the camera keeps the shutter closed, to capture a 'dark frame'. The noise captured in this second frame is then used by the camera to remove the noise from the first image.
While this solution works reasonably well, it means that all your exposures take twice as long. You have to wait for the photo to expose, then wait the same amount of time again for the dark frame to be taken and the noise reduction applied.
It's also unlikely to completely eliminate the long exposure noise. You may still be left with a few hot pixels that are visible in dark areas of the image.
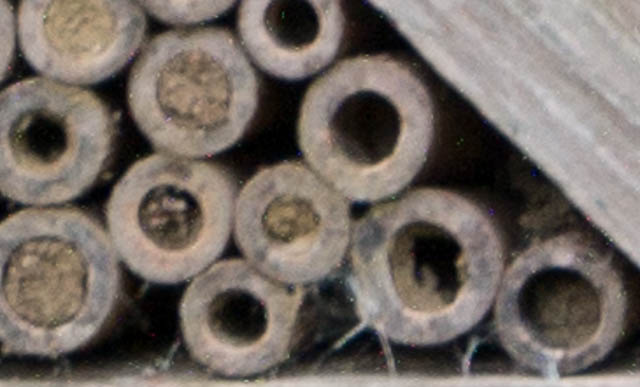
Enlarged crop from a long exposure taken with Long Exposure Noise Reduction turned off
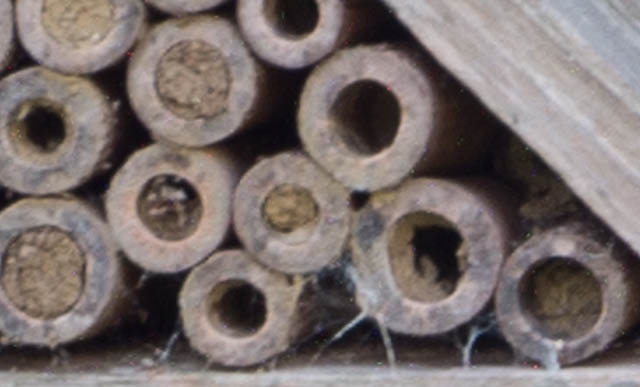
With Long Exposure NR turned on, hot pixel noise is reduced, but not eliminated
I would suggest testing your camera with and without the long exposure noise reduction turned on. If having the setting turned on results in a noticeable improvement to the image, then it's probably worth keeping turned on. Otherwise turn it off, so you don't have to wait so long for each image to complete being taken.
Dealing with color casts
The stronger the ND filter you use, the more likely it is that you'll find the resulting image has a color cast you'll need to deal with. As long as you take your photos in RAW format, this is easy to correct. Simply use the white balance color picker tool in your RAW convertor to set the white balance on part of the image that should be neutral in color (such as clouds).
The ND filter combination used to take this image gives a slight magenta color cast (left). Using the white balance correction tool in the RAW converter corrects the color cast easily.
If the scene doesn't naturally contain anything neutral in color, you may want to consider using a gray card. Place this in your scene and take a photo. Depending on the exposure time, you might want to do this photo at a wide aperture and relatively high ISO so you don't spend multiple minutes just on a gray card photo.
When you've got your gray card photo, you can remove the card from the scene and take your proper photo. When processing the images you can select all the images taken with the same filters and in the same lighting conditions, and use the image with the gray card in to set the white balance for all of them, just by setting the white balance on the gray card.
Alternatively, you can adjust the white balance sliders manually, and judge what the 'correct' white balance is by eye. After all, you may well not want a 100% neutral white balance.
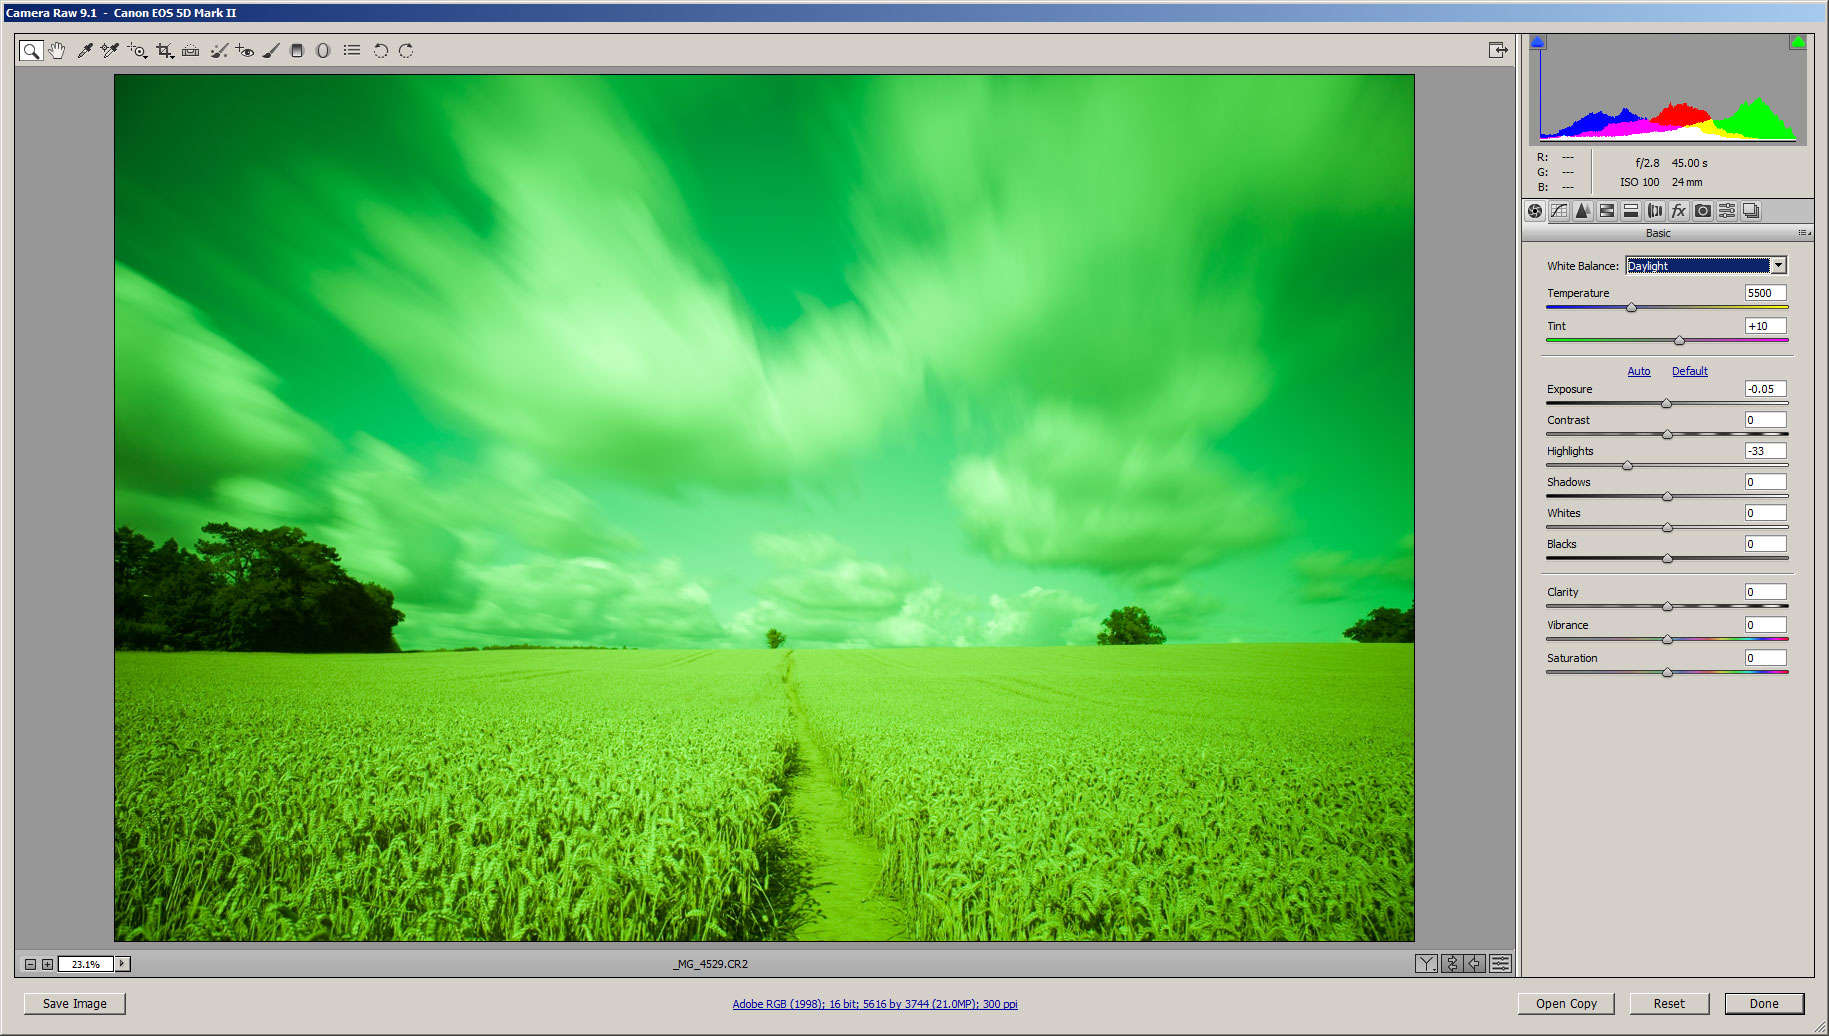
A welding filter can be used as cheap alternative to a strong ND filter, but they often have a strong green color cast

Adding the maximum amount of magenta white balance adjustment is not enough to correct the color cast. But using an RGB curves adjustment in addition can provide a fairly good color correction.
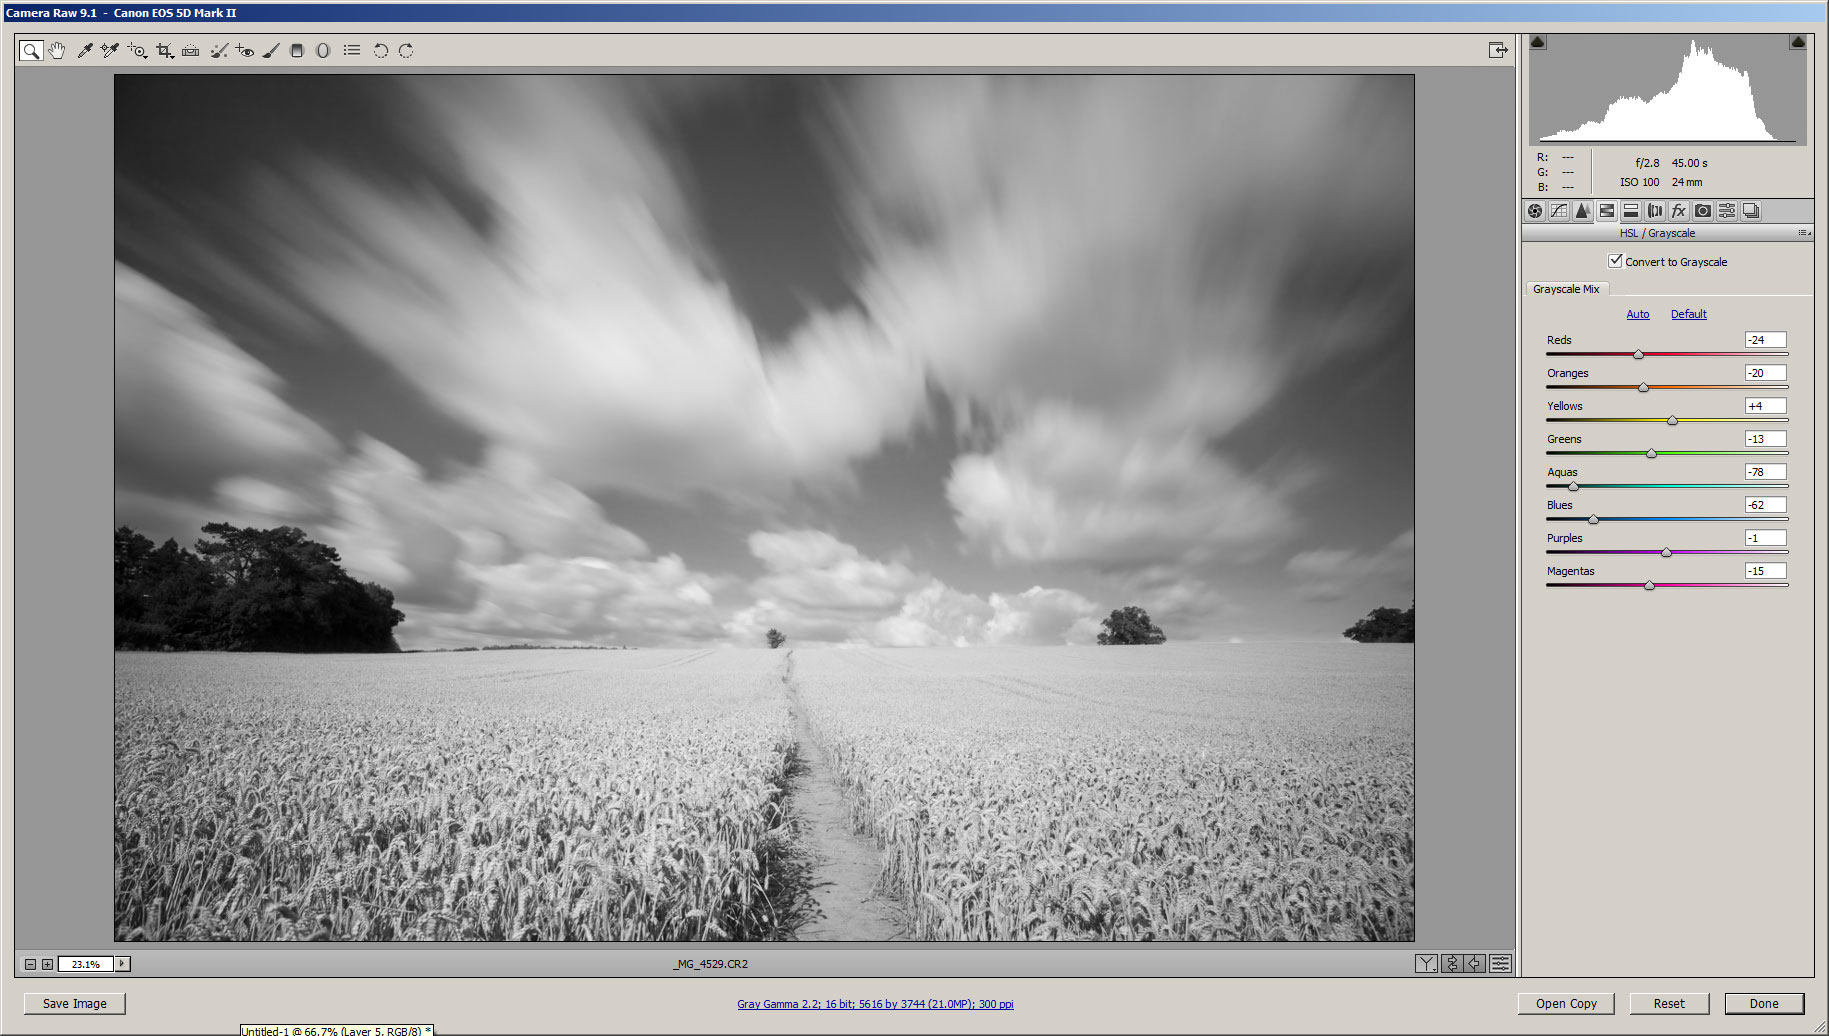
An alternative is just converting to black and white. For a custom black and white conversion (as opposed to a simple desaturation) on an image with a very strong color cast such as this, setting the white balance is needed before performing the conversion.
Combining multiple photos for a pseudo long exposure
You can take multiple shorter exposures and then blend them together into a single long exposure image. How well this will work depends on what it is you're shooting, and how long you can get the exposure for each individual image to be.
For example, with a river or stream the water is moving in a constant flow. You could probably get away with taking hundreds of pretty short exposures then blending them into a single long exposure. Whereas with clouds, they are not moving in a constant flow and you could get small gaps between each exposure.
I suggest trying to get your shutter speed as slow as possible using the camera settings and ND filter(s) or a polarizer at first. (A polarizer reduces the light that passes through it and so can act as a 2 stop ND filter). Then if the exposure is still not as long as you would like, take as many shots as you need to make up the length of the exposure you want.
For example, let's say you're photographing a waterfall and want a 5 second exposure. You don't have an ND filter with you, but you do have a polarizing filter you've added to the lens. Setting your camera to ISO 100 and f/22 only gives you a shutter speed of 1 second. By taking 5 one second images in quick succession, you can achieve your 5 second exposure with a little bit of processing.
For the example I'll work through below, I used a 10 stop ND, ISO 200 (the minimum ISO setting on the camera I was using), and f/22. This gave me a 30s exposure time, but I wanted 3½ minutes.
I set the camera to continuous shooting mode, and attached a remote shutter release cable. I locked down the shutter button on the release cable, so the camera started taking photos with the above settings. When the camera started taking the seventh shot (7 x 30s = 3½ minutes), then I unlocked the shutter button of the release, so it wouldn't take any more after that.
To combine the images into a single long exposure we need to stack them together, then create an average of the stack. I'll cover how to do this in Photoshop CS / CC and GIMP.
Creating the long exposure in Photoshop CS / CC
https://www.youtube.com/watch?v=wqqI32Aw1J0First open all your images as layers in a single document. You can do this by opening them separately, then click-dragging each of the images to one single image. If you do this, be sure to double-click the background layer of the image you are dragging all the other images into, and turn it into a standard layer as well.
Or, more simply, use File > Scripts > Load Files into Stack. From there you can find the images you want to combine, and open them as layers in a single document.
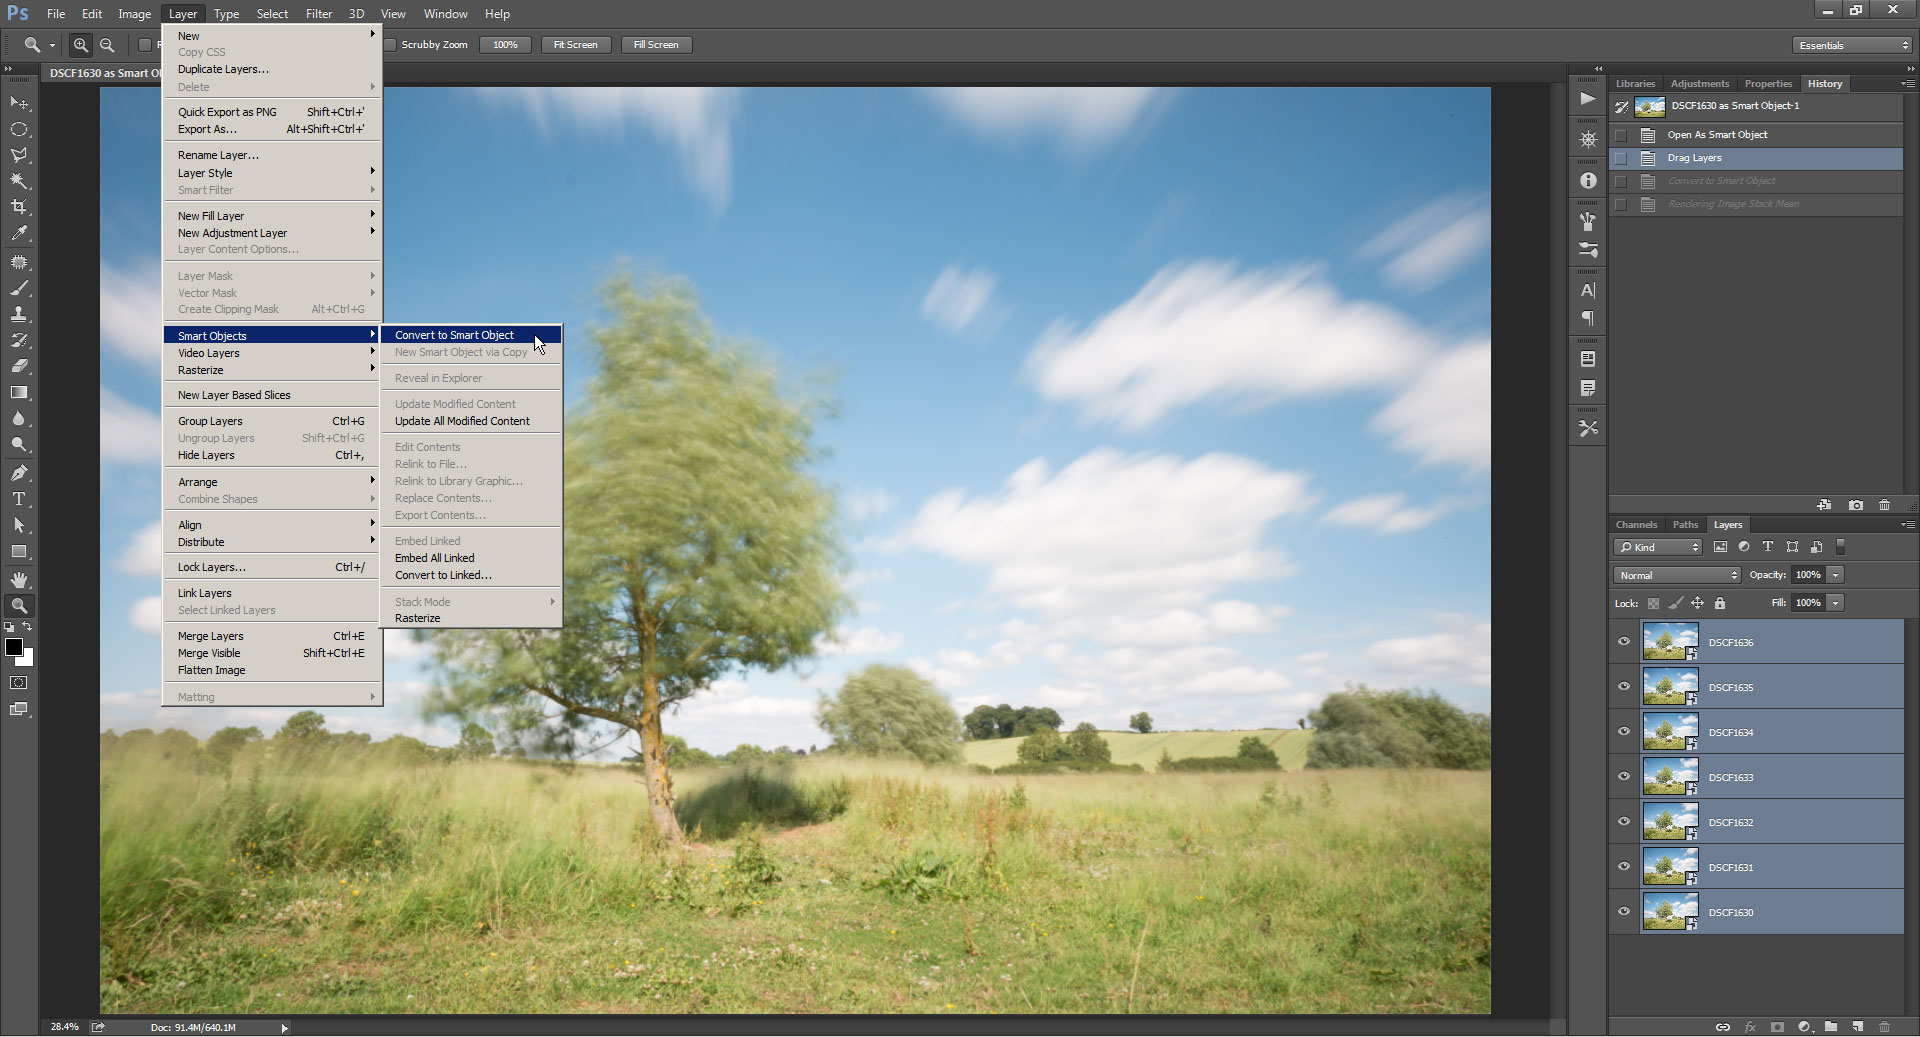
When you have your document with all the images as layers, select all the layers in the layer palette. Then on the top menu go to Layer > Smart Objects > Convert to Smart Object.
When that completes, you'll only have a single layer in your layer palette. This layer is the smart object that contains all the images. With the layer selected, on the menu go to Layer > Smart Objects > Stack Mode > Mean.
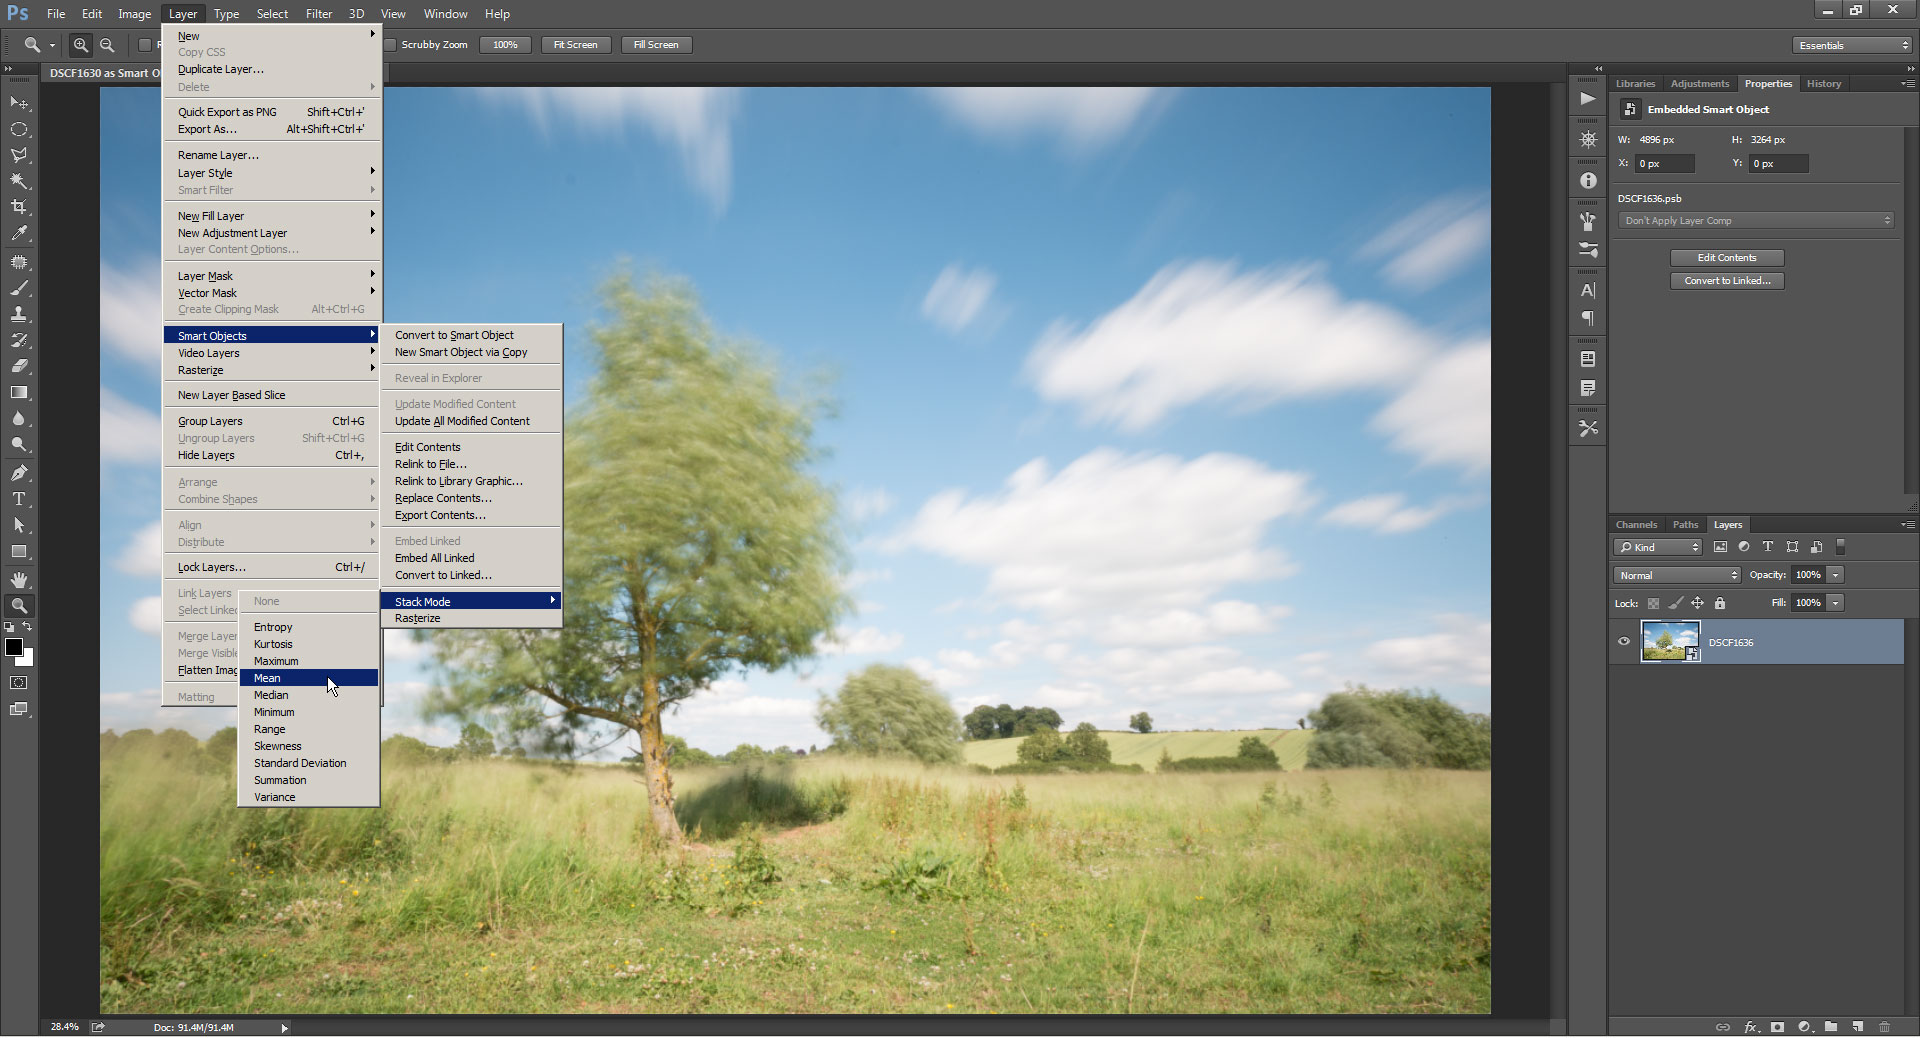
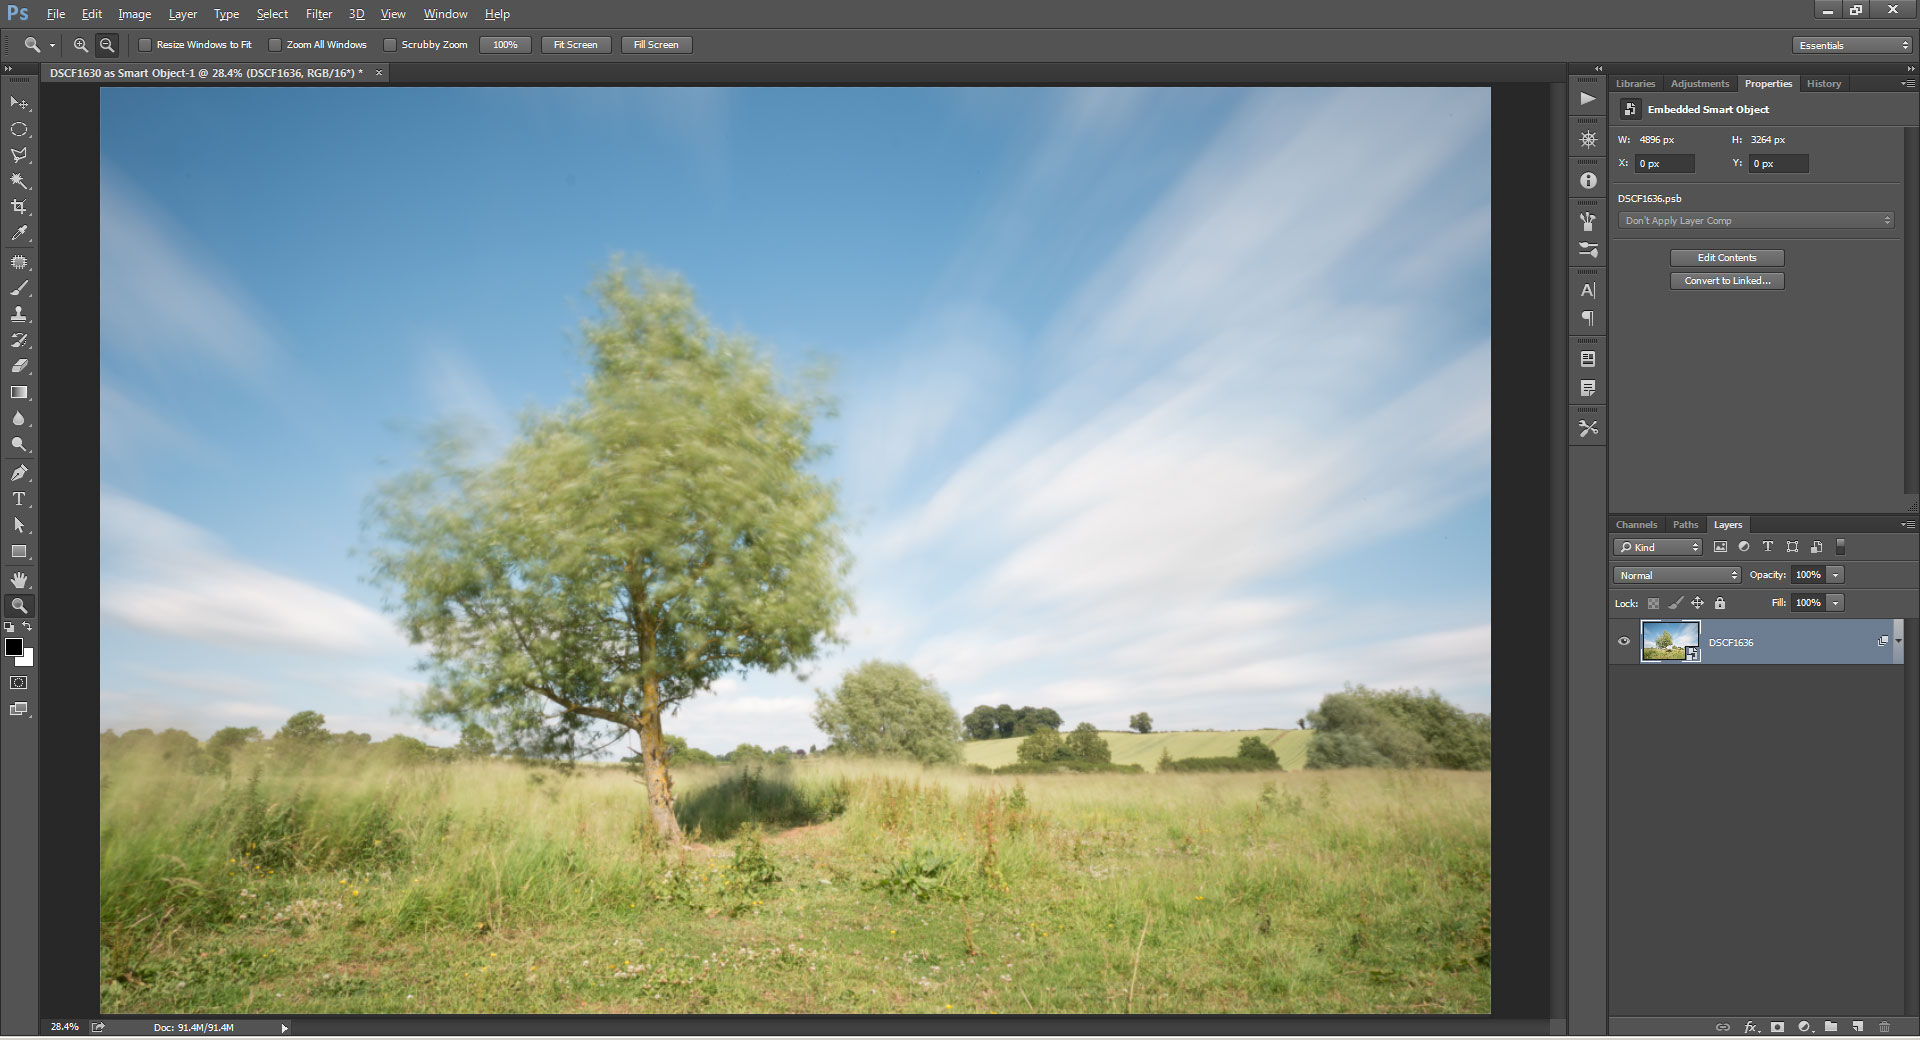
This blends the images together, creating a mean average of all the images in the stack, giving a single long exposure image.
Creating the long exposure in GIMP
https://www.youtube.com/watch?v=FKoiL6SfDfAYou can do the same thing in GIMP using the G'MIC plugin. As with Photoshop, you need to start by loading all your images as layers in a single document. In GIMP you can do this easily by going to File > Open as Layers, then selecting the images to open.
When you have your document with all the images as layers, go to Filters > G'MIC.

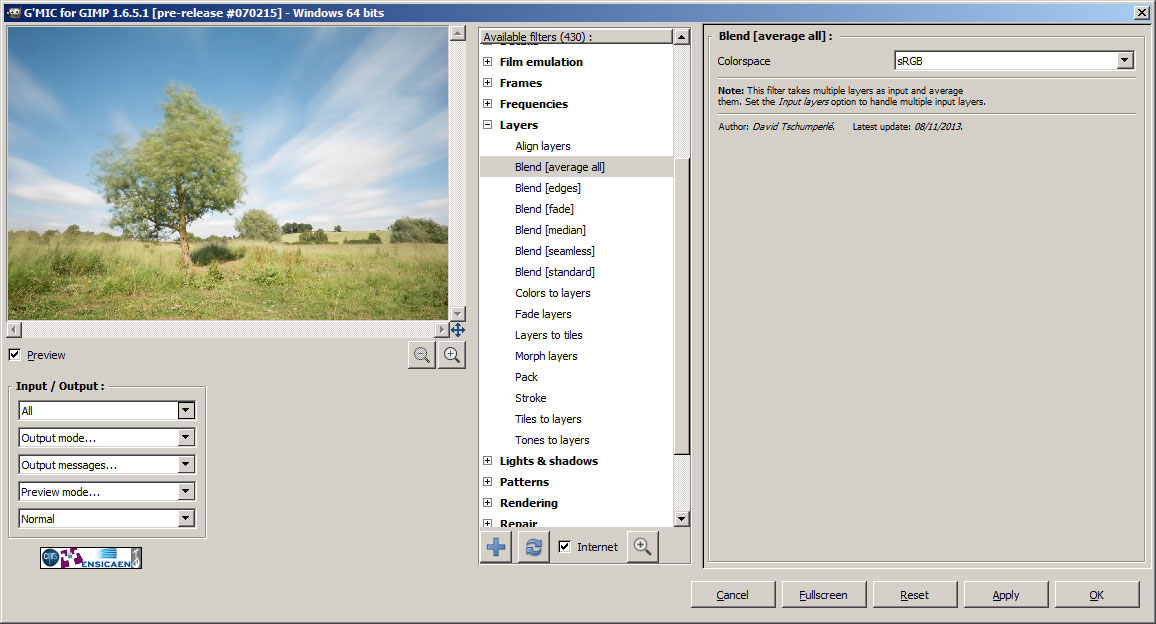
The G'MIC options window will open up. Under Available filters, expand the Layers heading, and select Blend [average all] from the options.
On the left side of the window, there is an Input / Output section. Click on the top drop down box there, and choose All. Then click the OK button on the window.
This will then blend the images together, creating a single long exposure image.
I'm not convinced the software method is as good as a real single long exposure image - I see a bit of stuttering in some of the clouds. However, it's a pretty decent solution if you don't have any other way of getting the exposure slowed to the length you would like.
One good thing about it is that because the exposures are relatively short, it avoids any long exposure noise problems. Long exposure noise reduction can be (and should be) turned off when using this technique.
Depending on the weather and exactly how long an exposure it is you want, long exposure photography during the daytime can often be quite tricky. But the difficulty of the process, and probably also the patience needed to wait for a single image to complete, mean that there are not a lot of people taking this sort of photo.
If you want to try something new, and take a few photos that will likely stand out from the rest of your work, as well as others, then why not give it a go?


