How to Take Natural Looking Landscape HDR Photos
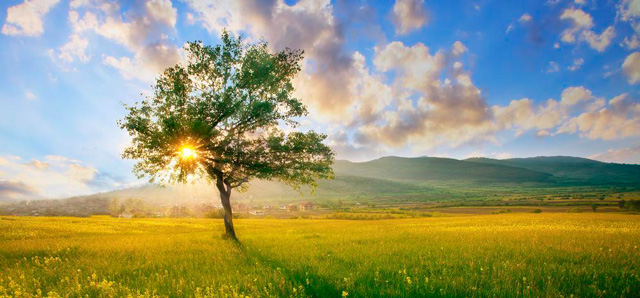
HDR photography can create some absolutely jaw-dropping effects when implemented correctly. This type of photography, however, can be extremely difficult to perfect. Due to the nature of HDR composite shots, the finished piece can often look artificial and contrived – in short, you can tell that it is an HDR shot. If you want to achieve perfection and create magnificent HDR photos, the finished piece should look natural, and people should not be able to tell that it has been edited.
Landscape HDR photography presents additional challenges due to the high level of contrast in the composition. Let’s look at an example – you have hiked to Malham Cove in the Yorkshire Dales and want to take a shot of the rocks and surrounding countryside. The only issue is that the sky is hugely over-exposed, whilst the rocks and fields are under-exposed and wreathed in shadow – due to the extreme contrast, an HDR composition of this particular scene could look unnatural.
So how can you achieve perfection and improve your HDR photography? How can you capture stunning landscape photos and create a final effect that looks both beautiful and natural? If you follow the simple steps and guidelines we have formulated below, we are confident you can improve your HDR compositions ten-fold!
Phase 1: Shooting the initial image set
The first step is to perfect the art of taking your initial HDR composite shots. The standard practice is to have one photo at optimal exposure, plus one photo over-exposed, and one photo underexposed.
If we look at a landscape shot, the under-exposed shot will usually provide the detail and colour in the sky, whilst the over-exposed shot will provide detail in the darker areas such as the foreground objects and trees. The optimal shot will provide a base from which the other two images can be combined. The following are some simple steps you should consider when taking your HDR photos:
Camera setup
- Ensure the image mode is RAW
- Use Aperture (AV) priority mode
- Use either a wide-angle lens or a mid-range zoom lens
- Consider using a tripod for stability & a remote control
Bracketing
- Initial shot: Approximately F/11 and ISO 100
- Lower Bracket: -2 aperture stops below the initial shot
- Upper Bracket: +2 aperture stops above the initial shot
The setup and bracketing are essential processes to perfect when taking HDR photos. Using aperture mode is vital, and choosing the correct lens is also important – a wide-angle or mid-range zoom lens will provide a fantastic sweeping shot that captures a large portion of the landscape. Furthermore, a tripod is ideal to help take identical shots and to reduce motion blur.
The initial shot doesn't have to be F/11 and ISO 100, but this setting is preferred – F/11 will provide a large focal range, and ISO 100 will reduce the amount of grain/noise in the darker areas. The bracketed shots do not have to be +2/-2 either – it is advisable to consider each shot separately and simply choose a range of exposures that include the maximum amount of detail within a photo. Some cameras even have a bracketing or HDR feature that presents pre-defined exposures and will automatically take the HDR composites for you – if your camera has such a feature, consider playing with it to see the end results.
Phase 2: Post-processing in an image-editing program
Many cameras have a built-in HDR mode, which will get you a finished automatically merged image. However, shooting brackets and processing them manually will give you far more control over the photo and much better results.
For processing you can use image-editing software such as Lightroom, which has HDR editing features or software specifically designed for working with HDR images such as Aurora HDR. Using software such as the above can greatly improve your finished work and can also help take your landscape HDR photos to the next level.
Upload your HDR composite photos to your computer and from there import them into your post-processing software. In most cases there will be an HDR feature that uses a step by step process that will eventually render the images and merge them together to create the final piece – this process can sometimes take quite a while due to the amount of data involved.
Once the automatic HDR process is complete you can then edit the finished photo – if you leave the generated photo as-is you may be disappointed with the results – most HDR processes only merge the images together – editing has to be done manually. To create a natural effect, you should strive to do the following:
- Create a balanced level of exposure;
- Reduce the highlights and increase the shadows partially;
- Look at the saturation levels and alter to create a natural colour range;
- Add contrast and clarity in small amounts to create realistically defined areas;
- Change the white balance to create a realistic colour temperature;
- Try to create a consistent tone throughout the photo.
In essence, you should edit the photo so it looks realistic. HDR landscape photos often fall short when the sky is too bright and intense, or the foreground and landscape objects have too much detail – when you look at the photo it just doesn’t look right. By altering the parameters above, you should be able to create a finished product that looks beautiful and realistic.
Realism is key
You can go wild and create an HDR photo that looks over-the-top and in your face, but if you want a natural effect, you must be prepared to restrain your creative side and edit with caution. When editing, consider how you remember the scene and question your actions – was the sky that colour? Was that the correct shade of green for those trees? Did the ripples in that river have bright highlights? Answer these questions and alter your editing accordingly – by doing so, you should hopefully create a realistic HDR photo.
We hope you have found this guide useful – landscape HDR photography really can create some breathtaking results. Furthermore, in certain situations, an HDR photo will create a much more suitable end-product when you are exploring the outdoors. Why not head out into the wide world today and try your hand at HDR photography to see what results you can develop?


Nice and helpful tips that photographers can follow through.
HDR photography works very well when shot outdoors in natural light. Avoid using artificial lighting whenever possible, as it produces false hues and harsh shadows.