Auto Bracketing Explained
Auto bracketing is a feature found on most cameras that allows you to take multiple photos in quick succession with a single parameter changed between each shot. Normally auto bracketing refers to exposure bracketing, but it can also be used for white balance bracketing.
In this article we'll look at both exposure bracketing and white balance, what they do, and when they can be useful.
Exposure bracketing
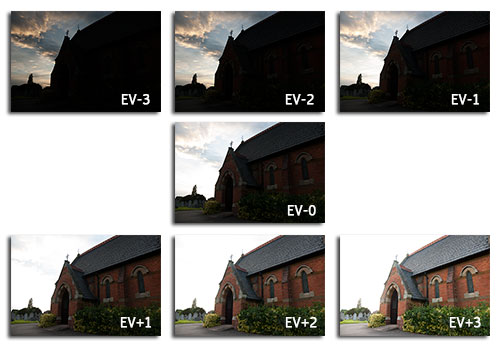
With exposure auto bracketing, the camera will automatically take a normally exposed photo, plus one (or more) under-exposed, and one (or more) over exposed photo. How many photos it takes, and how much the exposure is varied between the photos depends on the camera settings.
Exposure is measured in stops, a one stop increase in exposure means the image will be twice as bright. A one stop decrease in exposure means the image will be half as bright.
Most cameras will allow you to set the bracketing increment from one third of a stop, up to one stop. Most Canon cameras allow setting up to two stops increment.
Many cameras also allow you to set the number of frames you want to bracket. Three frames is the standard, but 5 and 7 frames are fairly common options as well.
So, if you set the bracketing increment to 1 stop, and the number of frames to 7, you would end up with a set of exposures like below:
Using exposure bracketing for capturing scenes with a high dynamic range
The main reason for using exposure bracketing is when you are photographing a scene with a large dynamic range. That is, the range of tones from dark to light is too great for your camera's sensor to capture accurately. Without bracketing you either end up with a photo that has blocked-up shadows, or blown-out highlights. Photographing a sunset is the most common example where this occurs.
By bracketing the exposure, you can capture detail in both the highlights and the shadows. The only problem is, that the photo exposed for the shadows has badly blown out highlights, and the photo exposed for the highlights has badly blown out shadows. Thankfully, you can combine the photos into a single well exposed shot using image editing software.
HDR (High Dynamic Range) software is the most popular choice for combining bracketed exposures into a single image. This works by combining the image data from each exposure into a single HDR image.
Computer monitors do not have enough dynamic range to display this HDR image correctly though. So, you tonemap the image to compress the tonal information of the image to something that can be displayed on a monitor.
Tonemapping typically involves a range of sliders and options, allowing you to precisely map how bright or dark the highlights, midtones, and shadows of the final image should be.
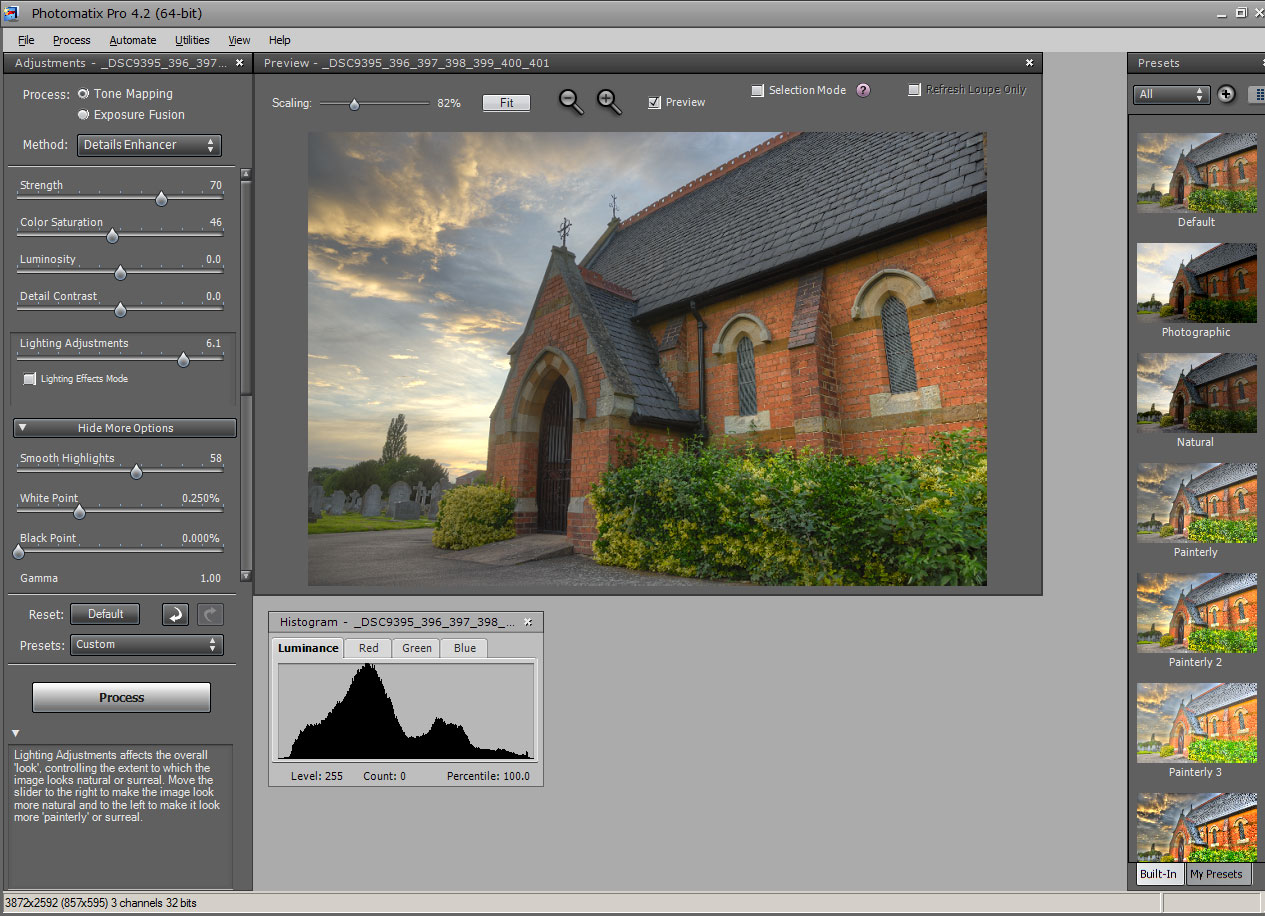
Tonemapping an HDR photo in Photomatix
An alternative to HDR and tonemapping is blending exposures manually using layer masks. For more information on layer masks, and an example of using layer masks to blend bracketed exposure, please see my previous article How to use Photoshop Layer Masks.

Blending bracketed exposures using layer masks in Photoshop
Safe-guarding against incorrect auto-exposure with exposure bracketing
Another use of exposure bracketing, is when you want to shoot something quickly, but the light is changing, or you are worried that the camera won't calculate the correct auto-exposure. In this situation auto bracketing can be used to quickly fire off three shots with negative exposure compensation, no exposure compensation, and positive exposure compensation.
If the auto-exposure setting of the camera actually resulted in an image that is too dark, you are safe because you have the bracketed image with the positive exposure compensation applied (so it hopefully should be the correct brightness).
Or if the auto-exposure setting of the camera resulted in an image that is too bright, you are safe because you have the bracketed image with the negative exposure compensation applied.
If the auto-exposure setting of the camera got the image just right, well, you have the image with no exposure compensation applied as well. You can just delete the images that you don't need.
Normally I would recommend to just rely on the auto-exposure, and check the exposure is correct after taking the image. If not, then apply some exposure compensation. But when light is changing rapidly, or your subject will be gone by the time you've checked the image, exposure bracketing can come in handy.
White balance bracketing
White balance auto bracketing can be used to take several shots in quick succession with varying color temperature. Generally white balance can only be bracketed blue-amber, or magenta-green.
The bracketing works from your currently set white balance setting. So, if you had your white balance set correctly, and were bracketing blue-amber, you would end up with:
- A photo with a slight blue bias
- A photo with the correct white balance (your current white balance setting)
- A photo with a slight amber bias
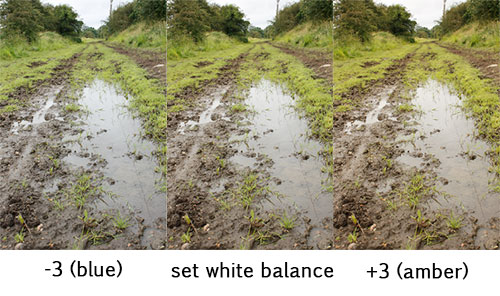
The main reason for using white balance bracketing is when you are not sure that your current white balance setting is correct. If your current white balance setting was actually too cool (blue), then the amber biased bracketed image may have the correct white balance.
You are most likely to have a problem with the white balance if you are shooting under mixed lighting, or changing light sources.
Another reason for bracketing white balance can just be for experimentation. You might just want to see what the scene looks like with a slightly warmer or cooler tone. Or a greener or more magenta tone.
To be honest though, white balance bracketing is something you will be unlikely to use very often. I don't think I have ever used it. This is particularly true if you shoot RAW format. With RAW, if you get the white balance wrong at the time of shooting, it doesn't matter too much as you can change the white balance later. Even with JPEGs, you can change the color balance of an image to some degree.
Focus bracketing
As a footnote, one thing that cameras don't allow you to bracket, but would be quite useful, is focus. Focus bracketing is useful for taking photos at various different focus points, and then the photos can be combined later into a single image. This process is known as focus stacking, and allows for an image with much more of the scene in focus than can be achieved in a single shot.
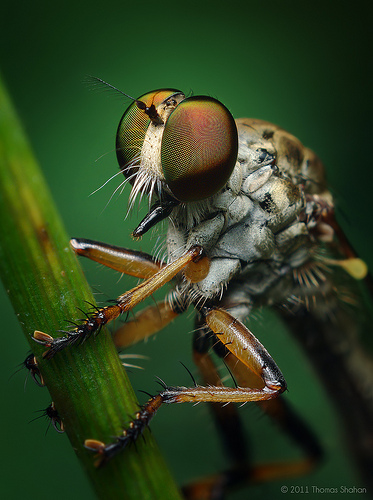
Female Ommatius Robber Fly by Thomas Shahan on flickr (licensed CC-BY)
Focus stacking is mainly used in extreme macro photography, but it can also be used for landscape photography as well. At the moment it has to be done manually, or via complicated computer programs. I hope in the future camera manufacturers will add focus bracketing to their cameras as well.


