Macro & Close-up Photography using Extension Tubes & Bellows
Continuing our look at different methods for capturing macro and close-up photographs, in this article I want to look at extension tubes and bellows. Both of these methods are only applicable for cameras with interchangeable lenses, as they sit between the lens and the camera.
They both work the same way, by extending the lens away from the camera body, the minimum focusing distance of the lens decreases. You can then get closer to your subject, and get some great macro photos.

Emerge by aussiegall on flickr (licensed CC-BY)
Extension Tubes
Extension tubes are simply tubes that sit between the lens and the camera. One end has a bayonet mount like a lens, which screws into your camera. The other end has a female mount, like your camera, that the lens screws into.
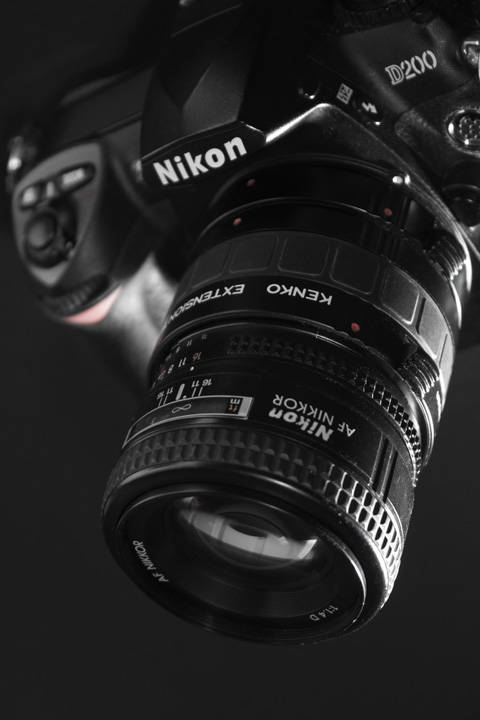
Camera with extension tubes and 50mm lens
Extension tubes are available in a variety of different lengths, and you can often buy them in sets of tubes with 3 different lengths. The different lengths allow you to achieve different magnification ratios (see below section on Calculating the magnification ratio with extension).
With extension tubes, there are two types - those that allow control of the lens from the camera, and those that don't.
'Dumb' Extension Tubes
Extension tubes that have no mechanical or electronic linking between the camera and lens are usually much cheaper. But, this means that you can't control the aperture of the lens from the camera settings.
If you have a lens that allows manual control of the aperture on the lens, this may not be quite so much of an issue. But as with using reversed lenses, many modern lenses have no aperture ring, and so will only work either with the aperture fully stopped down or wide open.
Gummibaerchen_6253rt by Stefan Munder on flickr (licensed CC-BY)
Even with lenses that feature an aperture ring, 'dumb' extension tubes are still not great. You either have to stop the aperture down manually when it comes to taking the shot, or you have keep the lens stopped down to your shooting aperture. This results in a dark viewfinder image on DSLR cameras, and can also make it more difficult to set the plane of sharpest focus accurately.
AF Extension Tubes
Extension tubes that allow diaphragm (aperture) control of the lens from the camera are more expensive, but much more practical. These models also normally allow autofocus (though autofocus isn't actually that useful with macro photography).

Butterfly in flight by JohnWCoke on flickr (licensed CC-BY)
Using these tubes on a DSLR, the camera will keep the lens wide open for focusing, and then stop it down to the desired aperture when you press the shutter button to take the photo.
For cameras that use an electronic viewfinder, e.g. MILCs and SLTs, then the view you see normally works with the lens stopped down to the taking aperture.
Bellows
Bellows work in the same way as extension tubes in that they connect between the camera and the lens. The difference is that unlike a solid tube, bellows can be extended or retracted. This enables you to vary the amount of extension, and so the magnification obtainable (see below section on Calculating the magnification ratio with extension).
Bellows work by having the front standard (to which the lens is attached) slide along a rail, which is attached to the rear standard (to which the camera is attached). The bellows then expand or collapse as the front standard is moved away from or back towards the camera.
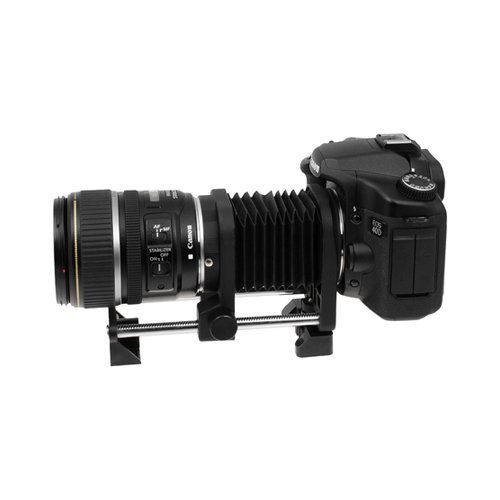
The rail that the front standard slides along is normally toothed, and a cog system connected to a knob is used to control the movement. This allows you to easily make fine grained adjustments in the amount of extension.

Window to your soul by Leszek.Leszczynski on flickr (licensed CC-BY)
Some bellows models also allow you to tilt the front standard with the lens attached. This lets you tilt the field of focus, so that it is no longer parallel to the image sensor.
Tilt is one of those things that it can be nice to have, but you can easily live without. An example would be if you were photographing an insect at an angle, you could tilt the lens so the plane of focus runs along the insect's body, keeping it all in reasonably sharp focus.
Without tilt you would only have where you focused in focus, normally the head of the insect. Bellows that allow tilting the lens are normally very expensive though. You will also likely need a still subject while you adjust the tilt to get the focus plane where you want it.
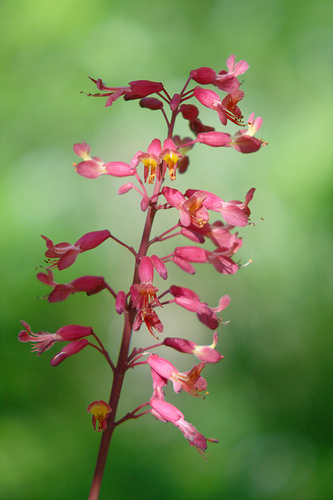
Flowers by smaedli on flickr (licensed CC-BY)
Some bellows allow you to shift the front standard, though I am not sure there is actually much use for this in macro photography.
The effectiveness of both tilting and shifting a lens depends partly on the size of image circle cast by the lens. If you tilt or shift the lens too much, you may get the edge of the lens in the photo (vignetting).
Bellows do not allow diaphragm (aperture) control of the lens, and so are best used with lenses that have a manual aperture control.
Prices of bellows vary quite a bit, they are generally a little cheaper than a set of auto diaphragm control extension tubes. But quite a bit more expensive than manual extension tubes.
A bellows unit will typically allow a larger amount of extension that a set of extension tubes. But it also takes up more space in your bag, thanks to the rail.
The bellows are made from material, and so can rip. If you buy older bellows second hand, you may find that the material has started to decay and they are no longer light-tight. Light leaks will cause whitish low contrast areas in the resulting photos.
Another disadvantage of bellows compared to extension tubes is that when fully collapsed, they still yield a significant extension. This can be a problem if you only want a close-up magnification, and not true macro.

morning glory asleep2 by Goader on flickr (licensed CC-BY)
For example, if you wanted around 1:5 magnification for a photo of a flower. If you were using a 50mm lens, this would require about 10mm of extension. The minimum length of a bellows when collapsed is likely to be much more than this, more like 45mm. That would give you almost 1:1 magnification, much more than you wanted.
Calculating the magnification ratio with extension
The magnification ratio provided by extension tubes or bellows is dependent on the focal length of the lens being used. A 50mm lens with 50mm of extension would give a magnification ratio of 1:1.
This ratio is when the lens is focused at infinity. Lenses focus closer normally by extension. On some lenses the lens will physically extend as you focus closer. Most modern lenses though are Internal Focus (often labeled as IF), which means the lens elements move inside the lens as you focus closer rather than the whole of the lens extending.

50mm lens set to closest focusing distance

50mm lens set to infinity focus with 48mm of extension tubes

50mm lens set to closest focusing distance with 48mm of extension tubes
Some lenses also employ focal length shortening as they are focused closer. For example, a 60mm lens focused at it's closest focusing point may actually be a 40mm lens.
So, if you want to work out the potential maximum magnification ratio of a lens with extension tubes or bellows, it's not as easy as it seems. You also need to know the amount of extension already used by the lens at its minimum focusing distance, plus the lens' actual focal length at the minimum focusing distance.

Amaryllis Stigma by Radu P on flickr (licensed CC-BY)
In practical terms though, how often are you going to need to know the exact magnification ratio that your equipment provides? In any event, if you do need this information, you can find it out by simply setting your lens to its closest focusing distance, adding the extension you want, and then taking a photo of a ruler.
By comparing the width of ruler captured in the image with the width of your camera's image sensor you can work out the magnification ratio. Camera image sensor sizes can be found through a quick web search, just search for "Camera model sensor size". For example, if your camera's image sensor has a horizontal width of 26mm, and the ruler measures 13mm across in the image, then this gives a ratio of 2:1 (2x lifesize).
If you want to know the sorts of magnification that a lens can achieve with extension when you don't own the lens or extension, then just do a web search or search Flickr. You're likely to find plenty of photos from others that have that lens and have used it with extension tubes. These will give you a good idea of the magnification the combination is capable of.

I saw a dragonfly by kaibara87 on flickr (licensed CC-BY)
Knowing how extension combined with focal length affects image magnification should help you in choosing a lens / focal length and extension for a specific subject.
For close-ups, a longer focal length lens combined with a smallish amount of extension can work very well.
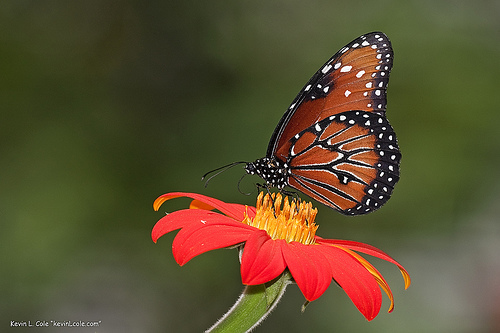
Monarch Butterfly, Male (Danaus plexippus), Western Region Monarch, photographed at the Butterfly Alive Exhibit at the Santa Barbarba Museum of Natural History by kevincole on flickr (licensed CC-BY)
For higher magnification macros, a wide angle lens combined with more extension can work very well. For example, a 24mm lens with 50mm of extension will give around 2:1 magnification ratio. Reverse the lens as well, and you now have around 4:1 magnification.

Dried daffodil flower taken with a reversed 24mm lens on 48mm of extension tubes, giving a reproduction ratio of just over 4:1
A zoom lens can work very well with extension. You can easily vary the magnification obtainable by just changing the focal length. For example, a 70-200mm zoom lens with 25mm of extension would give a magnification ratio of about 1:3 at 70mm, and about 1:8 at 200mm. It can seem strange that to increase the magnification you need to zoom out, but that's the way it works.
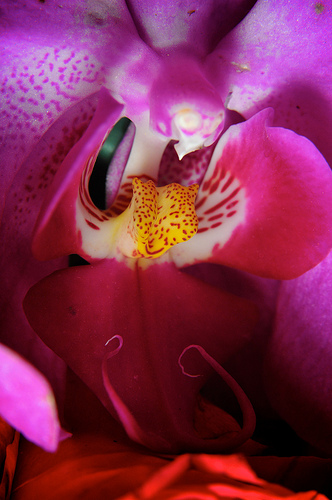
Pink Orchid Macro by Avatarshark on flickr (licensed CC-BY-SA)
Light loss
Extension tubes and bellows contain no glass in them, so they do not affect the image quality that your lens / camera combination is capable of capturing. However, they do result in some light loss.
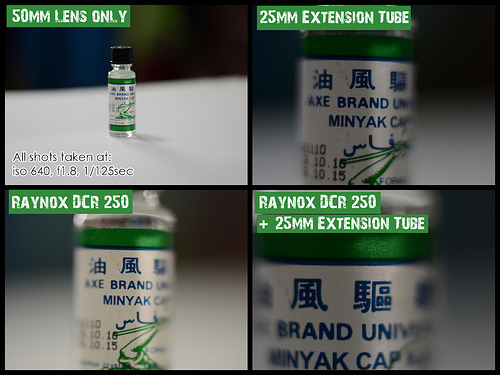
Raynox vs Extension Tube on 50mm Lens by abdulrahman.stock on flickr (licensed CC-BY)
When adding extension tubes to a lens you are increasing the area that the image circle of the lens covers, so the light is spread over a larger area. Think of it like a projector, when you move the projector further away from the wall, the size of the image on the wall increases. But the image on the wall will become dimmer as the same amount of light from the projector is now spread out over a larger area.
To calculate the light loss, you can add 1 to the magnification, and then multiply by the current aperture f-stop. For example, if a lens was set to an aperture of f/2.8, when the lens is focused for a magnification ratio of 1:1, the effective aperture is now (1+1)x2.8 = f/5.6.
Another way to think of it is that by adding extension you are effectively increasing the focal length of the lens. The physical size of the aperture stays the same though, resulting in a smaller f-stop.
For example, a 50mm f/2 lens has a maximum physical aperture size of 25mm (50/2). If you add 50mm of extension tubes to give an effective focal length of 100mm, the maximum effective aperture is now f/4 (100/25). So that's a loss of 2 stops of light. A photo taken with this combination at an aperture of f/16 would give an effective aperture of f/64.
In other words, the more you increase the magnification by using extension, the more light you need for a good exposure. If you're interested in understanding the Math behind all of this, there is a good explanation with the different equations here: Extension Tubes and Effective f-stops.
Macro photography is normally done using quite a small aperture to get a sufficient depth of field. When you add in the light loss caused by extension, it can often be a good idea to use flash to light your photos.

Can you resist? by jeans_Photos on flickr (licensed CC-BY)
The alternative is to use a slow shutter speed, which can sometimes be done early in the morning when the air is stiller. (Or of course will work fine for indoors studio work).

Euphydryas aurinia by Gilles San Martin on flickr (licensed CC-BY-SA)
Using a higher ISO to compensate for the light loss is another alternative. But using too high an ISO setting can start to rob your photo of details, precisely what macro photography is often about capturing. High ISO noise also shows up quite easily in the defocused backgrounds common in macro photography.
Using old manual lenses
As with reversed lenses, using old manual focus lenses on manual extension tubes or bellows can be a relatively cheap way of working at macro magnifications. Extension tubes can be used in conjunction with a reversing adapter for even greater magnification as well.
If you want to use an old manual lens on extension tubes (or bellows) without reversing the lens, you'll either need a lens that uses the same mount as your camera, or an adapter that lets you mount the lens. Adapters are available quite cheaply on eBay.
img_0781 by steevithak on flickr (licensed CC-BY-SA)
For example, you could buy manual extension tubes for your Canon camera and a cheap M42 lens. You'd then need an M42 to Canon adapter to mount the lens on the tubes.
To sum up, let's look at the benefits and disadvantages of using extension for macro and close-up photography:
- Costs more than a simple reversing ring, but is quite a lot cheaper than a macro lens. Similar costs to using a close-up diopter filter.
- The higher the magnification obtained using extension, the more light you need. (This is true of all macro lenses as well).
- Can be used with any lens, including macro lenses and reversed lenses for high magnification macro photography.
- Can be used with longer focal length lenses for close-up photography.
- Doesn't work well with some wide angle lenses - the focus point may be moved so close that it is inside the lens.
- Not as convenient as a macro lens as the extension needs to be removed from the lens if you then want to use it for non macro / close-up photography.


Dear Person; I’m looking for informations: how to take a photograph of a image on retina screen (I hope I’ve use correct sentense)