How to take tack sharp photos
Capturing sharp images is something that virtually every photographer tries to do with every image. Even if only a very slim portion of the image is in focus, we want that part to be sharp, and record as much detail as possible.

Emily by schani on flickr (licensed CC-BY-SA)
The only exception I can think of is some portrait photography, where a soft focus filter may be used to give a soft and dreamy look.
To get tack sharp photos, there are a number of things you can do:
-
Don't focus and recompose
Focus and recompose is a technique that is sometimes used when you want to frame your photo with your subject off-center or near the edge of the frame. You point your camera straight at the subject and then half press the shutter button to lock focus. Then recompose the image to put the subject off-center and depress the shutter button fully to take the photo.
This technique can work well in most situations, but if you have a shallow depth of field, or are after critical focus, then it can cause problems. The reason is that when you move the camera to recompose the photo, the plane of critical focus is also moved. So after recomposing the photo, the subject may no longer be in the plane of critical focus.
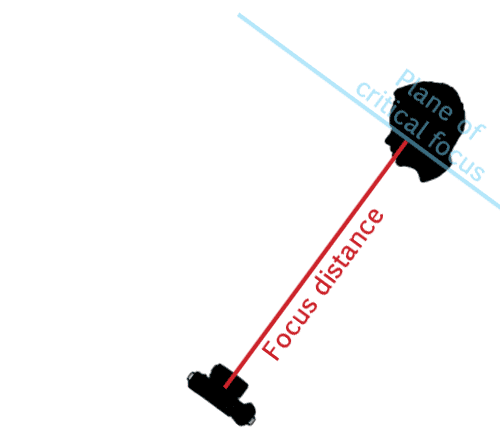
Pointing the camera straight at the subject and locking focus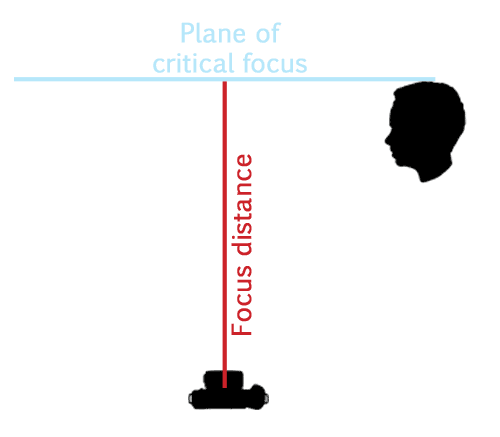
Recomposing the image so that the subject is no longer at the center of the frame. With focus locked, the subject is no longer in the plane of sharp focus.If your camera allows you to choose where to focus in the frame, compose your photo first. Then instead of focusing with the center focus point, use the focus point that is over your subject.

Kim and Dan's Engagement by ChrisGampat on flickr (licensed CC-BY)If you find that you don't have a focusing point right over your subject, just use the focus recompose technique, but with the focusing point that is nearest the subject. The focus won't be quite as dead on as it would be with no recomposing at all, but it will certainly be better than using the center focus point and then dramatically recomposing the image.
-
Time your shot with your breathing
When shooting handheld, particularly with longer focal length lenses, or at slow shutter speeds, it is important to hold the camera as steady as you can. Even your breathing can create some movement of the camera.
So for a tack sharp image, learn to time your shooting with your breathing. Get your shot lined up, and half press the shutter to lock auto exposure and focus. Then just as you finish exhaling, press the shutter down fully and hold your breath for a second.
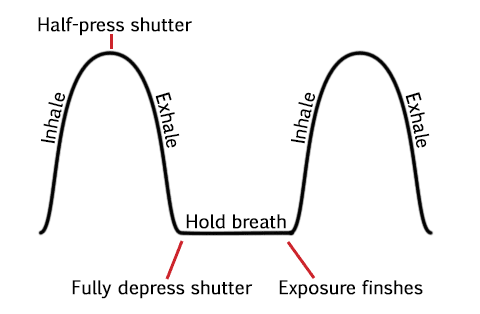
Breathing diagram for taking tack sharp photosAlternatively, hold your breath and activate the shutter just as you finish inhaling. Try both and see which works best for you.
-
Use a tripod
If you can, using a tripod will secure your camera against camera shake. For best results, use a shutter release cable to trigger the camera, so there aren't any vibrations or movement from touching the camera when you take the photo.
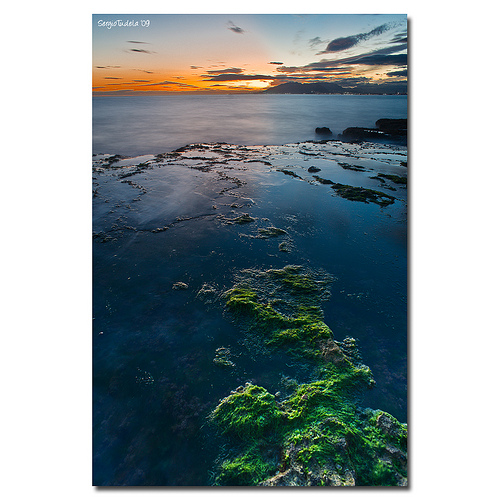
Silenced by SergioTudela on flickr (licensed CC-BY)If you have a DSLR camera, then using mirror lock-up or liveview mode will remove any vibrations caused by mirror slap.
When using a tripod, don't extend the center column. If possible, use a tripod with no center column at all. The reason is that when you elevate the center column, the camera is now just supported by that single column. Whereas without the center column, it is supported directly by the three tripod legs. Elevating the center column can lead to problems with camera shake, particularly if you are shooting at a long focal length.
If your tripod does have a center column, then while you should not extend it, you can increase the stability of the tripod by hanging a bag or weight from the bottom of the column. There is also a neat trick you can use with bungee cords that has a similar effect to hanging a weight underneath the tripod:
Using a tripod means you can ensure that any parts of your image that aren't moving will be tack sharp.
-
Use a fast shutter speed
If your shutter speed is too slow, then your image can suffer from blur caused by camera shake. If your subject is moving, you can also get blur from subject movement.
If you find this happening, increase the ISO setting you are shooting at, and / or use a wider aperture to let more light into the camera. This will allow you to use a faster shutter speed without the image getting too dark. For portraits you can also try adding more light to the scene in the form of flash.
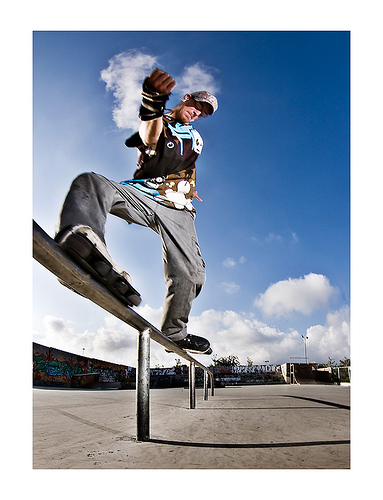
roller_3_reus by Aitor Escauriaza on flickr (licensed CC-BY)In situations where you're not dealing with a moving subject (e.g. landscape photography), then it may be preferable to use a tripod to support the camera instead. If you don't have a tripod available, see if there is some other flat surface you can use to support the camera. With the camera on a steady surface, you don't need to worry about slow shutter speeds.
-
Beware of diffraction
If you use a small aperture e.g. f/22, then the image may suffer from diffraction blurring. Diffraction is related to the size of the aperture you are using and the camera sensor's resolution and size.
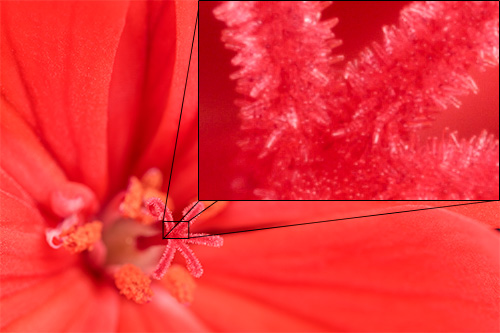
Image taken at an aperture of f/8 with 100% crop
Image taken at an aperture of f/16 - although depth of field is greater than f/8 the image is also suffering from diffraction softeningThe higher the resolution (megapixels) of the camera sensor, the more likely you are to see diffraction blurring if you view the image at 100% zoom.
The smaller the size of the image sensor used in the camera, the more likely you are to see diffraction softening. Some compact cameras are diffraction limited at f/3.5. This means that using an aperture smaller than f/3.5 (e.g. f/8), you don't capture any more real image detail, you just capture more diffraction blurring.
Most cameras with larger image sensors (e.g. DSLRs, MILCs, and SLTs), are diffraction limited around f/8 - f/16.
So for tack sharp images, try to find out the diffraction limit for your camera. The Cambridge in Colour website has an excellent explanation of how diffraction works and a diffraction calculator: Lens Diffraction & Photography. Then, when you know the diffraction limit, try to avoid stopping the aperture down below this.
-
Use high quality lenses
A good quality lens can also help you get tack sharp images. If you have a compact camera or superzoom with a built-in lens, then you can't do much about the lens quality. But if you have a camera with interchangeable lenses, it can be worth making sure you read lens reviews before you purchase a new lens.
Some lenses are sharper than others, particularly when shot wide open (without closing the aperture down at all). Generally sharper lenses are more expensive. Zeiss and Leica are renowned for the sharpness and clarity of their lenses, matched only by their high prices.
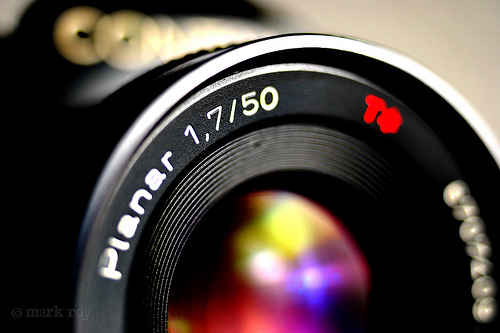
Zeiss Planar by electricnerve on flickr (licensed CC-BY)Viewing lens tests online can help give you an idea of how sharp a lens is. Photozone.de is probably the web's most extensive lens test website, covering hundreds of different lenses. Dpreview has a very nice lens comparison widget, along with reviews, though not such a large selection of different lenses have been tested.
Also check photos taken by others using the same lens you are interested in. And if you can, it is always a good idea to try out the lens in a shop before you purchase, so you can make sure that it meets your expectations.
With these tips you can make sure you get tack sharp shots almost every time. But remember that sharpness isn't everything. There are many things that go into making a great photo, sharpness is just one these. So don't get too carried away in obsessing over image sharpness.


