Seven Tips for using a Prime Lens in your Photography
A prime lens is a lens with a single fixed focal length - it cannot be zoomed. Prime lenses appeal to photographers for a number of reasons. Depending on the lens, it might offer some combination of a large maximum aperture, small size, excellent build quality, better image quality, or lower price, compared to a zoom lens. In this article we'll look at some tips for using a prime lens, and how to deal with some potential issues you may come across.
Don't always shoot wide open
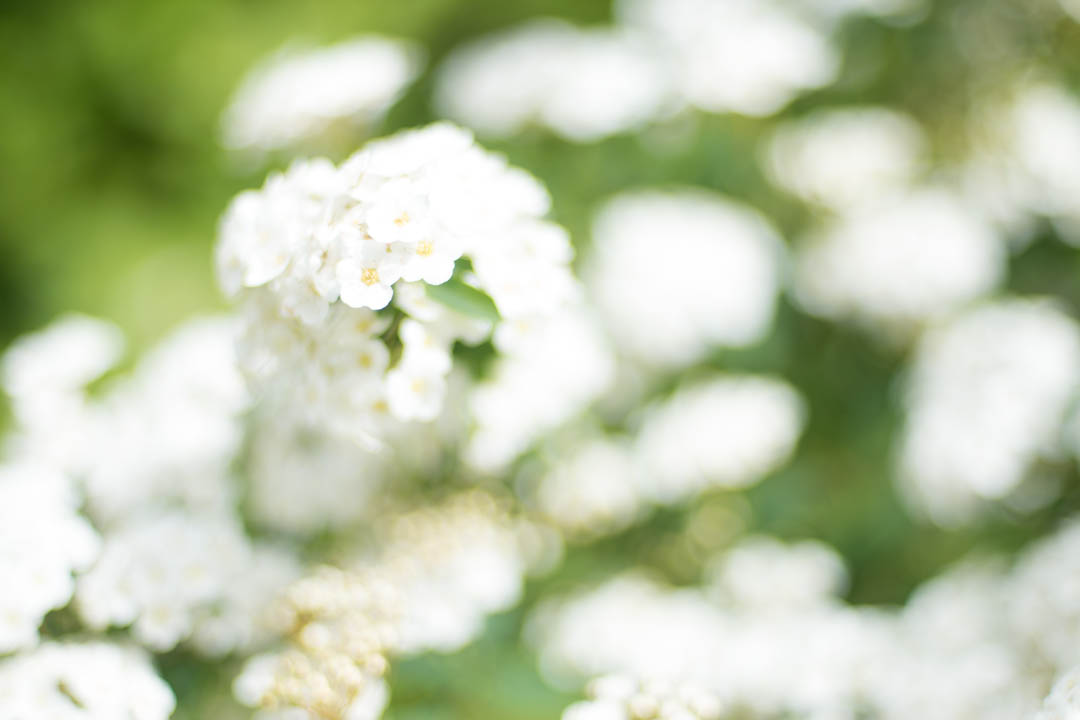
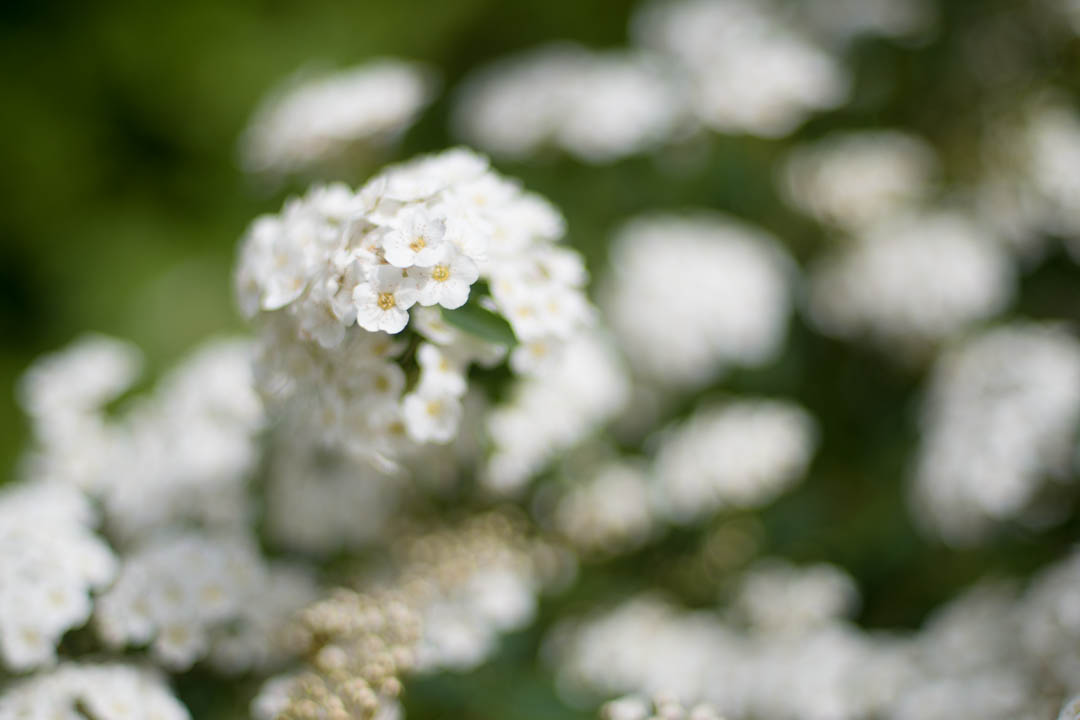
The majority of prime lenses feature fast maximum apertures that allow you to easily take photos with smooth defocused backgrounds (and foregrounds). However, just because the lens offers a large aperture, doesn't mean you always need to take advantage of it.
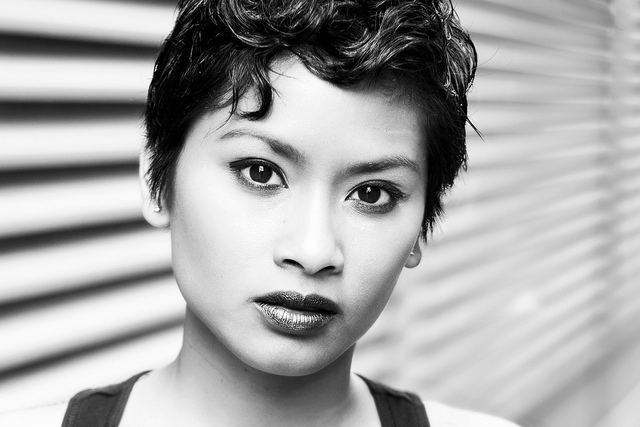
The aperture used to take a photo should be based on the subject matter and what you want that image to show. A super shallow depth of field is not going to be suitable for every photo (or even most photos). Is a photo where only one of your subject's eyes in sharp focus really better than one with a little more DoF where both eyes are in focus?
Another reason against shooting wide-open is that all lenses give better sharpness when stopped down one or two stops from wide open. This is also a reason why some photographers prefer prime lenses to zooms even though they never shoot at large apertures - they simply prefer the increased sharpness of the stopped down prime lens compared to the lesser sharpness of a zoom.
Any time you're tempted to shoot wide-open with a large aperture prime lens, just stop for a second and think. Do you really need only a tiny slice of the image in focus, or would it better with a slightly larger depth of field?
Using a large aperture in bright light
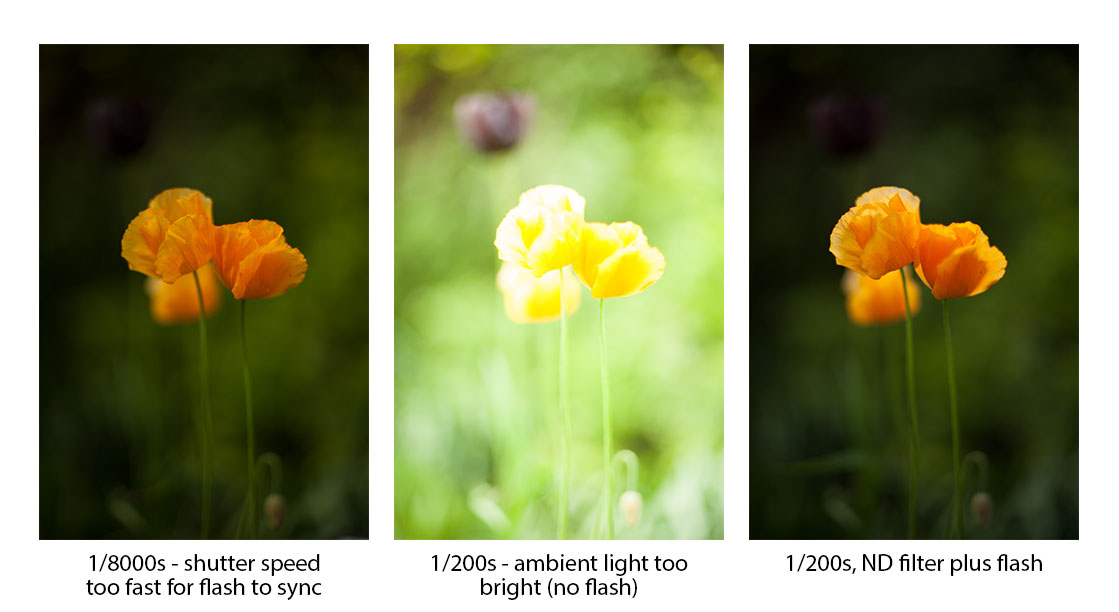
In situations where using a shallow depth of field makes sense, but you're shooting in bright sunlight, you may find your images being over-exposed. The problem is that a wide aperture, as well as giving a shallow depth of field, lets lots of light through. And so this in turn requires the use of a fast shutter speed to prevent the image being over-exposed.
In bright light you may find that the shutter speed needed for the exposure you want is faster than the maximum shutter speed your camera allows. For example, if you're shooting in bright light at f/1.4, you might need a shutter speed of 1/10000s. But your camera might have a maximum shutter speed of 1/4000s. The result - an over exposed image.
The solution is to use a neutral density filter on the lens. This is simply a neutral colored dark filter that cuts down on the amount of light that gets through to the camera's sensor. Neutral density filters are measured in stops, 1 stop being a halving in the amount of light it lets through.
Using our earlier example of a photo needing a 1/10000s shutter speed for the correct exposure, we can add a two stop neutral density filter. This would increase the exposure time needed by 2 stops, giving a 1/2500s shutter speed. This would bring the shutter speed within the camera's capabilities, and we could make the shot.
Using a fast aperture of f/1.4, the camera's maximum shutter speed (1/4000s) was not fast enough, resulting in an over-exposed photo
By adding a 2 stop neutral density filter (ND0.6) in front of the lens, the amount of light was cut down enough for a correctly exposed image at 1/1700s.
Using a large aperture with flash
With flash the situation and solution are very similar to shooting in bright light. Most cameras have a max flash sync speed of around 1/200s - 1/250s. That means that to shoot with flash, we need to use a shutter speed that is the same or slower than the max flash sync speed.
If you use a faster shutter speed, then either the flash won't fire at all, or it will fire but only a small section of the frame will be lit by the flash.
By using a neutral density filter on the camera, we can reduce the shutter speed enough to reach the max flash sync speed. For example, if we had a shutter speed of 1/500s and wanted to add some flash, but our camera's flash sync speed is 1/250s. We can add a 1 stop neutral density filter to the lens, reducing the shutter speed to 1/250s, which will allow us to use flash without problems.
Using an ND filter to bring the exposure down so a slower shutter speed and flash can be used
Another potential solution with some flash units is High Speed Sync mode. Usually this is only available on camera manufacturer branded flash units, and is an option you must turn on in your camera's settings. This mode allows you to use the flash at shutter speeds faster than your camera's maximum flash sync speed.
PrudenP4S2 Teara by Gregory Pruden on Flickr (licensed CC-BY)
In high speed sync mode the flash fires a series of short bursts, synchronized with the camera's shutter, so that the whole image is lit evenly by the flash. This uses more power than when firing the flash normally - the faster the shutter speed in high speed sync mode, the more power the flash must use.
This means that your flash when used in high speed sync mode can't be used at full power. But if you're using a large aperture anyway, this probably won't be a problem.
Another potential problem with flash is that while you may be able to shoot with a wide open aperture and shutter speed that is less than the max sync speed, you may find that when the flash fires, even at minimum power, it is too bright. Both of the above solutions (using an ND filter on the lens or using a fast shutter speed with a high speed sync capable flash) will work to combat this problem. But there is also another alternative.
Instead of adding a neutral density filter to your lens, you can add one to your flash. You can buy neutral density flash gels that attach to the front of the flash. Or just add something semi-translucent (such as a paper towel) in front of the flash. This will reduce the amount of light from the flash without adding any color cast.
Use of a hood
A lens hood helps protect the front element of your lens. It also reduces the likelihood of lens flare when photographing a subject with a light source just outside the edge of the frame.
With a zoom lens I would generally recommend the use of a lens hood. Zoom lenses aren't particularly small, and adding a hood doesn't make a big difference to the overall size of your camera / lens combination. But with a prime lens the situation is slightly more complicated.
Some prime lenses can be very small, and one of the benefits of a small lens is that it does not stick out so much (both literally and figuratively speaking). This can be very useful for more candid photography, where you want to take photos without being noticed. And even in situations where you are noticed, people can react differently if you have a camera with a large zoom compared to a small prime lens.
Adding a lens hood to a small lens in this situation can sort of defeat the purpose of having a small lens in the first place. So, with a prime lens you'll need to think a bit more about whether the benefits of a hood are greater than the potential disadvantages of the extra size it adds to your lens.

Adding even a small lens hood to a small lens can double the lens' effective size. Adding a suitable size lens hood to provide greater protection from lens flare can turn a lens from small to large.
Think in terms of field of view and perspective
Technically speaking, the focal length of a lens does not alter the 'perspective' of images you can take with that lens at all. Perspective is a function of the distance between you and the subject.
But in practice, a lens with a shorter focal length (wider field of view) will require you to get closer to your subject. While a lens with a longer focal length (narrower field of view) will require you to stand further away from your subject. So, in effect, the focal length does affect perspective.
caste5 by Piotr P on Flickr (licensed CC-BY) - the narrow field of view of a longer focal length lens captures a small portion of the background behind the subject
When using a zoom lens most photographers tend to think in terms of zooming out to photograph close subjects or large subjects (such as landscapes) and zooming in to capture subjects further away or details. With a prime lens though, you only have that single focal length. You need to think in terms of the field of view and perspective that focal length will give you.
This will help you choose the best lens for the job. For example, if you're taking portrait headshots, then a longer lens is a good idea. It will keep a reasonable distance between you and the subject, and the narrow field of view makes it easier to create a clean or out of focus background behind your subject.
Whereas if you wanted to take environmental portraits, then a wide angle lens could be a much better choice. It allows you to capture the subject and the area around them without having to put a large distance between yourself and the subject.

HarbourKids- Monster - October 10, 2011 - 12-51.jpg by Tharan Parameshwaran on Flickr (licensed CC-BY) - the large field of view of a shorter focal length lens captures a wide portion of the background behind the subject, giving a sense of location
Of course, considering the perspective and field of view is important with a zoom lens too. But with a prime lens you really need to carefully consider these things in advance as you can't change them by zooming.
Shallow DoF and Focus Accuracy
When shooting with a large aperture prime lens wide open or near wide open, accurate focusing can become critical. A large aperture gives a very thin depth of field, and any errors in focusing can become quite obvious.
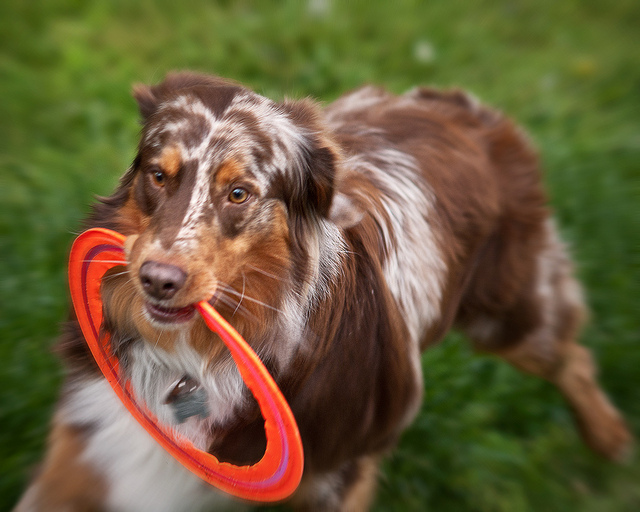
Frisbee Champion by Andy McLemore on Flickr (licensed CC-BY-SA) - shooting moving subjects with a large aperture like f/2.8 it is easy to miss focus. In this image you can see the plane of sharpest focus is nearer the rear of the head than the eyes.
Just a small amount of movement from either yourself or your subject between the time you lock focus and the time you take the shot can be enough to shift the focus from where you wanted it. So try to leave as little time as possible between locking focus and pressing the shutter fully to take the photo. If your subject is moving, then using continuous autofocus can also be a big help here.
You also need to be very careful when using the focus-recompose technique when using a large aperture. Because this technique involves rotating the camera, when you do this you are also rotating the plane of focus. And this can put the plane of focus behind the subject.
If you like using the focus-recompose technique and want to use a large aperture, I would recommend practising beforehand. Try shooting some subjects at varying distances, and see if the shift in focus is big enough to be a problem.
If it is a problem, experiment to find out how much correction is needed to put the focal plane back where you want it. This might be just moving the camera back a small amount. Or shifting the focus ring to focus closer very slightly. When you know how much correction is needed, then you should make a note of this so you can counteract any shift in focus next time you're using focus-recompose with a wide aperture. Bear in mind though that the amount of correction needed will vary with the distance between you and the subject.
Manual focus
It's also worth mentioning that large aperture prime lenses lend themselves well to manual focusing. The large aperture makes it easier to see where you're actually focusing. And prime lenses generally have very good focusing rings (while on zoom lenses they tend to be more of an afterthought).
With DSLRs you should note that you may need to switch the camera's focusing screen to make the most of manual focus with a large aperture prime. The standard focusing screens installed in most DSLRs don't show any difference in depth of field (and brightness) between f/2.8 and wider. So an f/1.4 lens wide open will show depth of field as if it was at f/2.8 in the viewfinder.
Switching to a specialist focusing screen can make manual focus much easier as you can use the shallow depth of field to accurately focus. These focus screens, however, do result in a darker view when used with lenses that have maximum apertures that are smaller than f/2.8. So if you use a lot of zoom lenses and just have one fast prime, then switching out the focusing screen just for better manual focusing with that one lens is probably not worth it.
An issue relating to manual focus with large aperture primes is that some lenses display focus shift as they are stopped down. Most lenses / cameras keep the aperture wide open as you focus, and only stop the lens down when you take the actual photo.
So, if you are using an f/1.4 lens, but have the aperture set to f/2, you would focus using the DoF of the lens at f/1.4. Then the actual photo would be taken at f/2. The extra thin DoF helps when focusing, but if your lens suffers from focus shift, then you could find that when the photo is taken at f/2 the focus has shifted from where you focused at f/1.4.
Most lenses don't suffer from focus shift (at least not enough to be problematic). However, if you do find this happening with your lens, there are a couple of different solutions. One is to simply learn the amount of focus correction that will be needed, and then apply this whenever photographing.
The other is to hold down the DoF preview button on your camera when manual focusing. This allows you to focus the lens at the actual aperture that the photo will be taken at, so there won't be any focus shift to deal with.
Using a prime lens may not be as convenient as a zoom, but they can offer quite a few different benefits that you just won't find in a zoom lens. Hopefully the tips above will help you get the most out of your prime lens(es) and avoid the potential issues that can come with shooting at the large apertures most prime lenses offer.


