How to take photos with a blurred background by using a shallow depth of field
We've all seen beautiful photos where the subject is in focus but the background is blurred. These sorts of photos may seem difficult to create. But with an understanding of depth of field, you can make photos like this too.
In this article we'll look how you can achieve a shallow depth of field to create photos with a blurred background.

The Aggressive Black Drongo! by VinothChandar on flickr (licensed CC-BY)
What is depth of field?
Depth of field refers to how much of an image is in focus. A large depth of field means that almost everything in the image is in reasonably sharp focus. A shallow depth of field means that only a small section of the image is in focus, while the rest is out of focus (blurred).
The depth of field extends in front of and beyond what is called the plane of critical focus. This is a 2D plane that is parallel to the image sensor inside your camera. When the camera focuses, the plane of critical focus is moved so that the plane falls on whatever is being focused on.
With a shallow depth of field, the focus falls off quickly on either side of the plane of critical focus. With a large depth of field, the focus falls off very slowly on either side of the plane of critical focus.
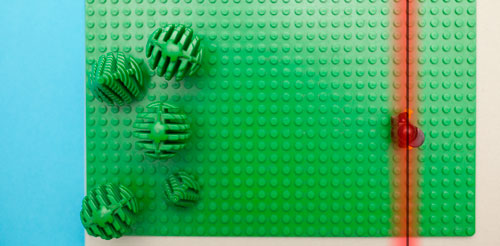
To give an example, here is a photo of a lego man. The studs on the lego base make it easy to see the depth of field. This image has a shallow depth of field.

The image below illustrates the depth of field in the above image. The black line shows where the plane of critical focus was placed. The red marking in the image illustrates the depth of field. There is an area of sharp focus at the plane of critical focus, then the area of sharp focus then drops off quickly.
How do I take photos with a shallow depth of field?
There are a number of different factors that affect the depth of field in an image, and how blurred the background will appear. These are:
Aperture
The aperture is the size of the iris in your camera's lens. A larger aperture (iris) lets through more light and gives a smaller depth of field. On the other hand, a smaller aperture lets through less light, and gives a larger depth of field. For a more thorough explanation of aperture please see the article: Photography Basics – Aperture.
To be able to control the aperture on your camera, you will need to switch the camera into Aperture-priority or Manual mode. These modes may not be available on some more basic cameras, if not, check if your camera has a portrait mode. Portrait shooting mode is a fully automatic mode that will normally select a large aperture.
Manual and Aperture priority modes both allow you to set the aperture you want to use yourself. Aperture is expressed as f-stops. A lower f-stop means a larger aperture, an example of a large aperture would be f/2.8. A higher f-stop means a smaller aperture, e.g. f/11.

Compare the image above, which was taken at an aperture of f/11, with the earlier image, which was taken at an aperture of f/2.8. As you can see the larger aperture (f/2.8) image has a much shallower depth of field (and so more blurred background) compared to the photo taken with the small aperture (f/11).
Image sensor size
The size of the imaging sensor used in your camera isn't something that you can change. But it does have an effect on depth of field, and how easy it is to create photos with blurred backgrounds.
The larger the size of the image sensor, the shallower the depth of field will be at a given aperture. This is one of the reasons many professional photographers use expensive and large 35mm DSLR or medium format cameras rather than compact cameras. The image sensors used in these cameras are much larger than those used in typical compact cameras, and so allow much greater control over the depth of field.
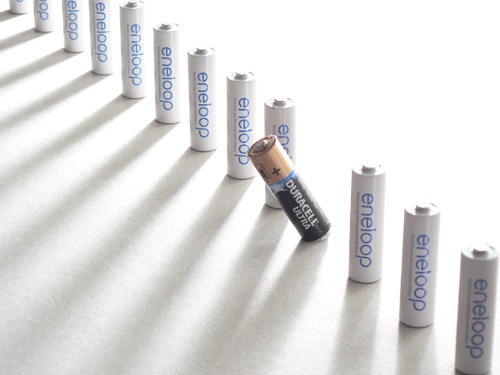
Photo by camera with small image sensor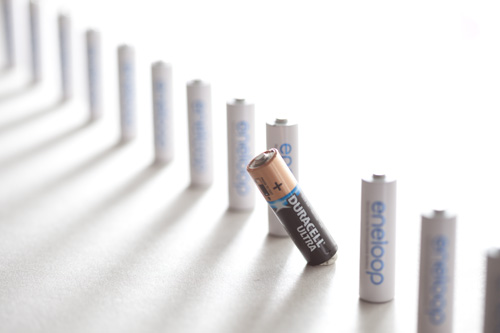
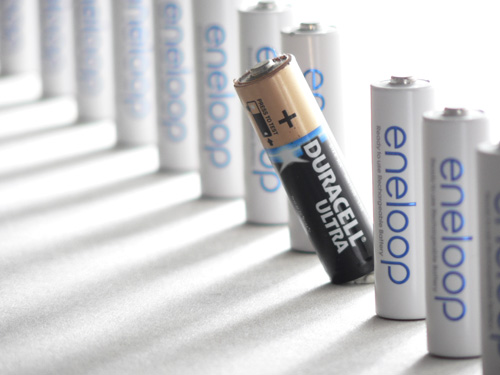
Photo by camera with large image sensorThe above two images were both taken at an aperture setting of f/3.2. The top photo was taken with a camera that only has a small 1/2.5" size image sensor. The lower photo was taken with a camera that has a 35mm size sensor (the same size as a frame of 35mm film). You can see that despite being taken with the same aperture, the photo taken with the camera that has a larger image sensor has a much shallower depth of field.
As I said earlier, you can't do anything about the size of your camera's image sensor. But you can bear it in mind as something to consider if you are looking at purchasing a new camera. And don't worry if your camera features a small image sensor - it is not impossible to get a shallow depth of field, just difficult.
Distance from subject combined with focal length
The distance between yourself and your subject, along with the focal length used affect the depth of field in your photos. If you use a long focal length (zoom in) and stand close to your subject, you will achieve a shallow depth of field.
The photo above was taken with the same small-sensored camera as was used to take the earlier photo. By using a longer focal length (zooming in) so that the main subject appears larger in the frame, we achieve a shallower depth of field.
If you use a wide focal length (zoomed out) you can still achieve a shallow depth of field, but you will need to stand extremely close to your subject. The photo below was taken with the same small sensored camera, zoomed out, but with the camera very close to the main subject.
One thing to remember is that as you change your distance from the subject, it changes the perspective as well. You can see this quite clearly in the example photos above.
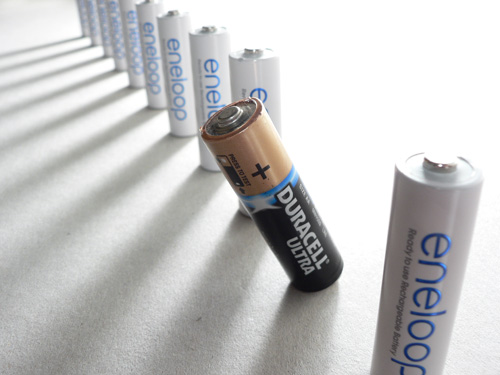
Distance of the subject from the background
This last point doesn't actually affect the depth of field. But it does affect how out of focus the background will be. The further away your subject is from the background, the more blurred the background will appear in your photo.
Taking our first example of the lego minifig, let's compare two photos. The first is where the subject is a reasonable distance from the trees. The second is where the subject is right in front of the trees.

You can see how the background is much more out of focus in the photo where there is a larger distance between the subject and the background.
When is it useful to have a shallow depth of field?
If you've read this far, you should now know what depth of field is, and how to achieve a shallow depth of field. But what sort of photos look best with a shallow depth of field?
Probably the most common use of shallow depth of field is in portrait photography. By blurring the background, it draws the viewer's attention to the subject, and not the background.
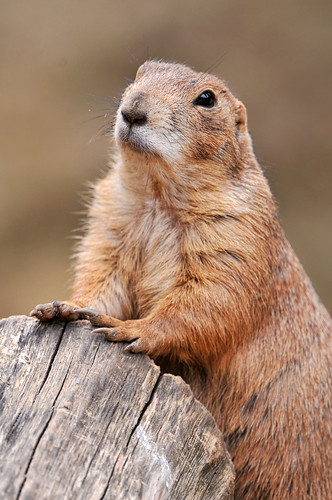
Posing prairie dog by Tambako the Jaguar on flickr (licensed CC-BY-ND)
Wildlife photography is another example where an out of focus background is desirable. Many wildlife photos are portraits, just of wild animals rather than people.
Shallow depth of field is also commonly used for floral photography. Most other types of photography don't rely quite so heavily on blurring the background, but images with shallow DOF are still quite common.
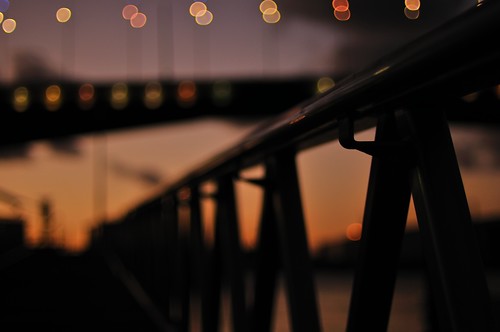
a bridge too near by mugley on flickr (licensed CC-BY-SA)
Landscape and architectural photography are where you're least likely to want a shallow depth of field. But even here, a shallow DOF can work well for some images.
I hope this article was helpful in explaining how to achieve a shallow depth of field and blurred backgrounds in your photos. If you find you still can't get the background quite as blurry as you'd like, I'll cover faking a blurred background in software for my next article.


Thank you so much for responding my email.
It was of great help and this post was very educative.
I will let you know when I get the camera.
BTW, the commenting problem I had was from chrome , I’m using firefox now and having no problems at all.
Thank you so much Dave.
No problem. Bear in mind prices on eBay can be quite variable, if one auction goes past your budget, there may be another for sale in the future that won’t be bid up past your budget. Checking regularly for new fixed priced (buy it now) listings can be worthwhile as well, as different people list the same camera at different prices, and sometimes these prices can be less than the same item would end up selling for in an auction format.
Good luck with your search!
Dave