Product Photography Tips – White subject on a white background
Photographing a white subject on a white background can be quite tricky, particularly if you are looking for a pure white background. In this article I'll look at a number of ways of achieving a pure white background while keeping the white subject exposed nicely.

I'll look at both editing and photography techniques, but they both revolve around the same thing - separating the subject from the background.
General setup guidelines
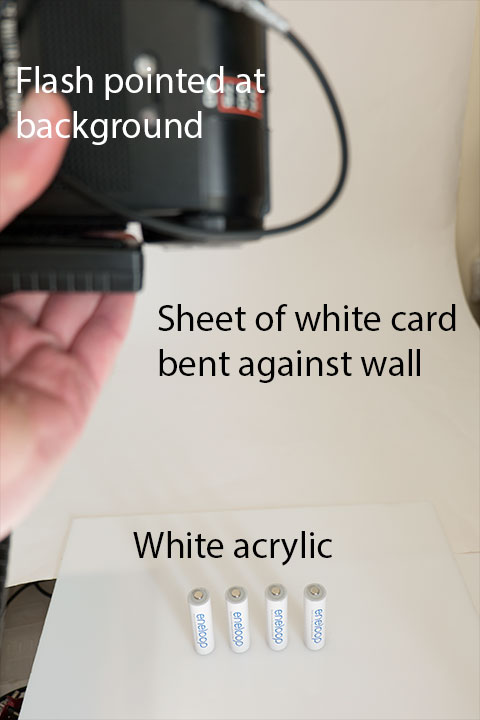
For setting up the shot, you need a well lit white background behind the subject. A piece of white card lit by a flash works well.
Position the subject some distance away from the background. The closer the subject is to the background, the more the light bouncing back off the background will affect the subject.
If the subject is too close to the background the bounced light will affect the edge of the subject.

Putting some distance between the subject and background reduces the amount of light bouncing back off the background and spilling round the edges of the subject

With the subject near to the background you get more light spill around the edges

If the flash power is too high you'll get excess light spill around the edge(s) of your subject(s), even with the background far away
Set the power of your background light so that it is just high enough to blow out the background. Use the highlight clipping warning in your camera to determine whether the background is pure white or not.
Highlight clipping warning example
If you're not sure about how to set the highlight clipping warning, check your camera manual. On many camera models there are various views that you can scroll through when reviewing an image. One of these views is usually a highlight clipping warning view of the image.
Don't worry about getting the background completely white all the way to the corners. All that matters is that the background is pure white around the subject. The other areas can either be cropped away or filled in white later when editing.
When lighting the background, you want the light spread across the background as evenly as possible. For larger subjects it can often be useful to use multiple lights. For example, one light for the left side of the background, and one light for the right side of the background.
While you could use just one light pointed at the center of the background, you would need to turn the power up quite high to cover the whole of a large background. And this then can result in the same issues discussed earlier when the subject is too close to the background.
The majority of products photographed with a pure white background don't tend to be large though. So in most cases a single light on the background will be fine.
Once you have the background lit so as to be pure white, you can then work on lighting the subject as you see fit.

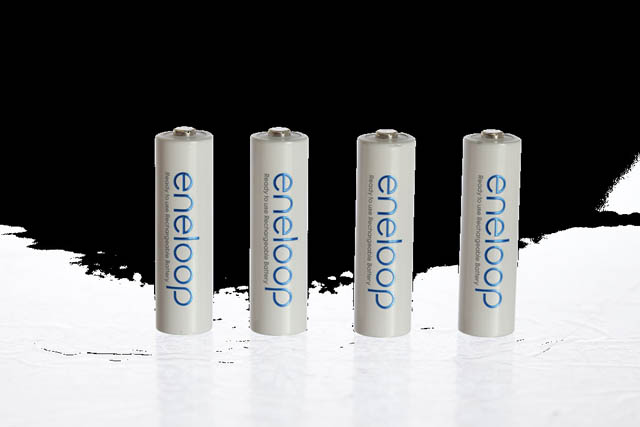
Photo taken using basic technique - batteries were just lit by indirect sunlight. Unedited.
Basic setup
This general technique is not perfect however. The foreground in front of your subject will not be pure white.
If you are using an angle where you are looking down at your subject, you will not be able to get the background as pure white either. The background in this case would be too close to your subject, and blowing it out to pure white would affect the subject.
To correct for this, you can instead use one of the alternate techniques below, or edit the photo to create a pure white background.
Lit from beneath
This is a variation on the general technique, where you place your subject on a translucent white surface that is lit from beneath. This ensures that the surface below the subject can be blown out pure white.
For the surface underneath the subject, you could use a light box (designed for viewing transparency films / slides). Or a glass table with a sheet of thin white paper on top and a light pointing up underneath. Or a sheet of translucent white plastic propped up between two boxes with a light pointing up underneath.
Hopefully you get the idea. For my example shot I just used a piece of translucent white acrylic held in the air by a clamp on a bendable arm. Underneath this I placed a flash pointing upwards towards the bottom of the plastic. Then I had the white cardboard background lit by a flash, as before. The subject was just lit with indirect natural sunlight.

Photo taken using white translucent sheet lit from underneath
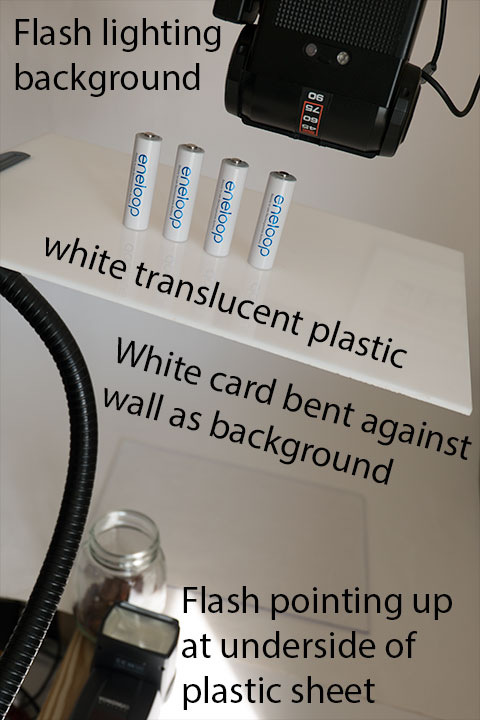
Setup for lighting surface from below
As with lighting the background, ensure that the light used to light the surface from beneath is set to the minimum power required to get a pure white surface.
The disadvantage of this technique is that you will inevitably get some light spill from the surface onto the bottom of your subject. If you are photographing a subject with fine hairs, such as a brush, then some of the edge detail may get blown out by the light from the surface.
Suspend the subject
Suspending the subject is a great way of achieving a pure white background without loosing detail on the subject. This can be achieved by suspending the subject on a stick or wire, or by placing it on a transparent surface.
Using a transparent surface
In my opinion the transparent surface method is much easier to set up. You need to elevate your subject away from the background. A glass table or a piece of transparent plastic propped up between two boxes will both give good results.
On the floor underneath your table you want your white background (such as white card). This should be lit as before - just enough power to blow it out as pure white.
This then gives a nice white background behind the product. Because the subject is further from the background, you don't get so much light spill around the edge of the product as you do when lighting the subject from beneath.
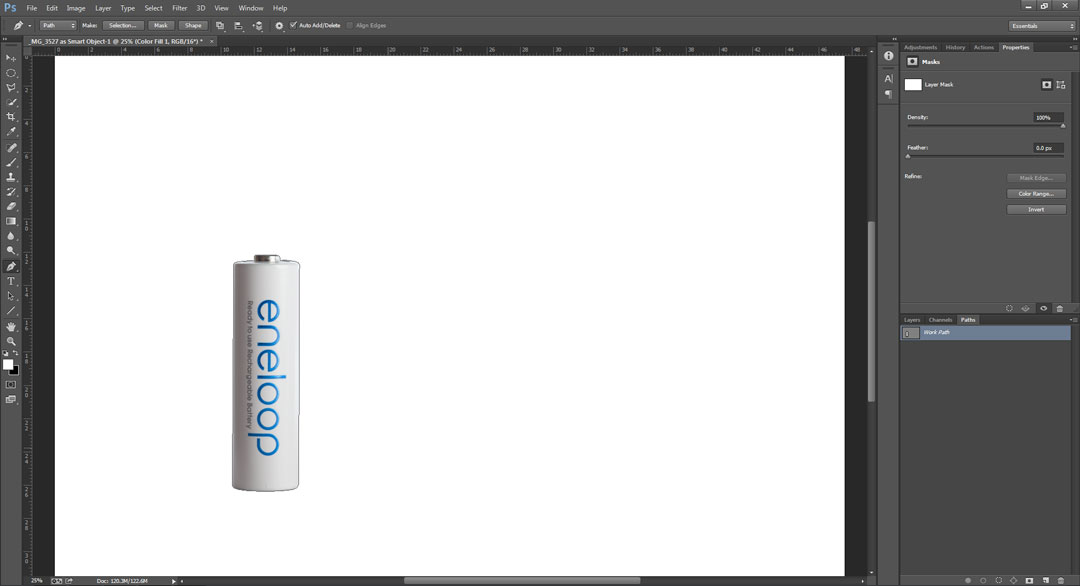
For my example I've used a sheet of transparent plastic held up by a clamp on an adjustable arm. I used two flashes for lighting the background - one for the top part of the background, and one for the lower part of the background.
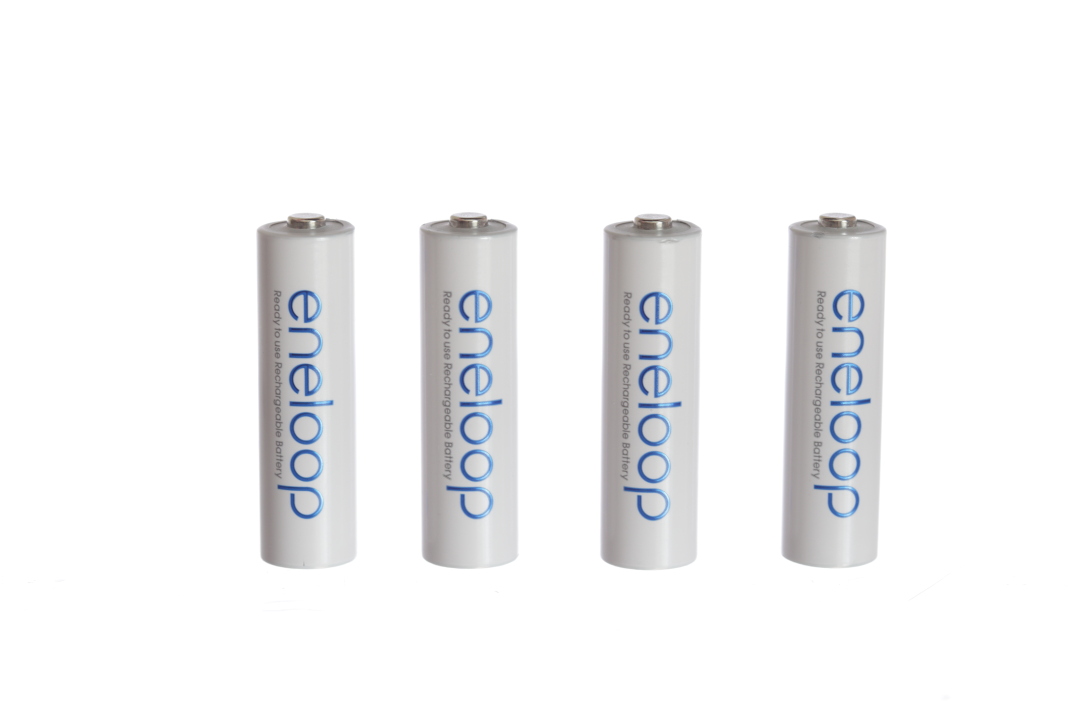
Photo taken of batteries on a transparent surface
Transparent surface setup
Using wires or a pole
The other way of photographing a subject like this is to suspend it on a stick or wire. With wire you can use thin white cotton thread or fishing wire. You might need to construct a frame, with the subject suspended in the center of frame and connected to both sides of the frame by wire. This will stop the subject spinning as it can on a dangling wire.
To suspend a subject on a stick, one option is to have the stick protruding out horizontally from the background, and attached to the back of the subject. This setup allows you to cleanly photograph the subject without the stick holding the subject up being visible.
You can see an example of this technique demonstrated in the video by Phillip McCordall below:
The other option is to use a vertical stick (or stand) attached to the bottom of the subject. This leaves most of the area around the subject as the white background, with just a small area at the bottom of the subject that will need cleaning up.
Any wires or the support stand that show up in the image can then later be removed in photo editing software.
Editing - cutting out the object
Image editing software such as Photoshop can be used to remove virtually any subject from virtually any background. However, the closer the unedited image is to the intended result, the easier the process will be.
Try to get the background as close to pure white as possible in-camera. And avoid photographing the subject against a colored background, as this can leave a color cast around the edge of your subject.
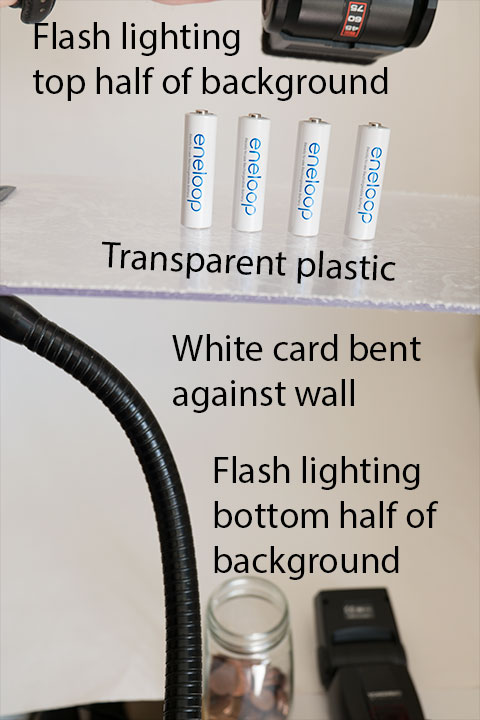
The main tool used for cutting out objects in image editing software is the pen tool. This works very well for objects with a well defined outline.
A single battery selected with the pen tool then extracted
I'm not going to go into detail on how to use the pen tool here, as it has enough options to create an article in itself. If you search the web you can find plenty of articles on it, and I might even write one myself to add here sometime.
If photographing a solid object, make sure you use a large depth of field (small aperture) to get everything in focus. If the edges of the subject are blurry due to not being in sharp focus, this can make creating a well defined selection of only the subject very difficult.
For subjects that do not have a well defined edge, such as something that is fluffy, or semi-transparent, then you are best off using a specialist masking tool. Software like Topaz Remask, onOne Perfect Mask, or Vertus Fluid Mask all have tools for extracting tricky subjects from their surroundings.
However, even with the use of specialist software, creating a good mask of a difficult subject will take quite a bit of time. Particularly if it's your first time using the software.
Once you've extracted the subject from the background, it is then very easy to drop in a pure white filled layer behind them.
Editing - blowing out the background
I'm pretty sure I've covered this before in a different article, but it won't hurt to repeat it here. If you have a photo where the background is almost but not quite pure white, then turning it pure white in editing software is pretty simple.
Note that this technique will only work where your subject is brighter than the background. If the background is darker than the subject, then you will not be able to blow it out to pure white using this technique without also blowing the subject out to pure white.
The greater the difference in brightness between the subject and the background, the better results this technique will give.
There are three tools that I use: White color fill layer; Threshold adjustment; and Curves adjustment.
Image before editing
Color fill layer
A white color fill layer can be used to manually paint white over areas of the background that should be pure white but are not. Whether you use the mask of a color fill layer, or just paint white onto a standard layer, the result is the same.

I used a white color fill layer, then painted the mask white around the edges and added a gradient to the bottom
This is not really suited for painting close to the edges of the subject. But it can work very well at filling in the wider areas of the background, such as the corners.
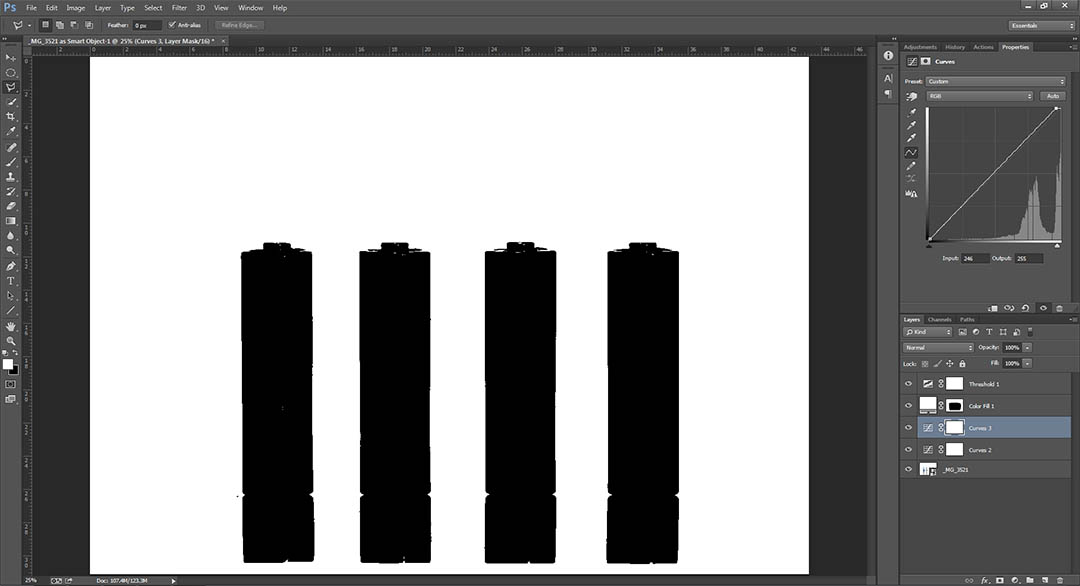
Threshold adjustment
The Threshold adjustment is a tool we can use to ensure that our background is 100% pure white. When you create a threshold adjustment layer in Photoshop you are shown a histogram of the image, with a slider at the bottom.
The threshold adjustment will change the display of the image so that all the tones to the left of the slider are rendered black, while everything to the right is rendered white.
By moving the slider all the way to the right edge of the histogram, we tell the software to render anything that is not pure white as black. This makes it easy to see any parts of our background that are not pure white, but should be.

The threshold adjustment layer shows that only the parts painted white in the previous step are actually 100% pure white
Curves adjustment
The curves adjustment is a great tool for brightening the background around the edges of the subject. Create a curves adjustment layer below the threshold layer, and then adjust the white point until all the area surrounding the subject appears as white.
You can now hide your threshold layer. If the subject has been brightened too much, use a layer mask for the adjustment to reduce or remove the effect over the subject.
If the background is darker on one side of the subject than the other, I would suggest using two curves adjustments. This way you avoid overly brightening the subject on the side of the image that does not need brightening as much.
Create one curves adjustment suited for blowing out the background around the subject on the brighter side. Adjust the layer mask as necessary.

Curves adjustment to blow out most of the background without effecting the batteries too much
Then create another curves adjustment, this time suited for blowing out the background on the darker side of the image. Fill the mask for this adjustment in black, then paint it back in, only where it is needed.
With the secondary curves layer added to blow out the rest of the background, we can see we are also loosing some detail on the tops of the batteries

With the Curves layer mask edited to only affect the areas of background that weren't already blown out
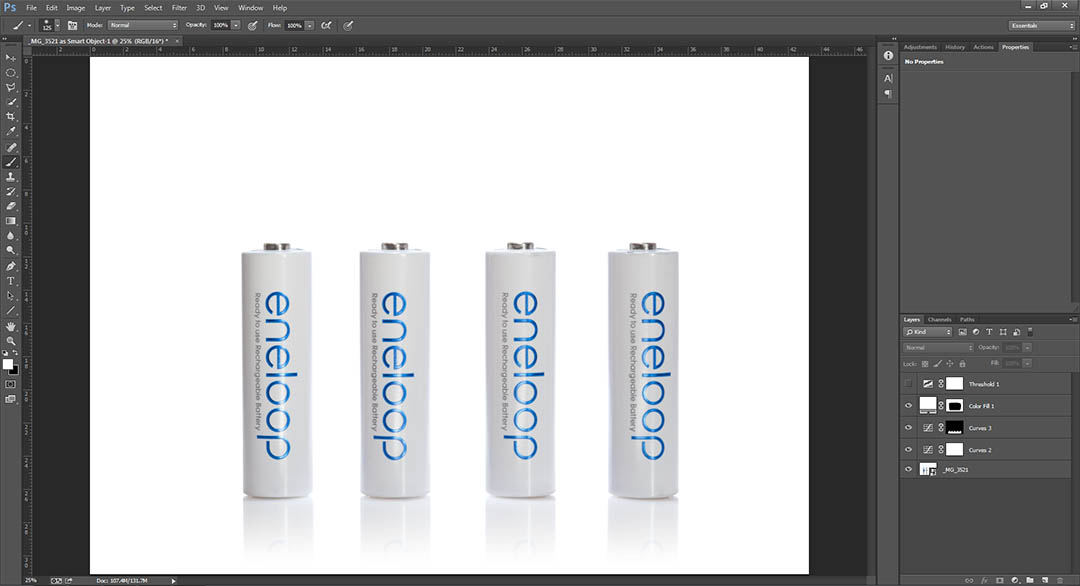
Image with Threshold adjustment layer hidden
So, which method is best? It all depends on what you're going for really. My personal preference tends to be a pure white background where the subject has some shadow under it. Without the shadow, the subject is just floating.
For this reason I tend to prefer the basic setup, then using a curves adjustment(s) to ensure all the background is blown out white.
You can add shadows to the subject using the other methods. If you've extracted the subject from the background, then that makes this easier. You can paint your shadow on a layer below the subject layer, and not have to worry about the shadow overlapping the subject.
If you're photographing the subject on a white surface lit from beneath, or with the subject suspended above the background, then adding a shadow is trickier. Typically you want to paint in a soft shadow, but you also need to avoid painting too much shadow over the subject itself.
The easiest way is to paint the shadow as you want, ignoring that it is going over the subject. Then use a layer mask to hide the shadow where it goes over the subject.
Finally, while a pure white background works well for catalog and web usage, it is not the only way to photograph products. Sometimes a grey or black background might work better. Or a background with a gradient.
But for the times when you do want a pure white background, and are also working with a tricky white subject, then hopefully the tips above will come in handy.


Hi, I just wanted to say that this post helped me massively. I was struggling to get this right for white and colourless/clear products and was utterly blocked.
This allowed me to (finally) figure out how to get this right and I was able to move forward and get my stuff photographed. I’ve had a backlog to get through and was just frustrated and everything was always washed out!
It’s such a relief that I’ve finally managed to get this technique right. Thank you!