Slit scan object photography how to
Slit scan photography is where a photo is taken through a small slit, with either the slit moving across in front of the sensor / film, or the film moving across behind the sensor. It can produce some very interesting images, there is a long list of examples here: An Informal Catalogue of Slit-Scan Video Artworks and Research.
Some of these techniques can be very difficult to achieve, however a slit scan of an object rotating on a turntable is something you can do at home with a standard digital camera.
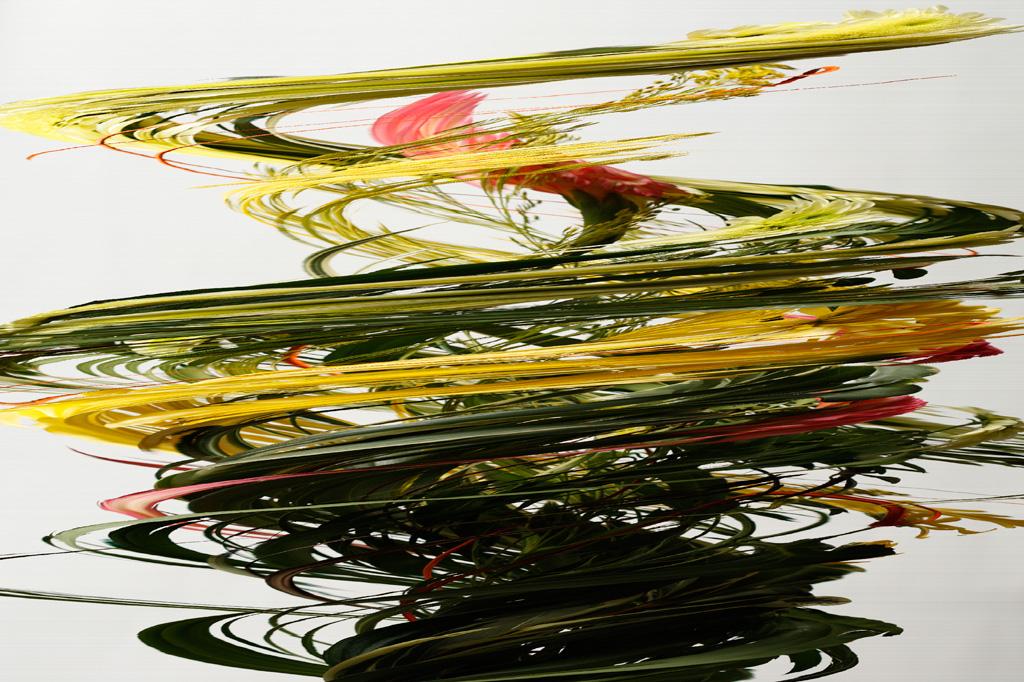
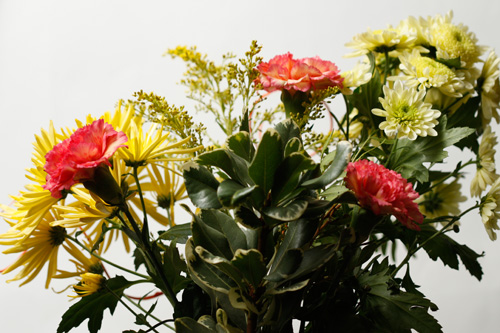
The above photo is a slit scan image of flowers rotating on a turntable. Below is one of the frames used in creating the above image, you can see there is quite a difference!
The process involves putting your subject on a turntable, turn the turntable ever so slightly and take a shot. Turn the turntable a small bit more and take another shot. Repeat until you've moved the turntable through 360 degrees.
You can purchase motorized turntables and triggers for your camera to make the photo taking process automatic, e.g. The Time Machine Streak Photography. However, in this article we'll be looking at doing it the manual way.
After taking all the photos, you then need to process all the photos to take a consecutive slit from each photo and combine them into a single image. I'll cover both manual and automated ways to do this.
Setup and taking the photos
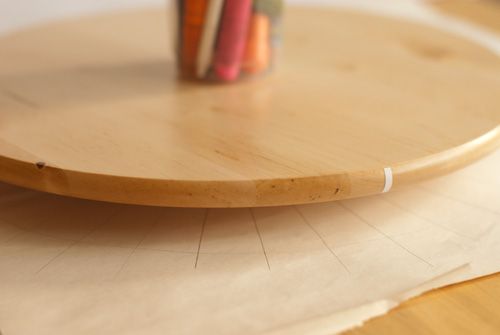
So, to start off with, you'll need a turntable. A Lazy Susan turntable can be purchased quite cheaply and works well for this.
You only want to rotate the object a small amount between shots. The way I do this is by putting four small pieces of sticker on the edge of the turntable, 90° apart. Each piece I color in a different color. This makes it easier to tell when you've rotated the subject a full 360°.
Then I just rotate the turntable a small amount between each shot by hand. Because I'm doing it by hand with no guide, the amount of rotation varies slightly from shot to shot, but this doesn't seem to be much of a problem in the final image.
If you want to be more accurate you can get a large sheet of paper, then draw round the top of the turntable on the paper. Then use a protractor to draw a large set of degree lines emanating out from the center. When finished place the paper underneath the turntable. Using the marker on the edge of the turntable, this makes it much easier to turn the turntable a set amount of degrees each time.
Example with 10° lines - you'll probably want lines every 1° or 2° for practical usage.
For lighting your subject, you are best to use a controlled light source. If you use sunlight, the light will change while you are taking the photos, which will show up in the final image. So photographing at night, or during the day in a room with the curtains closed is best.
Use either flash or continuous lighting to light the subject. If using flash make sure you are starting off on a new set of batteries, or power the flash unit from the mains. When the batteries in a flash start to run out of power, the light from the flash reduces slightly until the flash demands a new set of batteries. So if your flash runs out of batteries part-way through a shoot, it will probably show up in the final image as a sudden change of brightness.

The photos for this image were taken using a mixture of flash and natural light. As the day wore on, the natural light got less. This leaves a visible transition between the last photo of the rotation and where the image sequence restarts for the next rotation.
You don't want the camera to move at all, so make sure it is attached tightly to a tripod. Use a remote shutter release to trigger the camera, so you don't have to touch the actual camera when taking the photos.
Set the camera to use manual focus, so it won't be re-focusing the lens for every shot. Put the camera in Manual exposure mode, and make sure the white balance is not set to auto. We want to make sure that nothing changes in between each image other than the rotation of the subject.
Set the camera to JPEG, high quality (fine) and medium file size. The reason we do this is that we'll be taking a lot of shots. We also want to take them in relatively quick succession. For this sort of photography there seems little point in filling your hard-drive with several hundred RAW files when JPEG will work just as well.
Also, on some cameras the buffer can fill up when shooting RAW files quite quickly, so you have to wait for the images to be written to the memory card before you can take any more. When shooting JPEG you are unlikely to have this problem.
Take a few test shots, a good idea is to take 4 shots of the product, rotating it 90° between shots. Then review the images on the camera's LCD, flipping between them, checking that the subject does not move off to one side as you rotate the turntable. If it does, then it is not properly centered on the turntable. Adjust the subject's position as necessary, and then try again.
Now start taking the shots, and rotating the turntable a small amount between each shot. You want to make sure that you take a full 360° worth of shots, so when you think you are back where you started, it is a good idea to continue rotating the turntable and taking shots just a little longer for some overlap.
You can delete any overlap shots on the computer, but it is far better to have to do this than to think you've shot a full 360° worth of shots and then find that actually you were a little short.
How may shots do I need to take
The number of shots you need to take depends on both the final image size you want, and also how many rotations of the subject you want to appear in the final shot.
The example at the top of this article was comprised of 638 images for a full 360° rotation. The height of the image was 2056 pixels. Using 1 pixel slices of each image, this means that final image contains a total rotation of 1160°.
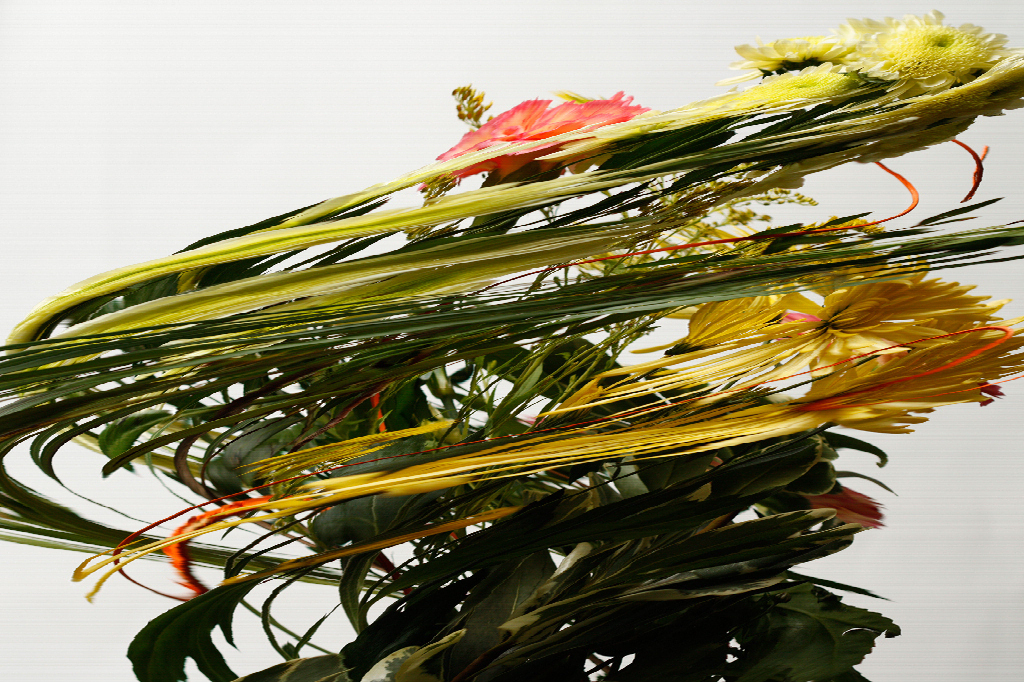
If we use a smaller image size e.g. 682 pixels high, and again use 1 pixel slices, we end up with an image that shows 384° of rotation in total:
The reason for using 1 pixel slices, is that with larger slices you tend to get a staircase effect. For example, the following image uses 73 images with an 8 pixel size slice:

Even using 2 pixel size slices, I find the resulting image has too much of a staircase effect for my taste.
Processing the shots manually using Photoshop (or similar image editing software)
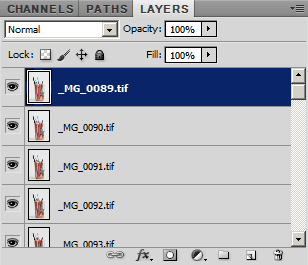
The first thing you need to do is load all the images as layers into a single document.
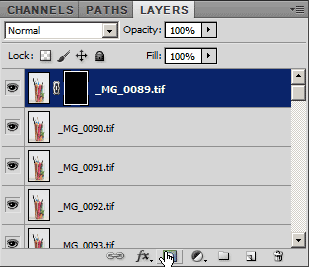
At the top of your subject, select a 1 pixel high row. (Photoshop has the Single Row Marquee Tool for this).

With the top layer selected, click the create mask button to create a layer mask based on the 1 pixel row selection.
Ctrl-click the layer mask thumbnail for the mask you've just created.
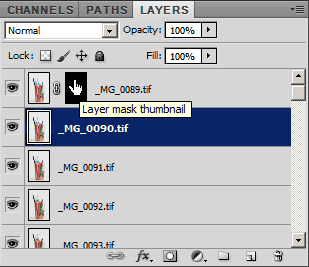
With the second layer selected, click the create mask button.
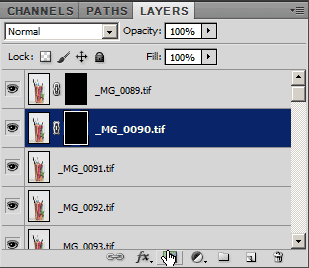
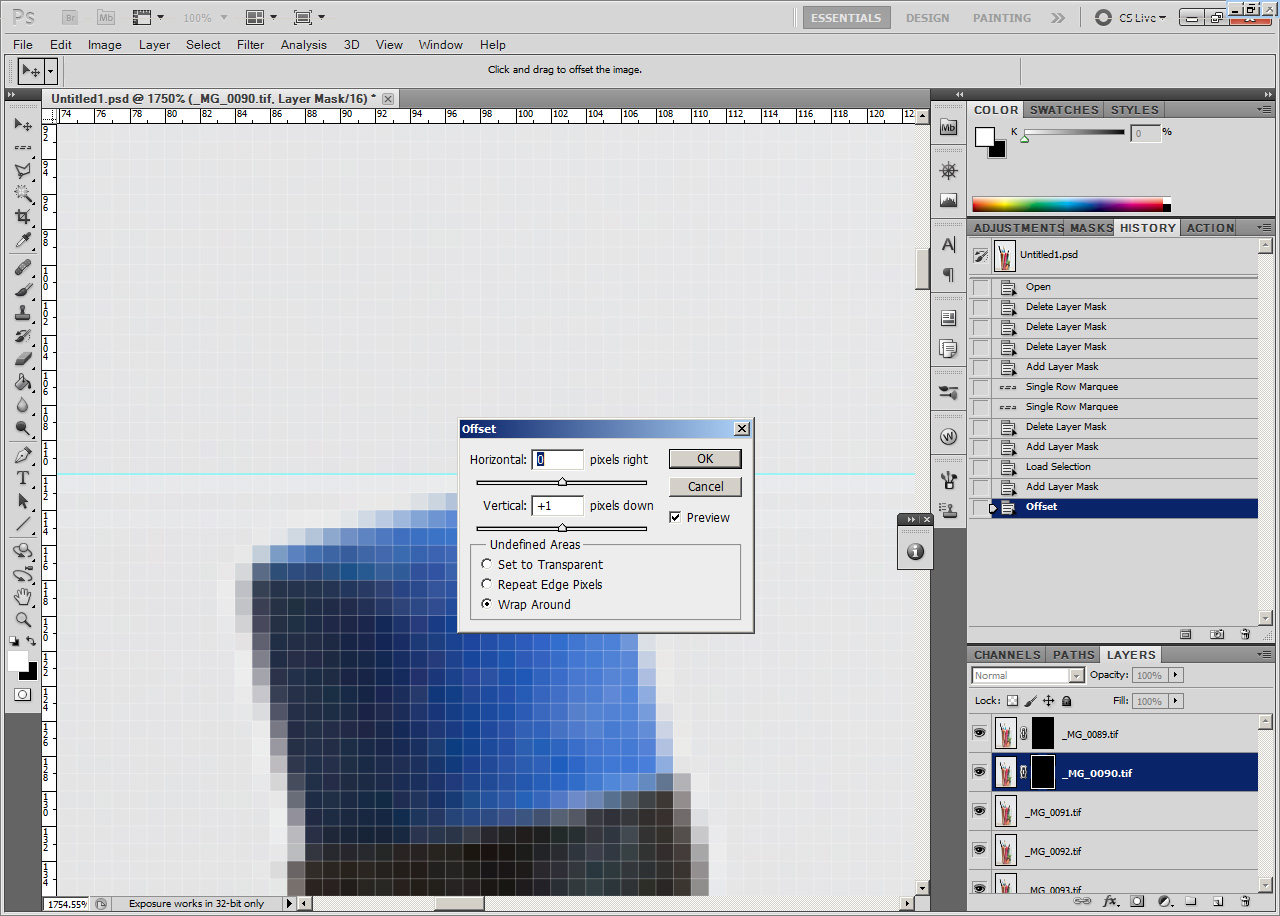
With the mask for the second layer selected, go to Filter > Other > Offset. Change Vertical to +1 and make sure that wrap-around is ticked. Press OK. This will shift the row of masked pixels down by one.

Now repeat steps 4-6 for all the other images. Ctrl-click the mask you've just created, create a mask for the next image down, then offset the mask down by 1 pixels. (In Photoshop you can press Ctrl+F to repeat the last filter so you don't have to go into the filter menu every time to apply the offset filter). Keep going until you reach the bottom of the image layers and the image is complete.
Processing the shots automatically using a script
Now, obviously this is very time consuming, but thankfully the process can be automated. Photoshop has scripting abilities, likewise with GIMP, and I am sure many other image editing programs have scripting abilities as well.
For the process of this article however, I have written a rather basic windows script that uses the free software ImageMagick. Download and install ImageMagick, then you can download the image slicing script here: image-slicer.cmd. (For windows only I'm afraid - if you would like an equivalent for a different operating system, or have any trouble, please let me know).
Edit June 2012 - Please note I have now produced a version of the script that should work for Mac and Linux users: image-slicer.sh. Unfortunately it lacks the drag and drop functionality of the windows version, so you will need to use the terminal to execute the script. Instructions are available in a video here: How to use the image slicing script to create a slit scan photo (Mac & Linux version).
Edit March 2017 - Updated versions of the script to work with ImageMagick 7: Mac / Linux; Windows.
Make a folder that contains all the images of the rotation. The files should be JPEGs (ImageMagick sometimes crashes with TIFFs), and there shouldn't be any non-image files in the folder. In Windows Explorer, click the folder of images and drag it on top of the imageslicer.cmd file.
A black windows command prompt window will pop up and start processing the images. It may take quite a long time until it is finished.
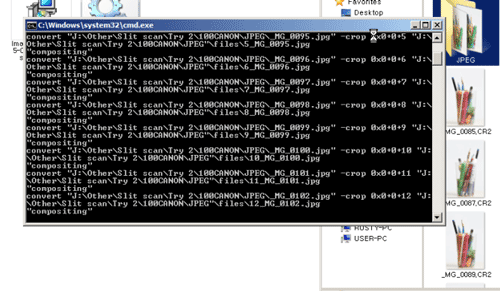
When the script finishes running, you'll find that inside your folder of images it has created a new folder named 'files'. Inside the files folder you'll find a series of images, each one with one more slice added. The last image in the folder is the one that you'll want. The other images you can delete, or they can be used to create an animation.
This video demonstrates the above process:
And here is an example of an animation created using the files:
If you have a video capable camera, in theory it should be possible to take a video, extract the frames from the video, and then run the same 1 pixel slicing method on the extracted frames. However, I have not tried this.
Creating slit scan photos like these is not likely to be a technique you'll want to employ often, but it can be fun and create unusual images. It can take quite a long time, for example to take the 638 shots for the flowers image took me about an hour. Processing the images can take even longer, and uses quite a bit of computer power.
If you don't mind playing with scripting the image processing yourself, or compositing the images manually, there are also many other slit scan effects you can try. You can do a horizontal slit scan (as opposed to vertical), a diagonal, or try an image with top and bottom static, but the middle section as a slit scan.


This looks excellent! However, when I drag and drop the folder onto the .cmd script, nothing happens. No icon hover is displayed or anything. Also, the .cmd script just opens in Notepad when I double click on it. Any help??
Hi Evan
I’m not sure why it’s not working for you. I’ve sent you an email with a different way to run the script that should hopefully give an error message to give an idea of what the problem is.
Dave
Thx a lot for the tutorial and the script! 🙂
But somehow i’ve got the same problem as the first commenter.
I’m using Win7 on a 64bit Machine, so nothing unusual i guess.
I have Image Magick installed, downloaded the script and followed along to your tutorial.
But when i drag the folder with the images onto the .cmd-script, nothing happens.
The only thing that actually happens is that window copies the image-folder into the directory of the .cmd-script.
Since i’ve been looking around for a slit scan related script like that for ages – if you could help me out that’d be so great! Thx! :))
Hi Stefan
I meant to update the article with an alternative way of running the script on Windows, but completely forgot. I’ve added that information now. If you scroll up from this comments section, the piece between the two videos describes a couple of potential solutions.
Try just renaming the cmd file to .bat first (thanks to Evan for letting me know of that solution). If that doesn’t work, then try the method of running it via the command line. If that gives you an error, you can let me know what the error says and I’ll see if I can work out from that what the issue could be.
Regards
Dave
thanks for the tutorial and script!
im wondering if there is an easy to change the setting of your script fromt top to bottom to something else,
for example
left to right
bottom to top
many thanks
sept
Hi Sept
I think it should probably be possible to modify the script to do that, but I will need to spend some time to see how it needs to be modified.
In the mean time, I think you could probably replicate the effect by rotating all the images. If you want to start from the bottom, just rotate all the images by 180° before you run the script. If you want to go from side to side, rotate the images by 90°. I haven’t tested that, but I think it should work.
Regards
Dave
hello
that is a smart workaround. thanks for the idea.
also, i just tried using time displacement in after effect and the result is fairly similar. there is more control but its more difficult to use and takes longer to render.
thanks for sharing
Hola Dave,
Thanks for the tuto , this is very interesting, but I’ve got a problem with the script mage-slicer.sh (and the link for sending you a message doesn’t work). The message error was:
./image-slicer.sh: line 31: identify: command not found
./image-slicer.sh: line 32: identify: command not found
Any idea?
Regards
Yeut
I Dave,
This tutorial was so useful!
but how i can modify the script? Is there any tutorials about “create or modify scrypt” around the web?
Thanks
Hi Vincent
You can open the script file to edit it using any text editor. With regards to modifying it, for Windows you want to search for something like ‘windows batch scripting’. For Mac / Linux, search for ‘bash scripting’ or ‘shell scripting’.
ImageMagick (the program used to modify the images) has a massive amount of different things it can do, you can read about the different commands on the ImageMagick website: http://www.imagemagick.org/script/command-line-tools.php
Hope that helps
Dave
I don’t know why, but in “files” pictures are not continuos, so I have to delete some of them (which are “jumped” between movement of flower). It’s hard to explain, but I hope you understand. Sorry for my english
Hi,
This is a great thing you guys have worked up on. I am glad i came across this video.
I followed the steps as suggested in the video however, when i copy the folder on the image slicer the command prompt window appears and nothing happens.
It shows “identify is not recognized as an internal or external command”
couldn’t detect Height and width of the image.
If you guys can help me fix it up that would be a great help.
Hi Megh
It was because ImageMagick has been changed, I’ve added an updated version of the script to the article now, which should work okay with the newer versions of ImageMagick.
Cheers