Lighting setups for great portrait photos
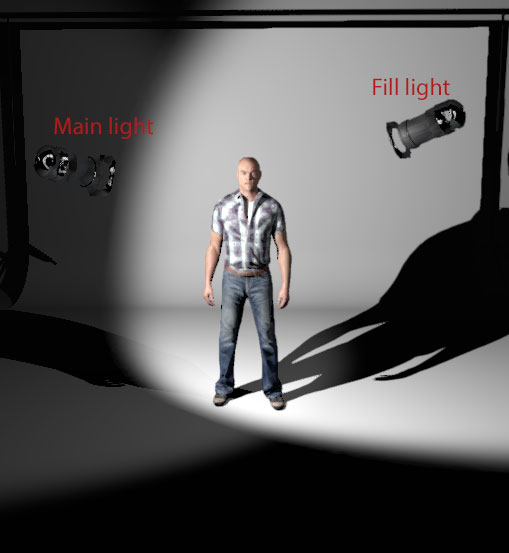
In this article we'll look at four different lighting setups you can use to create beautiful portraits. These techniques all involve using multiple off-camera light sources. For a couple of the techniques you may be able to get away with just using natural light and a reflector, but really these setups work best if you are using controllable light sources such as speedlights or studio lights.

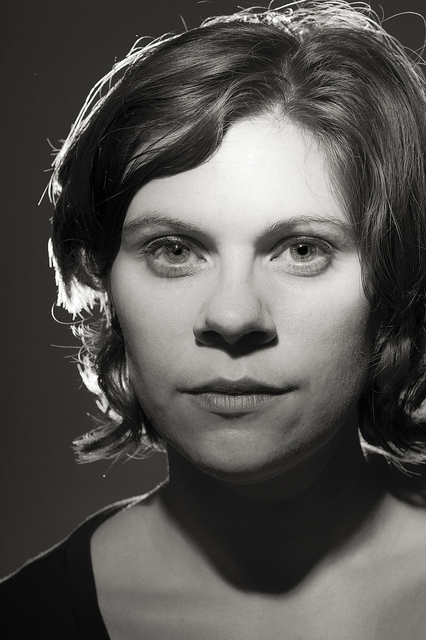
Butterfly / Paramount lighting
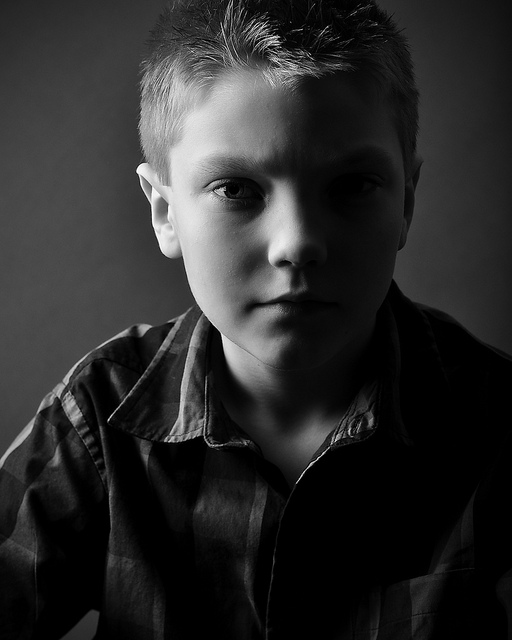
This lighting technique is often referred to as butterfly lighting as it creates a small shadow under the nose, similar in shape to a butterfly. It is often used for female portraiture, highlighting the cheekbones. It was a popular technique with Hollywood fashion photographers in the 1930s and 40s, hence why it is also known as Paramount lighting.
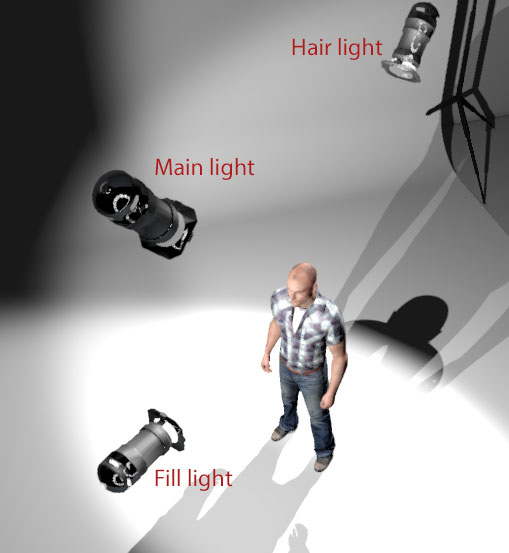
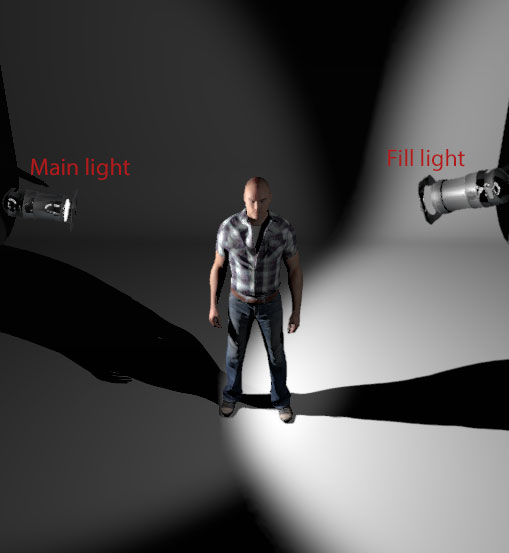
The main light is placed at a high angle in front of the subject, pointing down towards their face. For this reason it does not work well with subjects with recessed eye sockets, as it would cause the eyes to be in shadow. If you do find this to be the case, try lowering the main light a little or having your subject look up towards the main light more.

Portrait of Helena by Lizzie Harper on Flickr (licensed CC-BY)
A fill light (at a lower power than the main light) or a reflector is placed at around the same position as the main light, but lower down, approximately parallel with the subject's face. This fills in the shadows somewhat and reduces the strong contrast of the main light.
A hair light is often included in this setup too. This should be positioned high and behind the subject, lighting just the back and top of the hair. This gives the hair more of a sheen and can help separate the subject from the background.
Test by I .. C .. U on Flickr (licensed CC-BY-ND)
The subject should be looking in the direction of the main / fill lights to create the butterfly shadow under the nose.
If you position your main / fill lights off to one side at an angle, (and have your subject look off to that side), then this will result in the rear side of the head nearest the camera being partially in shadow. This may be wanted, but if not, then consider adding a reflector on that side to fill in the shadows.
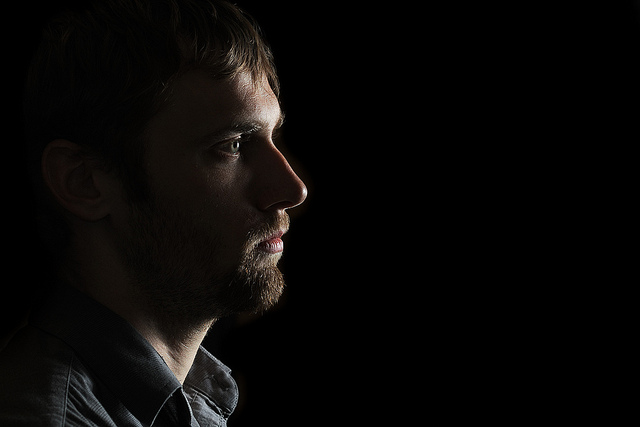
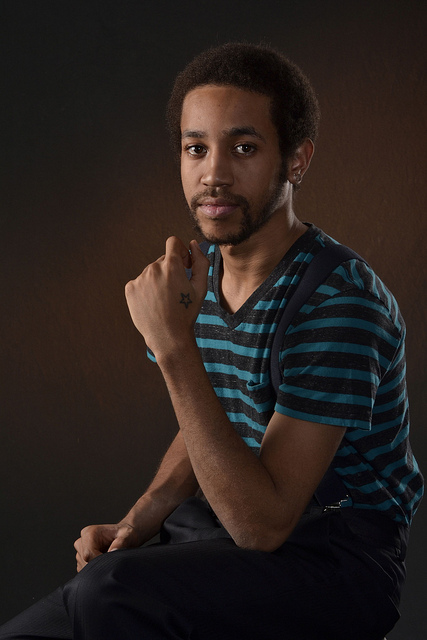
Profile / Rim Lighting
A portrait taken with the subject in profile and the use of rim lighting aren't interdependent, but they are often used in combination together. For this setup the subject is posed in profile, looking off to one side.
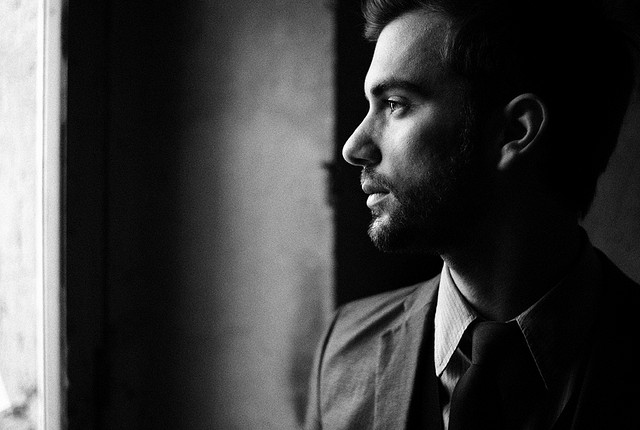
Visione by Daniel Zedda on Flickr (licensed CC-BY)
The main light is positioned facing the subject (so at 90° to the camera), or slightly behind the subject, so that it highlights the rim (outline) of the subject's face. It will also highlight the hair on the front of the head, and depending on how far back you place the light, the hair around the back of the head may be highlighted too.
A fill light is sometimes used off to the same side that the subject is looking in, but placed at an angle (e.g. 45° to the camera) so as to highlight the side of the subject facing the camera. Whether this is needed depends partly on whether you have the main light exactly facing the subject, or slightly behind them. The further behind the subject the main light is, the smaller the area of the face is that will be illuminated.
Corey - 5 minute portrait by Illusive Photography on Flickr (licensed CC-BY)
It is the rim lighting in this technique that really helps the subject stand out from the background.
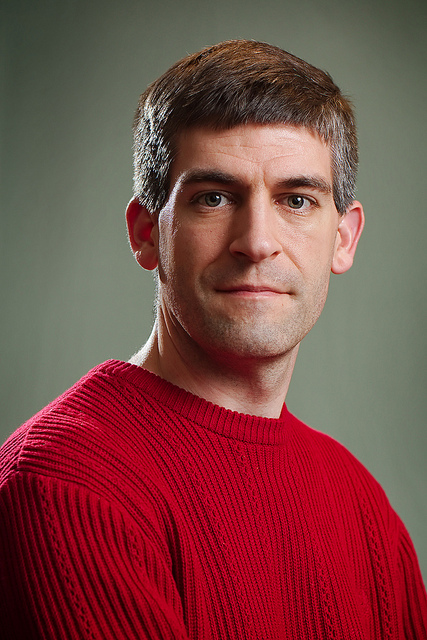
Rembrandt Lighting
Rembrandt lighting is named after the lighting often found in portraits by the famous painter. It produces a portrait with half the face in shadow, except for a highlight on the cheek.
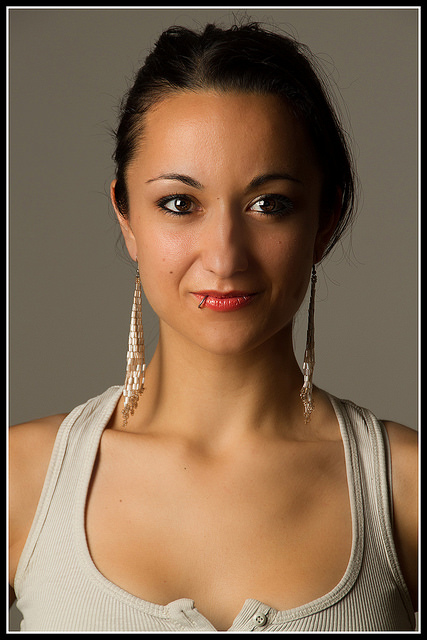
Foto Estudio: Rembrandt Light by Fernando Serer on Flickr (licensed CC-BY)
The main light should be positioned at an angle of about 45° to the side of the subject's face. In terms of height, it is typically positioned slightly higher than the subject, though the same height as the subject can work too.
A fill light or reflector is often used to fill in shadows on the opposite side of the subject's face. However, this is usually quite a weak light, in order to retain the dramatic shadows created by the main light.
Optionally, a kicker / rim light may be placed behind the subject, pointing towards the shadowed side of the subject. This creates a bright rim around the subject's shadowed side, adding definition to their shape, and separating them from the background.
Red Sweater 2 by Philip Dean on Flickr (licensed CC-BY)
For more on this technique, please see this article: Portrait Photography Lighting Styles – Rembrandt Lighting.
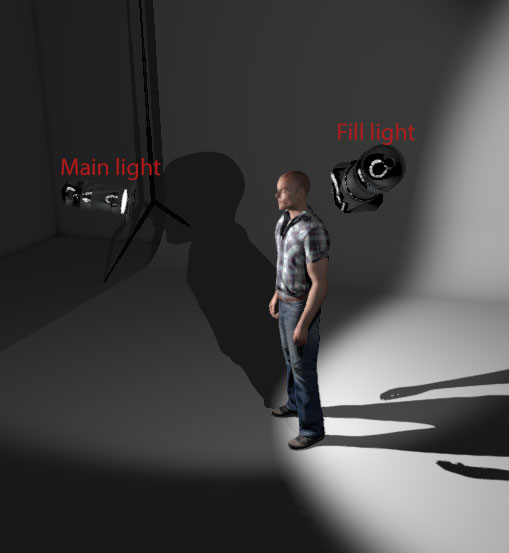
Split Lighting
Split lighting is a technique where half the face is well lit, and the other half appears in shadow. The main light should be positioned so that it is pointing at the side of the subject's face. It should be approximately the same height as the subject's face too.
Split Lighting by Enid Martindale on Flickr (licensed CC-BY)
Just a single main light can be used for a very contrasty and dramatic effect, or a fill light / reflector can be used on the other side of the face to bring back some detail on the shadow side.
As with Rembrandt lighting, a rim light on the shadow side of the subject can work well to bring out the subject's shape.
AndreaMooreP3Shot#1 by Andrea Moore on Flickr (licensed CC-BY-ND)
Lighting the background
With all these techniques there is one light I haven't mentioned - the background light. If you're shooting in a studio (or anywhere with a wall behind behind your subject), you'll probably want to add a background light too.
The most common look is a spotlight behind the subject, tapering off in brightness towards the edge of the frame. This could be a light positioned below and behind the subject, pointing up towards the background.
Vlad S. by Aurimas on Flickr (licensed CC-BY-ND)
If you're using a semi-transparent sheet background held up by a background stand behind the subject, then you can try lighting the background from behind. This makes it easier to get the exact size and shape of highlight you want as you can position the light wherever you want without worrying about it being visible in the image.
The closer the light is to the background, the smaller the highlight on the background will be. If you have to have the light positioned further away from the background, consider using a snoot or grid to focus the beam of light to give more of a spotlight effect. Zooming the head of a speedlight flash that supports this function will also have a similar effect.
With each of these portrait lighting techniques, there are numerous variations. You can add or remove fill lights, rim lights, and background lights. You can adjust the ratio between the main light and the fill light so shadows become brighter or darker.
You can over-light a subject for a high key effect or under-light for a low key portrait. You can add colored gels to your lights. You can use harsh light, or very soft diffused light, or a mixture of both. You can use very directional lighting that only highlights a small part of the subject.
These four lighting techniques should give you a good base for the overwhelming majority of portraits. It's then just a case of tweaking to get the exact look you're after.


I would like to learn more about the lighting photography technique