Single vs. Continuous – Camera Drive Modes Explained
On the vast majority, if not all cameras, when you press down the shutter button, the camera will just take a single photo. However, you can change this behavior by using the camera's drive mode setting.
The drive mode lets you change the rate at which the photos are taken. In this article we'll look at the different drive mode settings, and when you are likely to find them useful.
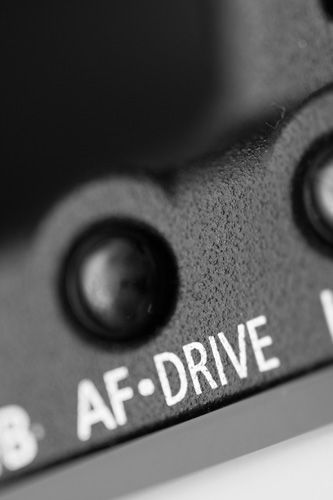
Single
Single shooting is the standard drive mode of all cameras. It means when you press the shutter button, the camera will just take a single photo.
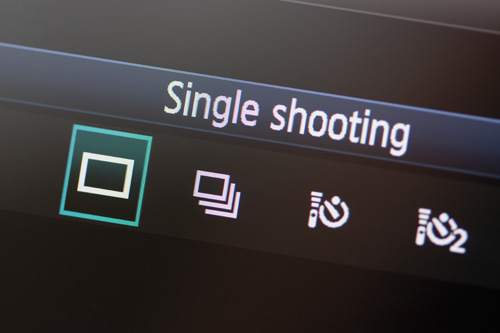
This is most useful for portraits, street photography, and most general photography. When you don't want the camera rattling off a series of shots that will look exactly the same, single shot is a good choice.

Portrait of Joseph Muscat by blurredfoto on flickr (licensed CC-BY-ND)
Continuous
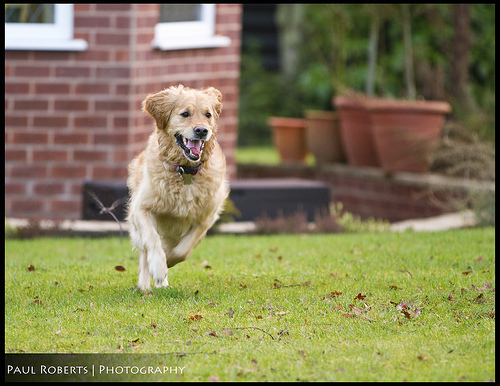
Continuous shooting drive mode is where you can hold the shutter button down, and the camera will continue to take shots until you release the shutter button. It is great for capturing a stream of shots of fast action, such as sports and some wildlife photography.
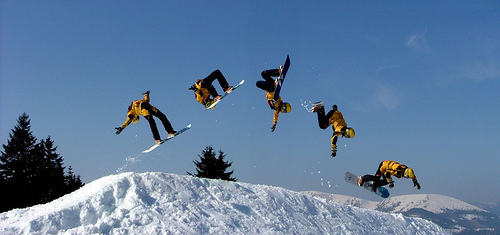
This guy is only 13, stylish jump 🙂 by MunsterNet on flickr (licensed CC-BY-SA)
Another time when the continuous drive mode can be useful is when bracketing shots. For example, for HDR and some landscape photography. If you want to bracket your shot, you can set the camera to use exposure bracketing and also set the drive mode to continuous. Then press and hold the shutter down. The camera will take the three bracketed shots in quick succession, and then stop. Much faster and easier than having to press the shutter button three times.
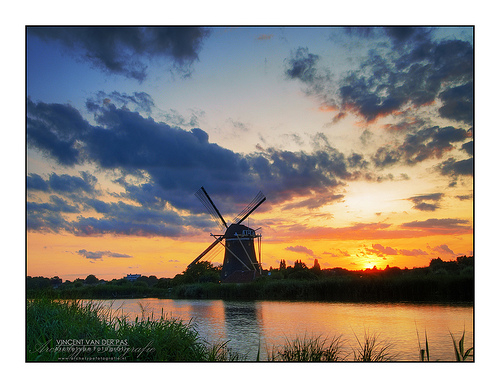
HDR Sunset @ Windmill 'Prinsenmolen', Rotterdam by Vincent van der Pas on flickr (licensed CC-BY-SA)
Many cameras offer two different continuous shooting modes - Continuous Low and Continuous High. These refer to how quickly the camera takes photos when the shutter button is held down.
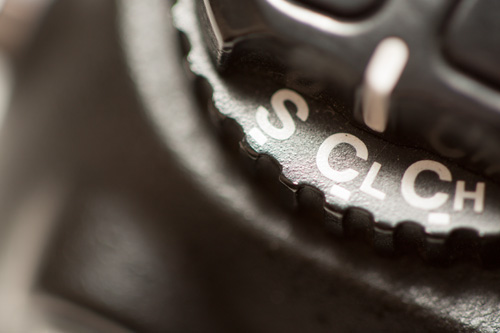
Often the continuous low drive mode will take 3 shots every second.
The continuous high drive mode, on the other hand, will shoot at the camera's maximum speed. This varies between camera models, 5-7 frames per second is reasonably common, though it can be higher. For example, the Sony A9 can shoot at 12 frames per second.
Limits to continuous shooting
Although many cameras can shoot continuously, the maximum speed they can shoot at can normally only be achieved for a short period. If you are shooting RAW files, they take up quite a lot of space. In continuous high drive mode, the camera captures the images faster than it can write them to the memory card.
After a couple of seconds of continuous shooting, the camera will have recorded so many large images that it may need to pause while it catches up and finishes writing the images to the memory card. Some cameras lock up completely when this happens, others will continue to shoot, but just at a lower speed.
If you shoot JPEG, then you are less likely to have a problem. JPEG files are much smaller than RAW files, and so can normally be written to the memory card as quickly as the camera can take them. It does depend partly on how fast your memory card is though.
Autofocus and Auto exposure with continuous shooting
When using the continuous shooting drive mode, you also need to think about the autofocus mode you are using. If you are using single autofocus (one-shot AF), then autofocus will lock when you press the shutter, and stay locked at the same point for the entire burst of images.
If you are using continuous autofocus (AI Servo AF), then the camera will continue to focus on the subject as it moves throughout the burst.
The Chase is On by johnroberts2 on flickr (licensed CC-BY-ND)
So, if the subject is moving towards or away from you, or at an angle to you, then it is better to use continuous autofocus to ensure the subject is kept in focus as it moves.
If the subject is moving parallel to you, then it is safe to choose single autofocus.
Regarding auto exposure in continuous shooting mode, most cameras will lock the auto exposure when you first press the shutter button down. Then the camera will keep the auto exposure locked throughout the burst, until you release the shutter button. The camera does not change the exposure during the image sequence.
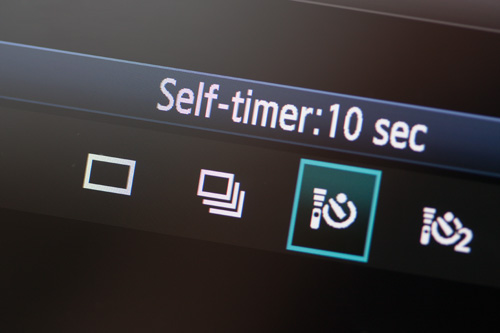
Self timer
The self timer waits a few seconds after you press the shutter button until the actual photo is taken. Most cameras offer a two second self timer and ten second self timer drive modes.
The traditional use of the self timer mode is to allow you to move in front of the camera, and include yourself in the photo. However, it is also very useful for reducing camera shake.
If you can rest your camera on a steady surface, such as a tripod, or a table-top, then you eliminate camera shake from holding the camera. However, the very process of pressing the camera's shutter button still imparts some movement to the camera, which could result in an image with some blur.
By using the self timer function, any movement or vibrations caused by pressing the shutter button will have dissipated by the time the camera actually takes the shot. This makes the self timer mode suitable for subjects where the camera will be mounted on a tripod (or a flat surface), and camera shake / movement needs to be minimized. For example, landscape photography, architectural photography, and night photography.
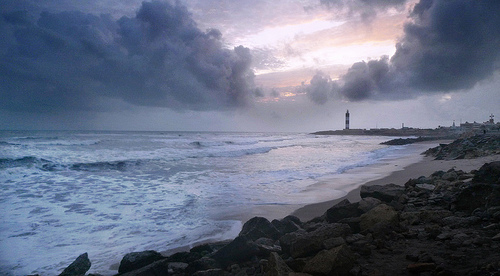
dwarka lighthouse II by nandadevieast on flickr (licensed CC-BY)
Mirror-up
Mirror-up, or Mirror lock-up, is sometimes found among the drive mode settings, other times it may be listed separately. It is only found on DSLR cameras, which use a mirror to give the view through the optical viewfinder.
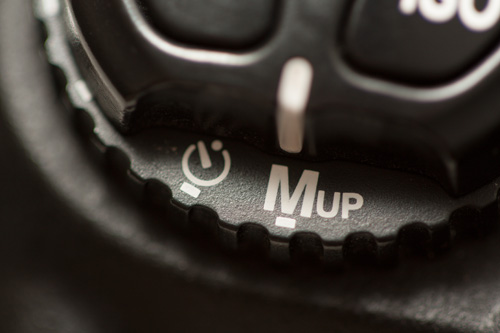
Normally when you take a photo with a DSLR, the mirror is flipped up out of the way of the image sensor. Then the shutter opens and the camera takes the photo. With mirror lock-up, when you press the shutter button, the mirror flips up, but no photo is taken. You then press the shutter button again, and the camera takes the photo.
The reason for mirror lock-up mode is that when the mirror flips up, it causes some vibration. So by pressing the shutter once to flip up the mirror, you can then wait a few seconds for any vibrations to dissipate before you press the button again to take the photo.
Mirror lock-up is only really useful if you are after the absolute best quality images your camera is capable of. You will also want to be using a remote shutter release, so you don't cause any vibrations by manually pressing the shutter button.
Generally mirror lock-up is used by fine art architectural and landscape photographers.
An equivalent (and actually even better) alternative to mirror lock-up mode with most modern DSLRs is to use Liveview with silent shooting enabled. With liveview, the mirror is already flipped up, and the shutter is already open. When "silent" shooting is enabled, the camera uses an electronic shutter to start the exposure (no moving parts so no noise or vibrations).
It is only DSLR owners that need worry about mirror lock-up for absolute best results. Other camera types don't have flipping mirrors, and so don't have any problems with vibrations from the mirror being flipped. I also want to emphasize that even with a DSLR, the vibrations caused from the mirror being flipped are very minor.
Bulb
Another one that is sometimes lumped with the drive modes, and other times included elsewhere, is Bulb mode. With bulb mode, the camera holds the shutter open for as long as you hold the shutter button down. Some cameras may also let you use one shutter press to start the exposure, and another to end it.
Bulb mode is suitable where you want a long exposure, normally over 30 seconds. Bulb mode is normally only found on more advanced cameras, such as DSLRs, SLTs, and Mirrorless cameras.
It is mostly used for capturing photos at night. However, you may sometimes want to take exposures over 30 seconds for blurring a moving subject, such as water or clouds. In which case bulb mode would be the one to use.
Bulb mode can also be useful when you are trying to capture a bright light source that you don't know the exact timing of. Examples being lightning and fireworks. Hold down the button to open the shutter, wait for the lightning or fireworks, then release the button to end the exposure.
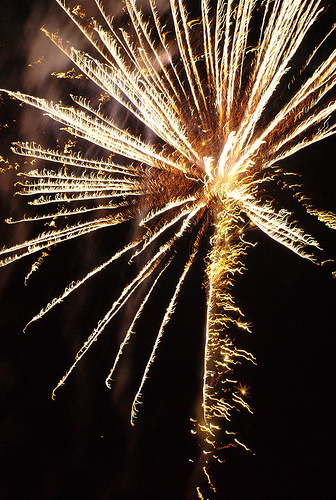
Fireworks 6 by Robbie Biller on flickr (public domain)
It must be reasonably dark when using this technique as otherwise you'll end up with an over-exposed photo. Luckily it normally is quite dark during storms or when fireworks are lit.
Knowing the different drive modes available is quite useful. Although you may be tempted to put your camera in continuous drive mode, thinking that you can just tap the shutter when you want a single shot, and hold it down when you want a burst of shots, this is easier said than done. Even if you try just to tap the shutter, often you will end up taking at least a couple of shots when the camera is in continuous drive mode.
So try to use the drive mode that is most suited for your subject. Most cameras make it pretty easy to change the drive mode, so it shouldn't be a problem to change from single shot to continuous shooting quite quickly if needed.


