How to use bulb mode for long exposure photography
Bulb mode is a special shooting mode that will let you take really long exposures. It allows you to keep the camera's shutter open for as long as you like (or until the camera's battery runs out). You're not likely to find it as feature of most point & shoot cameras, but it can be found on most more advanced cameras.
Most cameras that feature bulb mode allow up to 30 second exposure times in normal modes. This is more than enough for most situations. During the daytime a typical exposure time will be around 1/500s to 1/160s, a pretty quick shutter speed. But if you're out in the middle of nowhere at night, then a shutter speed of over 30 seconds may be necessary.
Night photography
Night photography is one of the most common uses of bulb mode. Most towns and cities are lit well enough that a 30 second exposure will be as much you'll need. But in some darker areas you may need to go into bulb mode (or raise the ISO) for a well exposed photo.
Shooting out in the country under the light of the moon, you may also find that you need over 30 seconds for a good exposure. This is particularly likely if the moon is not very bright.
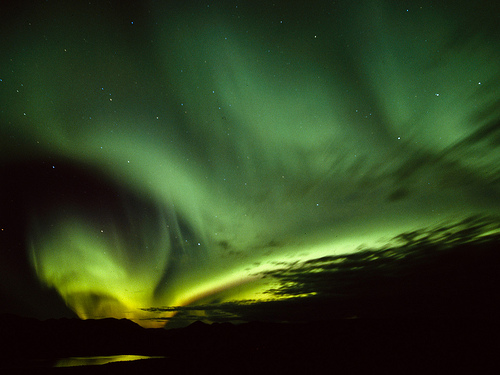
Fish Lake Aurora by Anthony DeLorenzo on flickr (licensed CC-BY-SA)
Star trails
Star trails can be captured using your camera's bulb mode. By leaving the shutter open, you capture the trails of starlight as the stars move across the night sky (or as the world rotates to be more precise).
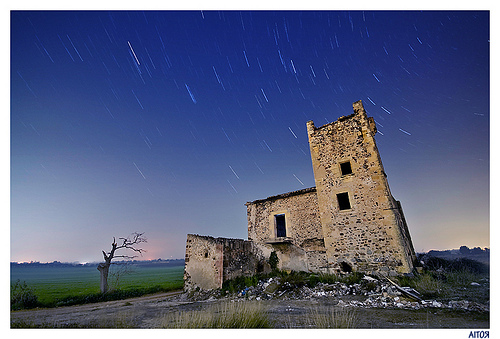
Startrails_7_ by Aitor Escauriaza on flickr (licensed CC-BY)
Bulb mode isn't strictly necessary for capturing star trails, you can use shorter exposures (normally 30s long) stacked in software. But bulb mode will let you get a star trail in a single exposure. Even if you do use a stacking technique, bulb mode will still be needed if you want to stack exposures longer than 30s each.
Water blurs
A long exposure can be used to blur moving water. Exposures over 30 seconds using bulb mode can give moving water a very smooth, almost mist like appearance.
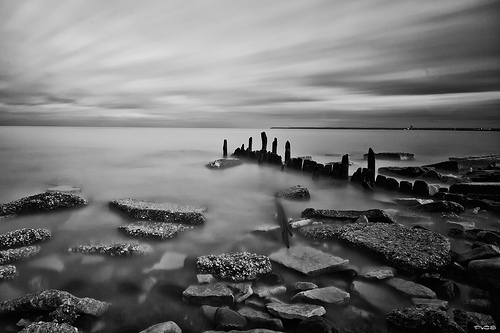
Shore of Ghosts (Explore) by CJ Schmit on flickr (licensed CC-BY-ND)
High speed photography
You may wonder how bulb mode, designed for long exposures, can be used for high speed photography? The way this is done is by taking the exposure in a very dark room, and relying on a flash to light the exposure. The duration of a flash burst is very short, normally shorter than the fastest shutter your camera can achieve. Since the room is dark for the rest of the exposure, the only light captured is from the very short flash burst.

Something Different #1 - High Speed Water Balloon by Luke Peterson Photography on flickr (licensed CC-BY)
This can be used for capturing high speed events, such as bursting a balloon, smashing a lightbulb, splashes and water drops, etc. The benefit of bulb mode over a standard 30s or less shutter speed is that with bulb mode you can open the shutter, trigger the high speed event, then close the shutter again. It doesn't matter if it took you 2 minutes or 1 second from opening the shutter to when you want to close it again.
Light painting
For more elaborate light painting photos, it can be useful to have an exposure over 30 seconds long. Bulb mode will allow you to light paint your photo for as long as you want.
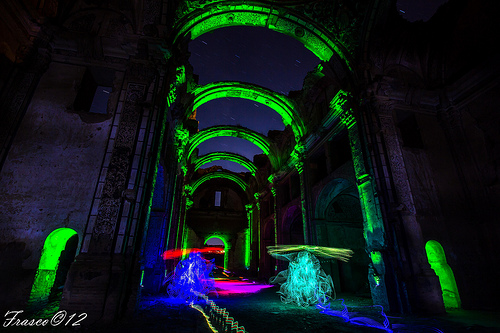
San Rafael by Fran Ramos. on flickr (licensed CC-BY)
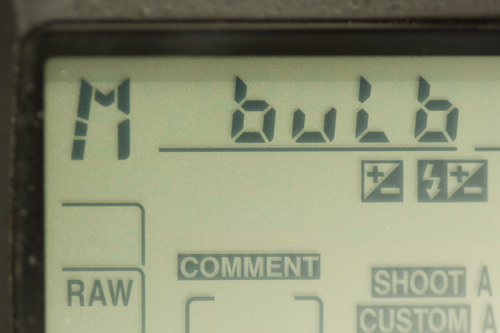
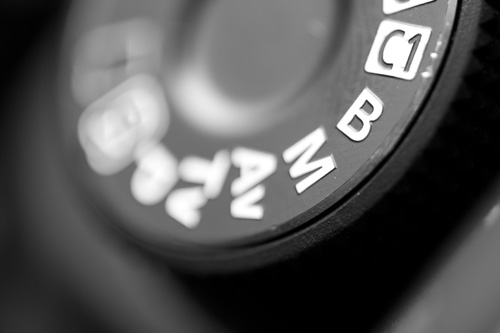
Setting your camera to bulb mode
The exact way to set your camera to bulb mode depends on your camera model. On most cameras it is a case of setting the exposure mode to Manual. (You might be able to use shutter priority, but I strongly recommend Manual mode so as to let you control the aperture used).
Reduce the shutter speed, and when you get to a shutter speed of 30 seconds (or whatever your camera's minimum shutter speed is), the speed below this should be 'bulb'.
Alternatively, on some camera models, bulb mode may be found as an exposure mode, or a drive mode. If you're not sure, check your camera's manual. (Tip: try downloading the PDF manual from the manufacturer's website, then you can search the document for 'bulb' to find the relevant info quickly).
Once your camera is in bulb mode, it will work one of two ways:
- The shutter will stay open for as long as you hold the shutter button down
- The shutter will open when the shutter button is pressed (and stay open). It will close on a second press of the shutter button
If you have a camera that works in the first way, then it is a very good idea to use a remote shutter release cable. This will let you lock the shutter button down, so you don't have to keep it pressed for the length of the whole exposure. Likely you will be shooting in the early morning or late evening when it is quite cold, so not having to keep the shutter pressed down means you can keep your hands a bit warmer in you pockets.
Because the exposure is long, you need some way to keep your camera steady during the exposure. A good quality sturdy tripod, or something like a brick wall, that won't move during the exposure is a good idea. You can try a cheap tripod, but they tend to vibrate a little in wind, which can ruin a long exposure photo.
Guesstimating exposure
Guessing the correct length of time to hold the shutter open for a good exposure can be a bit of trial and error. I'm sure if you used bulb mode regularly though, then you'd be able to make a good guess on correct settings based on your previous experience.
The way I like to get an idea of the needed exposure time is to first take a shot with a very high ISO and a wide open aperture. For example, ISO6400 at f/4 and 30s. I then adjust settings from there until I get a photo that is exposed how I want it. Let's say that the first test shot was too bright, and I find that ISO6400 at f/4 and 15s gives me a good exposure.
Now, using that information, I can work out what exposure time I would need with a lower ISO and smaller aperture. (For more information on working out exposure see Photography Basics – Exposure). An equivalent exposure to ISO6400 at f/4 and 15s would be ISO200 at f/8 and 32 minutes. (Exposure time increased by 7 stops due to 5 stop reduction in ISO and 2 stop reduction in aperture size).
There is a good reason for calculating exposure like this instead of just trying different long exposure settings until you get an exposure you like. Taking test shots with high ISO first allows you to get the exposure settings right, but without having to wait a long time to see the result of each test. So you can find the optimum exposure settings quickly.
Using the same example as before, if I had first taken a test shot at ISO200 at f/8 and 64 minutes (the equivalent of ISO6400 at f/4 and 30s), and then found the exposure was too bright, I have wasted over an hour for a test shot that could have been completed in 30 seconds. After that my camera might not even have enough battery left for another shot at 32 minutes.
Taking test shots at high ISO to calculate the correct exposure settings is definitely a good idea. For timing the actual exposure you can use a timer / intervalometer shutter release. But in most cases it's cheaper to just use your watch and manually close the shutter when you want the exposure to finish.
With such long exposures, if you go a few seconds (or even minutes for really long exposures) under or over the exposure you wanted, it won't make any difference to the image.
If you find that there is too much light for the exposure length you want, you can try using a small aperture (e.g. f/32), low ISO (e.g. ISO 50), and adding neutral density filters to cut down on the amount of light entering the lens.
Batteries
Keeping the shutter open for long periods of time really drains your camera's batteries. To make matters worse, long exposure photography is normally done in the night, when it is cold. This saps the battery even more (batteries don't work as well in cold conditions).
It is a good idea to bring a spare battery with you. Keep it in a pocket so that it is kept warm by your body. Before you start a long exposure, check the battery on the camera. If the battery is low, then the camera probably doesn't have enough juice to complete the exposure. You'll likely find the shutter clacks down and the exposure ends before you wanted as the camera has run out of battery. So if the battery is low, swap it for a fresh one.
You can buy battery grips for most DSLRs, SLTs, and some MILCs. These allow the camera to use two batteries instead of one, so the camera will last twice as long before it runs out of power.
Some cameras also have a power input, allowing them to be powered by an external power source (usually mains power). This isn't all that useful though, unless you're taking photos outside your house. (Or you don't mind lugging along a heavy power source with you into the countryside).
If your camera doesn't have a bulb mode, bear in mind that 30 seconds is long enough for most purposes. You can always give image stacking a try for longer exposures as well.


THIS IS AN EXTREMELY VALUABLE SITE FOR PHOTOGRAPHERS. MY CONGRATULATIONS AND GRATITUDE TO YOU. THE VERY BEST.