Product Photography Tips 2
Following on from the previous article on Product Photography, in this article I'll share a few more tips.
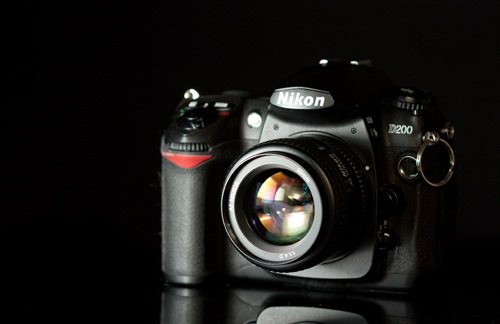
The products I've used for the example photos in this article are rather old and worn, but you are best off photographing a product when it is new, or at least still in good condition. Generally you'll want the product to look it's best, so make sure it is clean, wipe any dust off, and check for any scratches or blemishes.
For more dynamic product photos, try lighting your product from one side. This brings out detail and texture of the product, as opposed to the rather flat lighting you can get if you light your product straight on.
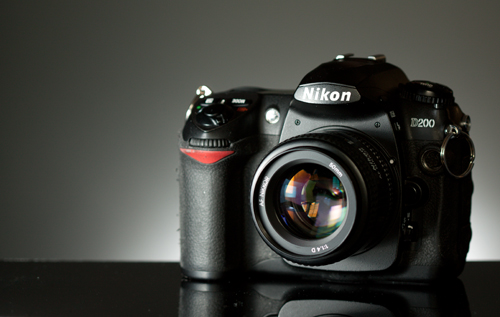
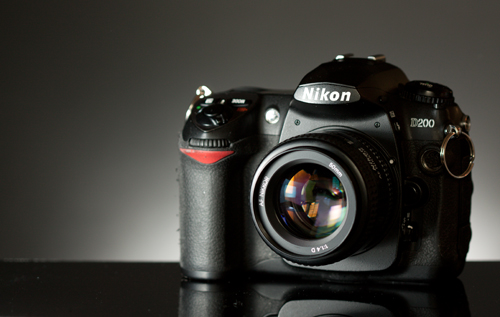
Adding a light on the background can work well to emphasize your product:
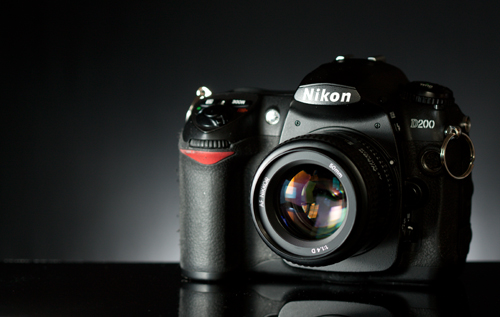
For a light coming up from the 'horizon', like a sunrise behind your product (as in the photo above), you can do the following:
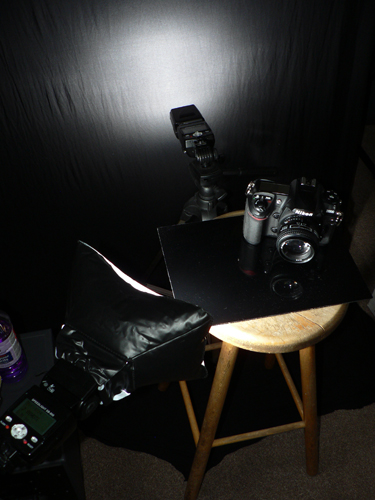
Set up for the photo above
Position the surface your product will be placed on so that it is higher than the bottom of the background. For this photo, the background was a cloth, and the perspex surface the product was placed on was on a stool.
Just below the surface your product will be placed on, position a flash unit or light. It should be placed quite near the background as we only want a small spread of light on the background. For this photo I positioned a flash on a tripod behind the stool.
If you are using a flash unit, you need some way of triggering it when you take a photo. The flash I used for this photo has a built-in flash trigger, so it fires automatically when the camera flash fires. However, you can buy these flash triggers separately, or use radio triggers.
Background - Card, Cloth, or Plastic?
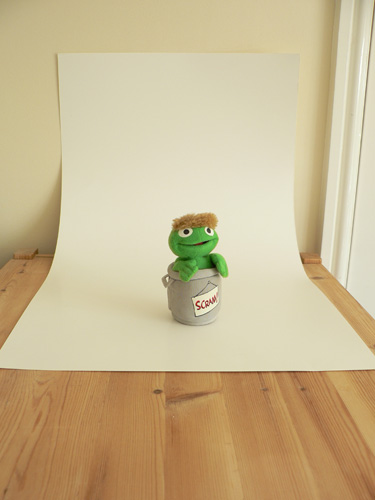
As a background behind your subject you will probably want to use something with a single color. You don't want the background to attract the viewer's attention away from the product. So a piece of plain colored cloth, card, or plastic works well as a background.
All can be picked up for not too much, and you may even have some around the house already. There are some differences between using cloth and more solid materials, such as card, as a background though, so let's look at those now:
Cloth
The main problem with using cloth is finding a support to hang it from. Draping it over some boxes, or a back of a chair can work okay.
You can also buy photographic background stands that you can clip or hang a cloth backdrop over. Obviously this has an additional cost, and the background stand can be quite bulky and take up quite a bit of room. It lets you stretch the cloth out much better than the back of a chair though, which helps to reduce wrinkles in the cloth.
Wrinkles in the cloth can be a big problem if you intend to have a highlight on the background. When you light the background, the wrinkles will show up. As it happens for these photos, this wasn't a problem (the photos above were taken with a cloth background), but it is a problem you need to be aware of.
To reduce wrinkles, make sure the background is stretched reasonably taut (but not too taut or the stretching will introduce wrinkles itself). Cotton materials are usually less susceptible to creasing / wrinkling than polyester. You can also try ironing the material before you use it, to iron out any creases.
Unless you're using a metallic cloth, cloth is not as reflective as a solid surface such as card. If you light a small portion of cloth, you'll often find the light spread is less than with card, as the cloth absorbs more of the light. It also means that less light will be bounced back off the background, towards your subject.
The way cloth absorbs more light than card can be an advantage or a disadvantage, depending on the look you are going for.
Cloth
Mountboard
Thin Plastic sheet
300GSM card
Card, Paper and Plastic
Card, Paper, and thin plastic sheets can easily be attached to a wall using tape or blu-tack, unlike cloth. You can also easily bend them into an 'infinity curve' by placing them on a table pushed up against a wall. An infinity curve just means there is no visible join between the floor and wall.
Paper is cheaper than card or plastic, though it can crease and rip much easier. Plastic is usually more reflective than card, and is difficult to find in large sizes (e.g. above A2).
Depending on the size of product you are photographing, it can be also be difficult to purchase card in large sizes, above A1. Large paper sheets are not available, but you can purchase large rolls of paper specially designed to be used as backdrops.
Keeping dust off surfaces
If you are photographing a product on a black surface, dust can be a particular problem. The dust shows up very visibly against the black. Plastic such as perspex is particularly a problem, it tends to build up static electricity, which attracts dust like a magnet.
Although it seems nearly impossible to get a completely dust free surface (unless you have a clean room available), there are a couple of ways you can reduce the amount of dust on the surface.
To do this, you want to reduce the static on the sheet. Wiping the surface with a used tumble drier sheet, or a cloth with a dab of Meths (Methylated Spirits) will help reduce static. You'll find you'll still have some dust on the surface in your images, but it should now be reduced to such a level that it can be removed in image editing software relatively easily.


