Why calibrate your monitor?
Calibrating your monitor is something that many people overlook. However, it is actually quite important. Most monitors will not display your photos (or anyone elses) correctly with their standard settings. Normally the screen is either too dark or too bright, but their can be color problems too.
Why calibrate your monitor
The main reason for calibrating your monitor is so that when you get a photo printed, it will turn out looking like it did on your screen. If your screen is too bright, then the photo might look good on the screen, but come out dark in the print. And vice versa if your screen is too dark.
For others viewing your photos on their screens, unfortunately there is nothing you can do to force them to calibrate their monitors. But having your monitor calibrated is still a good idea.
If you had an uncalibrated monitor that showed images too bright, then you might have a dark image that looks fine on your screen. Then you might send this image to someone who has an uncalibrated monitor that is too dark. For them the image will look really dark.
If you then calibrate your monitor, you might see the image is too dark, and brighten it up a bit. Now when you send the image to the person with a dark screen, it will still look a little darker than it should, but certainly not as bad as it did before.
Another benefit of calibrating your screen is that if you purchase a new screen in the future, then your photos will look the same on the new screen as they did on the old screen. (Assuming that you calibrate the new screen).
So calibrating your monitor is good for you viewing your images on screen, good for anyone viewing your images in print, and can also make improvements for others viewing your images on their screens.
How to calibrate your monitor
The simplest (but not most accurate) way to calibrate your monitor is by using a grayscale wedge, like below.

The wedge is split into equal sized blocks, and you should be able to distinguish between the white block and the previous slightly darker block. Likewise, you should be able to distinguish between the black block and the next slightly brighter block.
Generally you can adjust your monitor's contrast control to aid differentiating between the bright blocks, and use the brightness control to aid differentiating between the dark blocks.
It is important to note that the ambient light levels can have quite an effect on how your monitor appears to display tones. A low level of ambient light is best for an accurate display. Most professional monitors come with a hood that goes over the screen to cut down on the amount of ambient light that hits the screen.
It can take an hour for your monitor to warm up properly. However, I wouldn't worry about waiting 1 hour after switching on until doing any photo editing though. Typically the difference between the display after 5 minutes of being switched on and 1 hour of being switched on isn't that big.
The other way of calibrating your monitor is to use an external monitor calibration device. This is more expensive than calibrating your monitor by eye, but more accurate. Calibration devices also correct the color of the monitor.
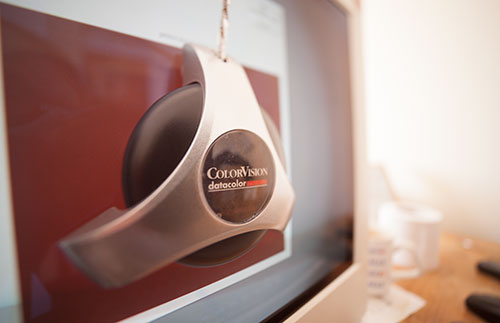
They come with special software that displays a range of color and tone patches. You place the device on the monitor, which measures the different tones and colors, and then compares the measured values to what the values should be. From this information the software generates a monitor profile to correct any problems.
This monitor profile is then loaded each time you start the computer. It is recommended that you profile your monitor regularly. Most calibration software will remind you automatically after a certain period of time has elapsed since the monitor was last calibrated.
Examples of monitor calibration devices are the Spyder series, ColorMunki, Pantone EyeOne, and Pantone Huey.
If you've spent money on a good camera, or spend time editing your photos, then it's well worth spending a few minutes to make sure your monitor is displaying tones correctly.


