How to fix blurry pictures
If you have a blurry photo, there is only so much you can do to remove (hide) the blur after the fact. Ideally, you want to be aware of what can cause blurry photos, and ensure you correct for this at the time of taking the photo.

In this article we'll look briefly at software methods for "fixing" blurry photos. Then we'll look at the main reasons why the photos come out blurred in the first place, and how to avoid getting blurry photos.
Software fixes
Unfortunately there aren't currently any methods available to really deblur a photo, but instead we can sharpen the detail that is there.
The way to sharpen an image depends on the image editing software you are using. In Photoshop Elements it can be found under Enhance > Adjust Sharpness while in the full version of Photoshop it is under Filter > Sharpen.
For a blurry image, try a strong setting with a reasonably large radius.

For this example image, which was a RAW file, I applied heavy sharpening and +100 clarity when converting the RAW file in Adobe Camera RAW. Then in Photoshop Elements I applied sharpening with a 64px radius and 29% strength.
There are also specialist sharpening plugins available that allow more control and can often do a better job, for example Topaz InFocus.
Adobe, the producers of Photoshop, have demoed a software feature that really does seem to fix blurry images, but this technology is not available on the market yet:
Fixes to prevent capturing blurry photos in the first place
There are five main reasons why a photo might come out blurry, let's look at these problems and how to prevent them.
Camera shake
This is the main culprit of blurry pictures. If your shutter speed is not fast enough, and you are hand-holding the camera, then small movements of the camera during the exposure may blur the photo.
You can usually identify blur caused by camera shake as everything will be smudged in the direction that the camera was moved. Sometimes you might also see "echoes" of the image if you managed to hold the camera reasonably still for part of the exposure, moved a tiny bit, then held the camera still again until the exposure ended.
To fix camera shake, there are a number of things you can do:
Use a tripod or some other form of support to keep the camera steady.
Use good technique for holding the camera steady (see The Proper Way To Hold Your SLR Camera).
Increase your ISO setting or use a wider aperture to allow for using a faster shutter speed.
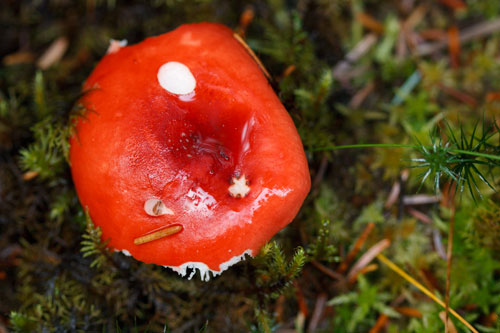
By increasing the ISO setting I was able to use a faster shutter speed and get a sharp shot of the toadstool handheldAdd more light to the subject to allow for a faster shutter speed (e.g. use flash).
If you are using a long focal length, switch to a shorter focal length and move closer to the subject. (The longer the focal length, the more any camera movement is magnified).
If your camera or lens support image stabilization, switch it on.
Take lots of shots in the hope that for at least one of them you manage to hold the camera steady for the entire exposure.
Out of focus
In an out of focus photo, normally your subject won't be sharp, but some other area of the image will be sharp. This happens if your camera focuses on the background, or some other object instead of your subject.

Resized for the web this photo doesn't look terribly out of focus, but you can clearly see that the focus was on the pots of pens and pencil case behind the subject, making the subject slightly out of focus.
There are a number of fixes for this.
If your camera supports it, select single point autofocus, and place the autofocus point over your subject, to ensure that the camera is focusing on the subject.
Point your camera directly at the subject and half-press the shutter button to focus. Now re-compose your original shot and press the shutter all the way down to take the photo. This is known as the
focus and recompose
technique.Move closer / zoom in so the subject is larger in the frame. This makes it more likely that the camera will focus on the subject than the background.
Sometimes there isn't enough light for the camera's autofocus to lock on to the subject. So increasing the light levels if possible might help.
You could be too close to the subject, and the lens can't focus close enough. This is more likely to be a problem when photographing small things that you need to get very close to. Use a different lens, or something like a close-up filter that allows the lens to focus closer.
If your camera supports it, you could use manual focus, and focus on your subject manually. For cameras that support Liveview with zooming on the LCD, this is a good way to get accurate focus. Manually focusing a lens on a camera using an optical viewfinder can be a bit more tricky though.
Subject movement
If your subject is moving, and your shutter speed is not fast enough, then you can get a photo where the subject is blurred but the rest of the image is sharp.

Moving Don & EP w/ Radoslav by Ctd 2005 on flickr (licensed CC-BY)
Again, there are a number of different ways you can fix this problem:
Pan with the subject, i.e. move the camera with the subject to keep the subject at the same place in the frame as they move. This will result in a nice photo where the background is blurred and the subject is sharp, emphasizing the subject's movement.
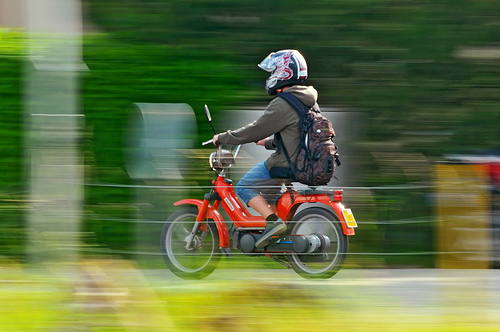
Panning test 1 by Tambako the Jaguar on flickr (licensed CC-BY-ND)Ask the subject to stand still (probably not practical in most cases).
Increase your ISO setting or use a wider aperture to allow for using a faster shutter speed.
Add more light to the subject to allow for a faster shutter speed (e.g. use flash).
Depth of field not large enough
If the depth of field is not large enough, this will result in a small plane of sharp focus across the image, with the rest of the image behind and in front of this plane being out of focus.
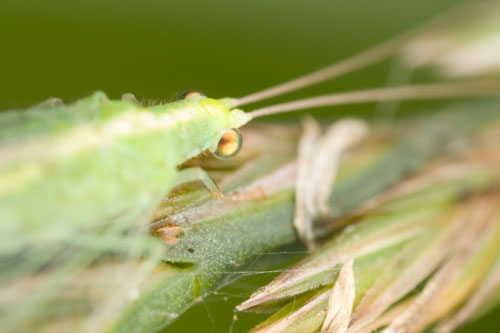
Shallow depth of field is a common problem in macro photography. From this angle only the eye of the lacewing could fit within the plane of sharp focus.
Sometimes this is what we want, but if you want as much of the image in focus as possible, here are some tips:
Stop down the aperture (use a smaller aperture) for a larger depth of field. Bear in mind that this reduces the amount of light that reaches the camera's sensor, so you'll need to adjust the ISO or shutter speed or add more light to the scene to compensate.
Use a wider angle focal length, keep standing the same distance from the subject, and crop the image later. Using a wide angle lens gives you a wider view, but also more depth of field. You can then crop the image in image editing software to get back to your original framing.
Take multiple images at different focal points, and then stack the images together in image editing software. This process is known as focus stacking, and is sometimes used for photographing small objects where depth of field can be very small, e.g. insects, jewelry. You can focus stack manually using layer masks, or use specialist software such as Helicon Focus
Blurry lens
Of the above, this is the least likely problem to be causing blurry pictures, but it certainly is a possibility. The problem can be caused by having a dirty lens, particularly if it has any grease or smudges on the front. A poor quality lens, or using a poor quality filter on a lens can also give blurry images.
To fix this:
Make sure your lens is clean, if you have a camera with interchangeable lenses, remember to check both ends of the lens, not just the front.
https://www.youtube.com/watch?v=G7S6VARidHk
If you are using a filter, take some test shots with and without the filter to make sure the filter is not affecting the image quality. For an example of how low quality filters can affect image quality, see this post: Lens Rentals: Good Times With Bad Filters.
If your lens is new, and you are 100% sure the problem is the lens, and not any of the other causes of blurry images, then you can return it to the shop for a replacement or the manufacturer for fixing under warranty.
If the lens is old, there could be lots of dust or fungus in the lens causing the problem, in this case you would need to get the lens repaired.
Some lenses aren't very sharp when shot wide open at their fastest aperture. Usually you can stop down the aperture to get better results.
Some lenses might just not be sharp at all, the only thing you can do here is to save the lens for when you a shot with a soft focus effect.
There are a couple of other things that could cause a blurry image, but they should be relatively obvious or unlikely. If you are shooting through some undergrowth or a fence, the blurred and out of focus undergrowth or fence could affect the image quality.
A dirty image sensor could cause problems. Although you may see dust spots on the image sensor in your images, it would be difficult to get the sensor so dirty it results in blurry pictures. So this is possible, but very unlikely.
Although it doesn't actually make images blurry, veiling flare caused by shooting straight into bright light sources can decrease contrast. This effect could be mistaken for image blur.
The main cause of blurry pictures is camera shake, so unless you can see signs that it is not camera shake, then consider this as the culprit first. With the tips above you should be able to get sharp images under the large majority of situations.


