How to convert a standard bag into a camera bag
When you've spent a lot of money on a camera and accessories, you probably don't want to just chuck them in a normal bag. They are likely to get scratched, damaged, and it is also more difficult to find the accessory or lens you want when they are all jumbled up together.
A specially designed camera bag has padding to keep your camera safe, and also dividers to keep all your gear organized and easy to access. However, they tend to be quite expensive.
Many photographers also do not like using a bag that looks like a camera bag. It can draw attention to yourself that it not wanted when doing street photography. It can also draw unwanted attention from thieves.
To avoid these problems, you can take a standard bag, and add a padded divided insert. This allows you to use a normal bag as a camera bag. If you want to use the bag for something else, you can easily remove the padded insert.
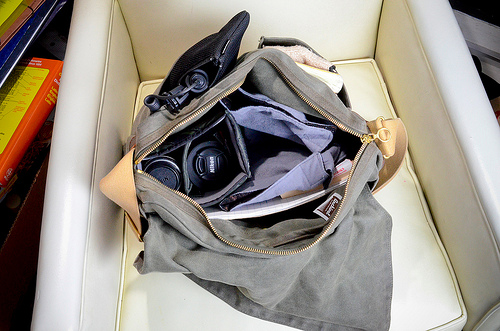
Archival Clothing Field Bag by mrjonathanpotter on flickr (licensed CC-BY-SA)
Shoulder bags, Satchel bags, and messenger bags all work well for adding a camera insert to. So long as the bag allows easy access to the gear stored in the insert, it should work well.
Standard backpacks do not normally open all the way down to the bottom. This means they are not so good for converting to a camera bag as it will be difficult to access items stored near the bottom of the bag. (Unless you don't mind removing the insert from the bag every time you want to access something near the bottom).
For the insert, you can either buy pre-made ones, or make one yourself.
Making your own camera bag insert
For making your own insert, you can cut up a camping mat for the padding and the padded dividers. Stiff cardboard can be used to give the insert more rigidity. Measure the bag you intend to fit the insert in, then cut the pieces as necessary.
The insert and any dividers can be taped together using strong tape such as Duct tape or Gaffer tape.
Here is a video showing how to make your own camera bag insert:
If you would prefer to have dividers that can be easily adjusted, you can purchase velcro receptive material (also known as loop nylon). Then cover the cut pieces of foam with this fabric before you stick anything together.
Stick or sew the sides and bottom of the insert together, but don't attach any of the dividers. Add some strips of hook velcro to the sides of the dividers. This will allow you to stick the dividers wherever you want inside the loop nylon covered insert.
Purchasing the velcro receptive fabric and hook velcro strips does add quite a bit to the cost of the insert though.
Using a commercial camera bag insert
If you are not feeling so DIY, you can also purchase camera bag inserts. These are basically the inside padded part of a camera bag, but with no bag. So you can just pop them inside an existing bag. Most feature adjustable inserts, just like normal camera bags.
The cost of an insert is quite a bit less than a full camera bag. You do need to check the size of the insert though, and that it will fit in your existing bag.
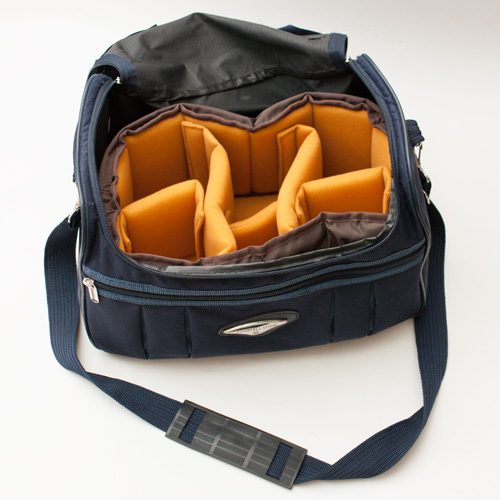
Shoulder bag with a camera bag insert
It is unlikely you will find an insert that fits your bag making use of all available space, like a home-made insert would. But you should be able to find one that fits nicely. Any spare space between the bag and the insert can always be used for carrying something flat, like documents or an ipad / tablet PC.
Using a camera bag insert can be a cheap and effective way to convert a normal bag into a camera bag. If you're looking for a camera bag that is not a backpack, it is well worth considering using a normal bag with an insert instead of purchasing a specialist photography bag.


