Portrait photography tips for making people look their best
When you are photographing someone for a portrait photo, you generally want to capture them at their best and minimize any flaws. Of course, you can touch up portraits in Photoshop, but this can be time consuming, so it's much easier to get it right in camera.
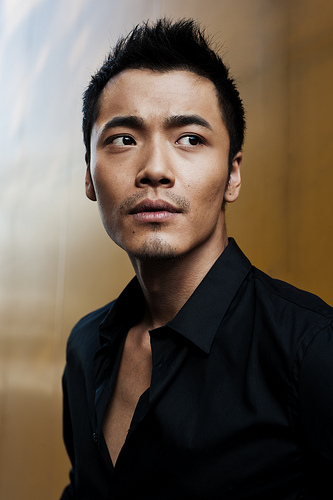
Xue Haowen Headshots by Jonathan Kos-Read on flickr (licensed CC-BY-ND)
Make your subject look slimmer
For photographing a full body or top half portrait of someone who you want to make look slimmer, try using a long focal length lens to compress the perspective. Ask the subject to pose with their arms slightly out from their sides. The gap between the arms and the waist prevents the arms from adding to the body mass, which would otherwise make them look larger.
You can also pose the subject facing away from the camera at an angle. Then ask the subject to twist the upper part of their body so it is facing more towards the camera, while keeping their waist at an angle. This can produce a good slimming effect for your portraits.
Yet another technique you can try is to light the face while keeping the body in darkness. This draws the viewers attention to the face rather than the body. If you light the face exclusively, the body won't pose any problem at all as it will not be visible. You can use a snoot or piece of card under your light to direct the light at the face and avoid spill onto the body.
If possible, you can ask your subject to dress in clothes the same color as the background you intend to use, or you can try and find a background with a similar color to what your subject is wearing when they arrive. The lack of contrast between the body and background removes attention from the body, and allows the subject's body to blend in with the background.
For head shots, ask the subject to turn slightly away from the lens. Position your light (or your subject) so that the far side of the face is lit, while the broader near side of the face is in shadow.
Reducing wrinkles
You can reduce the appearance of wrinkles and other blemishes by ensuring that your subject is lit from the front. Avoid lighting from the side as this will create shadows from the wrinkles, highlighting them.
Of course, if you want to capture the well weathered appearance of a wrinkled face, then do the opposite and light the face from the side.
A soft focus filter can also be helpful to blur the lines of wrinkles. You can use a commercial soft focus filter such as those produced by Tiffen or Cokin, or try stretching a piece of tights / stockings over the lens for a similar softening effect. However, you may be best off doing any blurring in Photoshop after the fact. This way you can avoid blurring the eyes, and tailor the exact amount of blur needed.
Reduce bags under the eyes
Keep some foundation makeup handy that you can use for subjects with bags under their eyes. Apply the foundation under the eyes to lighten and reduce the appearance of the bags.
Light your subject from the front with the light at eye level. Photograph the subject from a position slightly above them, so you are looking down at an angle. If your subject is seated this shouldn't be a problem, otherwise you may need to use a stool or step ladder to get a little height.
Ask the subject to look up into the lens while keeping the chin down, and this will help minimize the bags under the eyes.
Hiding a double chin
Position your light to point down towards the subject from above, while taking the photo from slightly above the subject, and having them look up towards you. This should cast a shadow over the double chin, hiding it.
Minimizing a large nose
Have the subject look straight towards you with the head tilted up slightly. Use front lighting pointing straight towards the subject to minimize any shadow from the nose. This will reduce the apparent size of the nose.


