Conquering Noise in Digital Photography
Digital noise is strange; we try to avoid it but its complete absence makes our images appear false. To produce realistic, quality photographs you need to know how to manage the levels of noise in your images. This often means reducing noise levels in some way, but before looking at how to do this consider why noise occurs:
- During long exposures the sensor can heat up causing noise
- Underexposing the image will lead to noise in the shadow areas due to the design of digital sensors
- Increasing ISO setting will cause greater noise as the camera works to amplify the signal from its sensor
The best way to reduce noise in your photos is to avoid introducing when you take the picture:
- Some cameras will handle noise much better than others. Nikon have an enviable reputation with their D3 and its ability to control noise at high ISO settings.
- Typically the latest generation of digital sensors will control noise better than older sensors.
- The size of the sensor is also important. A Full frame sensor will tend to handle noise much better than a small sensor from a compact camera where the pixels have been squeezed into a tiny space.
Assuming you are not in the market to change your camera, there are still steps you can take to control the noise levels in your pictures:
- Shoot at your cameras native ISO where possible, typically the slowest ISO speed. It's worth taking a series of identical images with your camera at increasing ISO levels to compare the noise. Ensure you know at what level it becomes unacceptable.
- Many DSLRs have a long exposure noise feature that can be activated (or set to Auto) so that when the duration of the exposure starts to produce noise, the camera will try to remove the noise. This usually involves a second exposure with the shutter closed so the noise pattern can be determined and removed from the shot. This doubles the duration of the exposure but it is a very good way to remove noise from long exposures.
- Where possible shoot in RAW rather than JPG. When JPG's are produced in camera, noise reduction is also applied. Whilst you can usually adjust the level of noise reduction through the camera menu, I find it's better to shoot in RAW and then apply noise reduction during the conversion from RAW.
- When shooting in RAW you can expose the image to the Right by increasing the exposure, pushing the histogram over to the right side. This helps control the noise in the shadow areas of the image and any slight overexposure can be corrected during the RAW conversion. I find the best approach is to review the histogram on the back of the camera after each shot and use the exposure compensation dial on my camera to increase the exposure when necessary. I try to avoid clipping the highlights in the histogram by pushing them too far to the right but I find I can usually recover at least a stop of overexposure. This is enough to open up the shadows and remove noise from these areas.
As it's not always possible to shoot using these techniques to minimise noise, you also need to know a few ways to remove it. Noise comes in two categories, Colour and Luminance. Colour noise is the coloured speckled pixels and tends to degrade the quality of the image. It also looks quite unsightly. Here is a 100% crop from an image I shot inside a shopping centre with my camera set at ISO12,800. I have turned off all noise management so you can fully appreciate the impact of colour and luminance noise.

If you have shot a noisy image that you want to try to improve, many RAW converters will include noise reduction. Don't forget also that many RAW converters allow you to open TIFF and JPG files and can apply the same noise reduction to these files. In the next shot I have applied both Luminance and Colour noise reduction as part of the RAW conversion.

Whilst noise reduction software may seem to work miracles, it works by applying a small level of blur to the image. For colour noise reduction this will cause colours to bleed into each other and can result in muddy looking image colours. With Luminance noise this tends to blur the detail in the image, especially fine details and prevents images from appearing as sharp as they should.
Whilst the RAW converters are generally quite good at noise reduction I find they can't really compete with specialist tools such as Noise Ninja and Neat Image. If you have a serious noise problem with an image that you just have to save, investigate some of these third party tools. When using such tools always apply the effect on a duplicated image layer. If you find the adjustment looks too strong you can reduce the opacity of the layer to allow a hint of noise to appear, making the image look realistic but not unsightly.
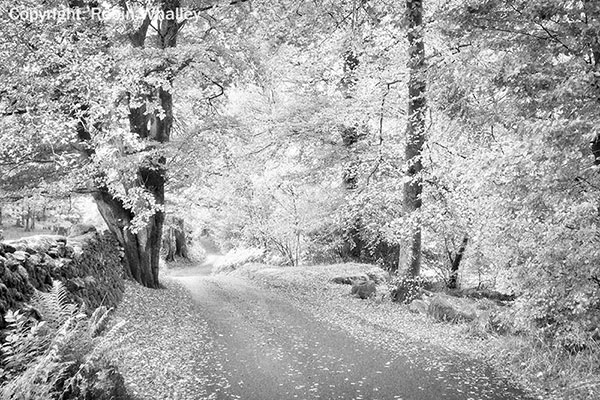
Finally, if you can't remove the noise from the image, why not consider making at a feature. I took this autumn scene in the Lake District but had my camera set to ISO1200 in error. I could produce a reasonable image by removing the noise but it just wasn't as sharp as I wanted it to be. Instead I decided to make an infrared conversion which would hide the colour noise but leave the luminance noise visible. I then added more noise to simulate the grain effect found in many infrared films. The result is far more successful than trying to save the colour image.
So make digital noise your friend.


