What is EXIF & How is it useful?
EXIF is a form of metadata (data about data) that is recorded in digital photos. It includes information such as the camera model used to take the photo, the camera settings used, and the date and time the photo was taken.
In this article we'll look at how to view the EXIF data of a photo, how EXIF can be useful, and even how it can help you improve your photography.

Technically, EXIF is a certain form of metadata that can be stored inside an image file. There are also other formats of metadata such as IPTC and XMP that can also store additional metadata in an image.

EXIF has a set number of properties that it includes, which are generally just the camera settings used to take the photo. The IPTC and XMP formats can be thought of as extensions to EXIF. They allow the inclusion of other metadata, such as the name of the person shown in an image, or the name of the location where the photo was taken.
Generally when people refer to EXIF, they mean all metadata stored in an image file (including XMP and IPTC). In this article I'll be using the same convention - when I refer to EXIF I mean any metadata stored in the file.
The EXIF data stored in an image doesn't affect how the image looks at all. It's not like those old cameras that used to stamp the date and time of the photo onto the actual image. We'll look at how to view the EXIF later in the article.
How EXIF data can help you improve your photography
Back in the days of film, there was no such thing as EXIF data. If you wanted to know what camera settings you took a photo at, you'd have to write them down at the time with the shot. And make sure that you kept a reference to the frame number and roll of film so you could tie the written settings back to the actual photo.
Settings by Nigel Wade on Flickr (licensed CC-BY-SA)
Quite a lot of work compared to just looking at the automatically recorded EXIF of a digital photo. But photographers did sometimes go to the effort of recording this information.
The reason for this is so that when you look at an image you've taken you can evaluate the technical aspects of it. If something went wrong, or went well, you can check the camera settings you used. Then you know not to use (or to use) those same settings in a similar situation in the future.
As an example, let's say you were photographing a sports game. When you later you review your photos you find that some have come out blurry due to subject movement. You can look at the EXIF data for those images and check what shutter speed the camera (or you) chose.
Then you know that you must use a faster shutter speed than that in the future. (And shooting in shutter priority mode or manual mode to ensure the camera uses the faster shutter speed would be a good idea too).
And it's not just shutter speed you can check. You can look for exposure problems, depth of field issues, focusing issues, pretty much anything to do with the camera settings. By identifying problem images and then viewing the EXIF data to see what setting caused the problem, you can learn what settings to use and not use in each situation.
This information can be particularly useful if you're just trying out a new technique or learning a certain style of photography. It helps you quickly learn what settings work and which don't.
How to view a photo's EXIF data
In-camera
Nearly all camera models allow viewing the most useful pieces of EXIF data in the images they record. Generally you need to put the camera into image review mode, and then use a button (often marked i / disp / info) to scroll through the different display screens for the image.

Depending on your camera it may just display a minimal amount of EXIF information (date / time, shutter speed, aperture, ISO, and whether flash was used). Or it may have a lot of information that is displayed over a couple of screens.
The exact implementation varies from camera to camera, so for precise instructions consult your camera manual.
On the computer
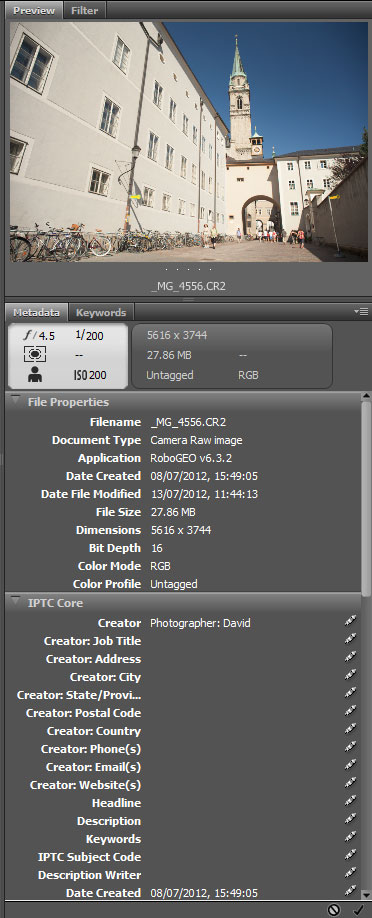
For Windows users there are a couple of built-in ways you can view the EXIF of a photo. The first is in the file info / properties pane at the bottom of Windows Explorer. When you select a photo, then a limited amount of EXIF data will be shown here.
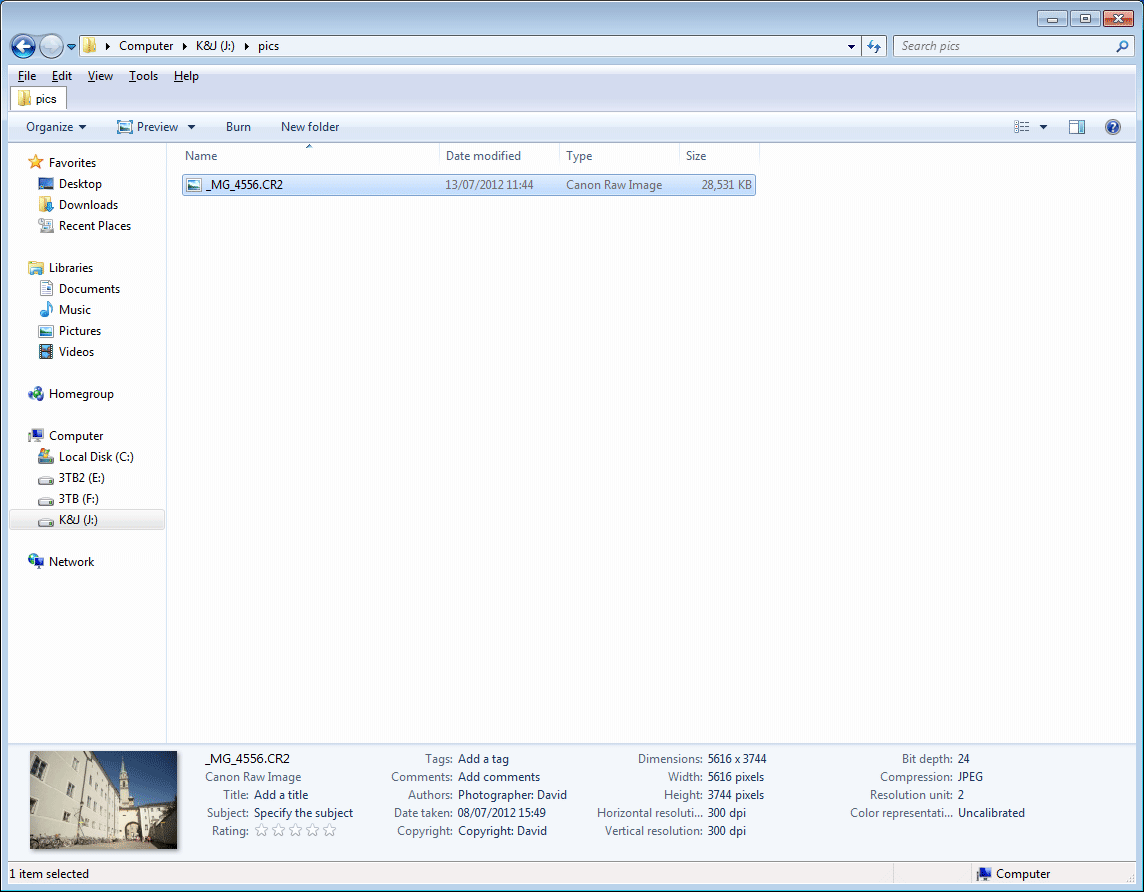
The larger you have the file properties pane, the more EXIF information you can see.
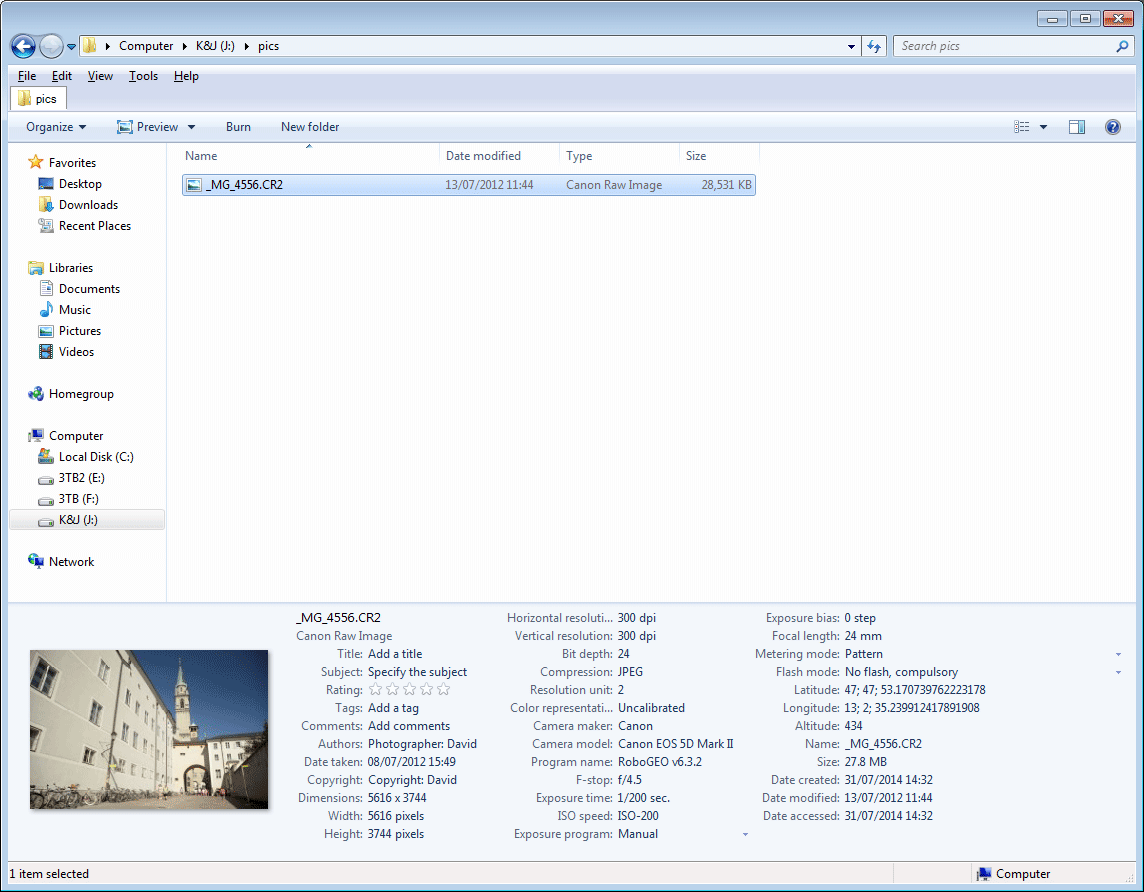
The other option for Windows users is to right-click on a photo and choose 'properties', then go to the details tab.
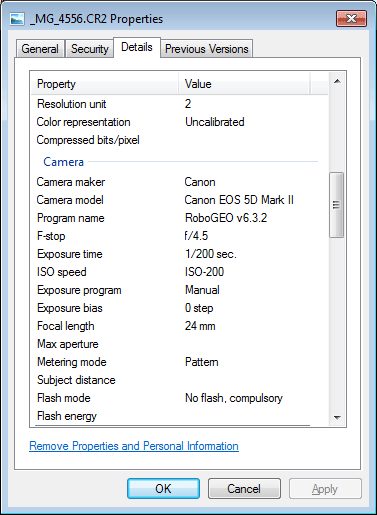
Note that for both these options, you can only edit some of the EXIF fields if you are viewing the EXIF for a JPEG file. If you're viewing the EXIF of a RAW file, then Windows will give you an error message if you try to change / add to any of the EXIF properties.
For Mac users you can right-click on the photo and then choose 'Get Info' from the context menu that pops up. Alternatively, press Cmd + I with the image selected in Finder. Then click on the 'More info' section to expand it and see the EXIF info.
However, whether you're on a Mac or Windows, using the built-in EXIF viewers is not really a great solution. Instead you are much better off using Image management software such as Lightroom, Adobe Bridge, Phase One Media Pro, ACDSee, or any of the many other similar software packages.
Image management software will allow you to view the most relevant EXIF data more easily. It will also allow you to easily change and add EXIF data, as well as searching and sorting images by their EXIF data.
One thing worth noting is that the majority of image management software does not write EXIF data to RAW files. Instead the information is stored in a sidecar file (a file saved alongside the RAW file) or in a database.
The issue with storing EXIF in a database is that if you change the software you use, or loose the database, then any EXIF data you have entered / modified for your images will be lost. (All the original EXIF data stored in the images by the camera will still be retained though).
Using EXIF to help organize your images
Using Image Management software it is quite simple to add tags / keywords to your photos. Typically you'd do this based on the content of the image, for example, for a photo taken at the beach you might tag it with 'Beach, sand, sea, seaside, vacation'.
This makes it much easier to find images in the future, as you can search for them (or browse them) by tag.
Some cameras also allow you to add star ratings or some other form of marker to images. This can be very useful as it allows you to easily mark images that should be prioritized for processing. You can then sort the photos by rating, and easily find the ones to work on (or just post to social media) straight away.

It should be noted though that some camera models store the rating / marker information in a way that is not accessible by most Image Management software. In this case the extra metadata stored by the camera has to be converted to something accessible by your image management software, which involves an extra step when importing the photos to your computer.
You can read more about general organizing of images and the use of metadata here: How to organize and manage your photos.
Making lens choices based on EXIF data
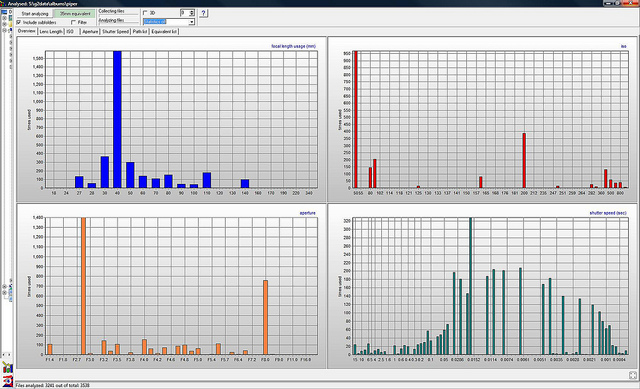
Another benefit of EXIF data is that you can analyze it to discover what focal lengths you take most of your photos at. This data can be useful in a couple of ways.
ExposurePlot by Piper Gu on Flickr (licensed CC-BY)
First, you might be deciding on what lens to take on holiday with you. Or maybe you're looking at purchasing a new lens or camera (with lens included). By seeing what focal length(s) you use most, you can make an informed decision, and make sure that your choice covers those focal lengths.
For example, lets say you have a 24-70mm zoom lens, but analyzing the EXIF of your photos you find that 90% of your photos are taken at the 24mm end. You might decide to sell the lens and invest in a 24mm prime lens instead (smaller and cheaper).
Or maybe you currently have a camera with a built-in lens, and you're looking to upgrade to a DSLR or CSC. You can check what focal lengths you shoot at most, and then make sure that any new camera you purchase comes with a lens (or lens kit) that will cover those focal lengths.
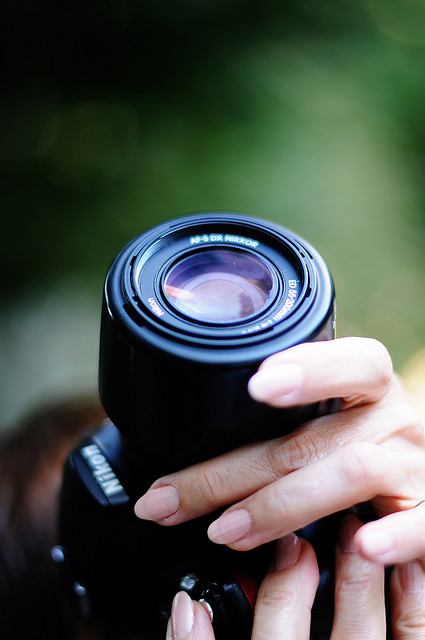
Lens by live on Flickr (licensed CC-BY)
The other way in which this information might be useful is the exact opposite. You could try force yourself to use a focal length that you don't often use. Too often we can just use a certain focal length or camera setting just because that's what we always use, not because it is necessarily the best choice for the photo.
By forcing yourself to use a focal length you're not used to using, you'll learn when that focal length is a good choice. It will also likely make you have to think more about how to capture the image you want, resulting in better, more thoughtful images.
But how do you see which focal lengths you use the most? Well, many image management software programs allow you to filter your images by focal length, showing you how many were taken at each focal length. There is also a piece of Windows software called Exposure Plot that can perform this analysis for you (but only for JPEG images). You can find some other suggestions for similar solutions here: What software can show my most frequently used focal length?
Other people's EXIF
I mentioned earlier how checking the EXIF of your images can help you improve your photography. Well, checking the EXIF of other people's images can also help you improve.
When you see an image you particularly like (or maybe don't like!) then you can check the EXIF to see how the photo was shot. Now, this won't give you the full story on how a photograph was created. But it can still give you some helpful pointers.
You can see the information such as the focal length (or maybe the lens) used, the shutter and aperture settings. This can give you at least some idea of the settings to use to create a photo in a similar style.
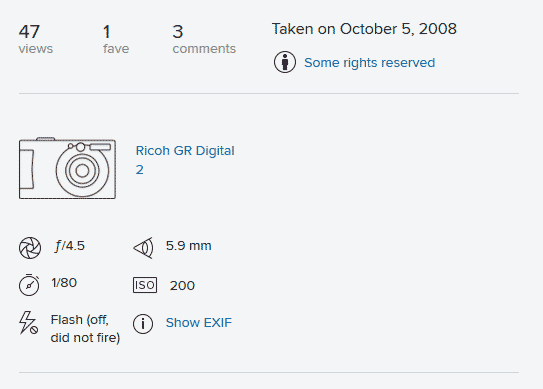
For viewing the EXIF of a photo online, some photo sharing websites display the EXIF alongside the photo. For example, Flickr displays basic EXIF data on the photo page, with a link for viewing the full EXIF data for the image.
You can also download plugins for most internet browsers to allow you to view the EXIF of any image on the web. Just search for the name of the internet browser you use, followed by 'exif plugin', e.g. 'Internet Explorer exif plugin' or 'Safari exif plugin'.
Problems with EXIF
Now, you should note that not all photos on the web will have EXIF data. In fact, many of them won't. The issue is that storing all the EXIF data in an image obviously takes up some room. In terms of a full size image, the amount of space EXIF takes up is pretty tiny.
For a web size image the amount of space EXIF takes up is still relatively small. However, to ensure images load as fast as possible some websites (e.g. Facebook) will automatically remove the EXIF data from any images uploaded to them. Some photographers may also decide to strip the EXIF from their images before they upload them.
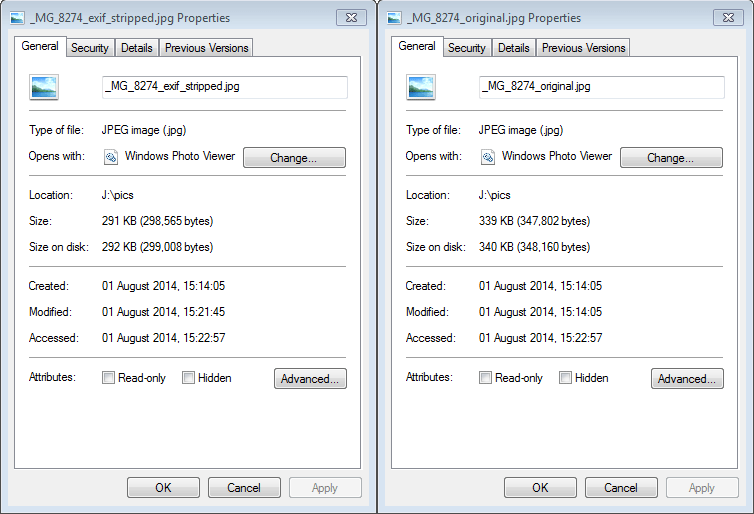
Comparison of the file size of an image resized for web use. One with EXIF intact, and the other with the EXIF stripped. The file size saving of removing the EXIF is not negligible as a percentage (14% smaller), but is quite small in terms of actual size (49kB smaller).
The other issue with EXIF is that it could contain personal information that you don't want shared on the internet. For example, if you take a photo at your house using your phone, it is likely that the phone will automatically include the GPS co-ordinates of where the photo was taken in the EXIF data. If you then upload this photo to the web, anyone can view the EXIF data and find out exactly where you live.
Another example is that some images contain a copy of the image embedded in the EXIF. This is true for all RAW files and some JPEGs, typically it is a slightly smaller and / or lower quality version of the image, intended for use as a preview image.
If you crop an image to exclude some part you don't want other people to see, and then upload it to the web, it may still include the original preview image embedded in the EXIF. Someone viewing the EXIF can then extract the uncropped preview image.
Images with embedded preview images in the EXIF are also a case where the EXIF can add considerably to the file size, making the image slower to load than it should be.
Hopefully you'll agree that overall, EXIF data can be very useful, and it's great that all cameras include this information by default.


