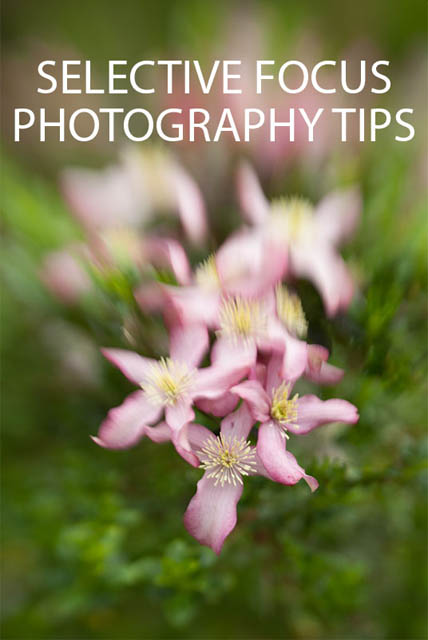
Selective Focus Photography Tips
Selective focus is a very useful technique for drawing the viewer's attention to a certain area of an image. Typically, though not always, the area you want to draw attention to will be the subject of the photo. By having the subject in sharp focus, but the rest of the image blurry, the eye is naturally drawn towards the sharp area of the image.
Selective focus can be achieved in-camera but can also be added to an image later using image editing software. In this article we'll look at both techniques.
Basic selective focus using a shallow depth of field
The most common, and usually the most simple, way to create selective focus is to use a shallow depth of field when photographing your subject. There are a number of factors that affect depth of field (how much of the image is in focus):
- Aperture
A large aperture setting, such as f/1.4 gives a very shallow depth of field. Most cameras will allow you to control the aperture setting by putting them in the Aperture-priority or Manual exposure mode.
Note that different lenses have different maximum apertures. With a standard 50mm prime lens you can open the lens up to an aperture of f/1.8. Whereas with a standard kit zoom lens set to 50mm, you'll probably only be able to open the lens up to f/5.6. So the choice of lens has quite a big effect on how narrow a depth of field you can achieve.
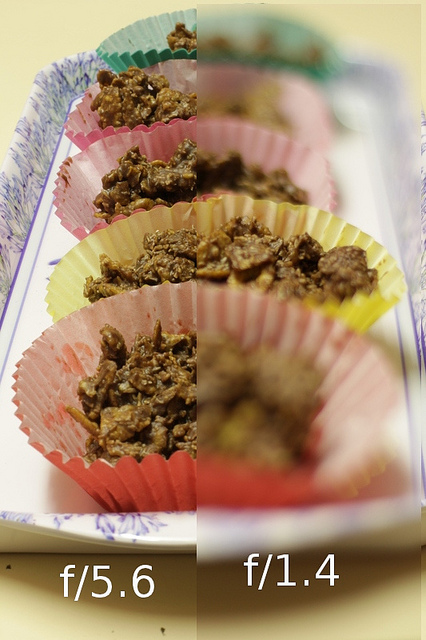
39/365 chocolate crackles by Hamish Darby on Flickr (licensed CC-BY-SA)- Distance from subject
The closer you are to your subject, the shallower the depth of field will be. If you're photographing a subject but can't get the selective focus you're looking for, try moving closer and focusing in on only part of the subject.
For example, for a portrait photo, if the background is too in focus when shooting a full length portrait, move closer and try a head shot instead.

Standing Small Before Giants - HBW! by Sean McGrath on Flickr (licensed CC-BY) - for small subjects you have to get quite close to them, and so obtaining a shallow depth of field is very easy- Focal length
The longer the focal length, the shallower the depth of field will be for a given distance between yourself and the subject. However, the larger the subject will appear in the frame as well. Using a longer focal length has a similar effect to getting closer to your subject, except that it doesn't change the perspective at all.
A longer focal length can also result in a background that looks more blurry than a similar image taken with a shorter focal length at a closer distance. The narrow field of view of a long focal length magnifies the area of background behind the subject compared to a shorter focal length, which helps the background look more out of focus.
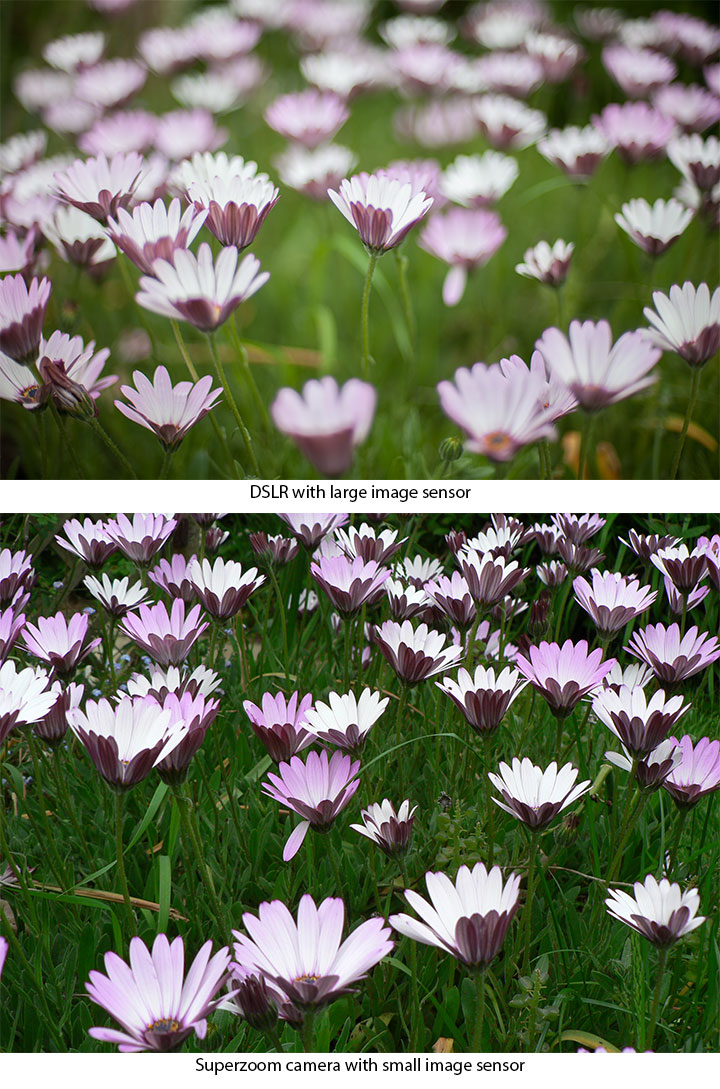
Katia by Dino Quinzani on Flickr (licensed CC-BY-SA)- Image sensor size
The larger the size of the image sensor, the shallower the depth of field will be. This is why it is much easier achieve photos with a blurry background using a DSLR than it is with a phone camera - the image sensors used in DSLRs are much much larger than the image sensors used in smartphones.

So, to have your subject in focus while the rest of the image is out of focus, try using a large aperture, getting close to your subject, using a long focal length, and using a camera with a large sized image sensor. You don't need to necessarily do all of these things together. Indeed, if you did you could find that the depth of field is actually too shallow and you end up with just a part of your subject in focus.
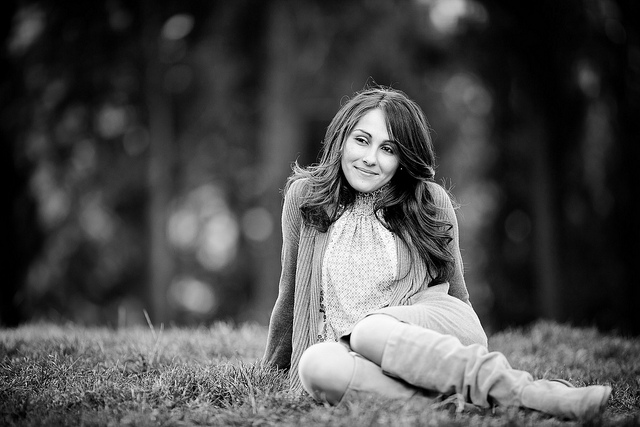
Bear in mind that with a standard lens, the plane of focus is parallel to your camera. So by angling your camera or the subject you can optimize the plane of focus to put more or less of your subject in focus.
For example, if you're taking a portrait photo and have the subject looking off at an angle, with a very shallow depth of field you may only be able to get one of the subject's eyes in focus. If you wanted to get both eyes in focus you may need to resort to a smaller aperture, which would also put more of the background in focus.
But by having the subject look straight at the camera, both eyes will be parallel to the camera, and so both fall within the plane of focus. This means you can get both eyes in focus while still using a very shallow depth of field, keeping the background out of focus.
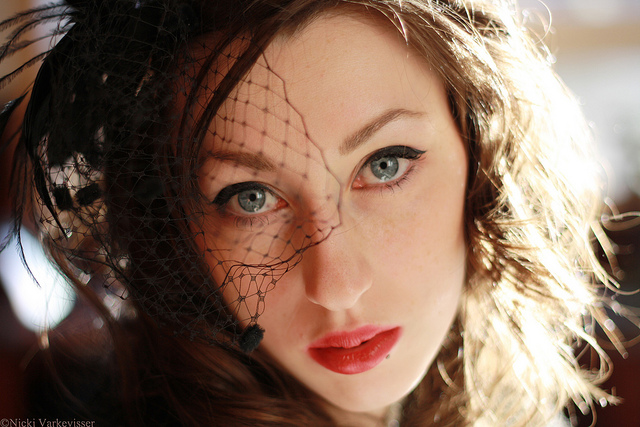
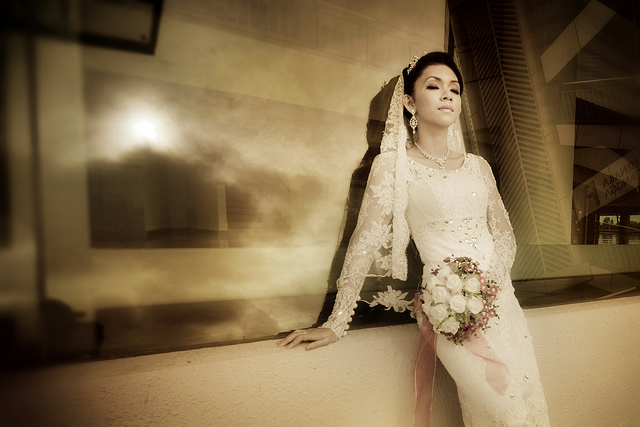
The Modern Femme Fatale by ClickFlashPhotos / Nicki Varkevisser on Flickr (licensed CC-BY-SA)
One of the problems with using a standard lens and shallow depth of field for selective focus comes when shooting larger subjects (such as groups of people). You can find that the depth of field is not large enough to get all of the subject in focus. You could use a larger depth of field, but that can bring other elements in the image into focus that you'd prefer were left blurry.
Another problem is when photographing subjects that are surrounded by lots of clutter. (Assuming you can't move your subject to put some distance between them and the elements you want to put out of focus).
Because a standard lens has a flat field of focus, if anything else is in the same plane as your subject, then it too will be in focus. And the nearer to your subject other elements are, the more they will appear in focus.
Using a selective focus lens
As I mentioned in the previous section, standard lenses have a flat plane of focus and everything within that plane appears relatively sharp. Take a photo of a brick wall with the camera parallel to the wall, and it will be sharp across the frame.
With a specialist selective focus lens, the plane of sharp focus is not flat, but rather there is a 'sweet spot' of sharp focus, with focus and sharpness gradually falling off away from this spot. Take a photo of a brick wall, and only the center would be sharp, towards the corners the image would get increasingly blurry.
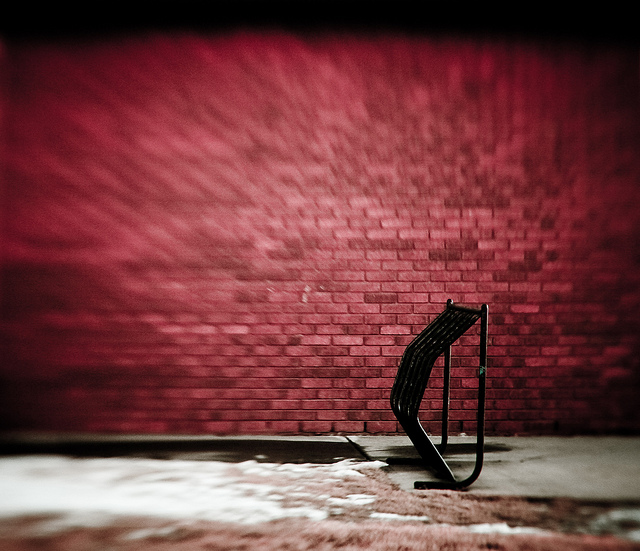
Vacant Rack by Kurt Bauschardt on Flickr (licensed CC-BY-SA)
This allows for creative focus that a standard lens can't offer. You can take a photo of a person in a busy place, but have the focus just on them, with the area around them blurred. The further away from the area of focus part of the scene is, the more blurred it appears. Not just in front of and behind the subject as with a normal lens, but also to either side of the subject.
The most well known selective focus lens is the lensbaby system. The point about the lensbaby system is that it allows tilting the lens, so you can shift the area of sharpest focus around - great for off-centered compositions.
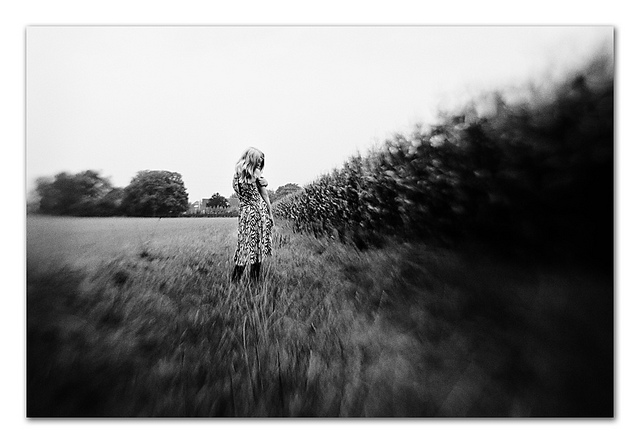
Iben-lens1 by Kristina Daley on Flickr (licensed CC-BY-ND)
Some older lenses have a sharp center but get quite soft towards the edges. This lack of sharpness in the corners of the frame is often looked down upon by photographers today, but for a selective focus image it can prove very useful.
While the effect is slightly different, you can also convert a standard lens to give a similar effect by use of a soft spot filter. This is a filter with a clear center, which keeps the image sharp in the center, but with glass that creates a softening effect towards the edges of the image.
You can buy soft spot filters commercially, or create your own. Simply take a cheap UV filter, and smear a very small amount of vaseline around the outside of the glass, leaving the center clear.
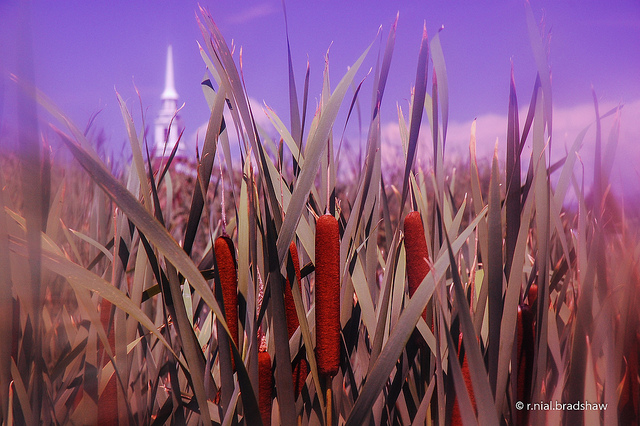
cat-tails-church.jpg by r. nial bradshaw on Flickr (licensed CC-BY)
Another way of getting a similar, but different effect, is to use a tilt lens. These allow you tilt the plane of focus so that it is no longer parallel to the camera's image sensor. Through careful tilting of the image plane, you can achieve a selective focus effect where only a small area of the image is in sharp focus.
untitled-5324 by HENG FU MING on Flickr (licensed CC-BY)
Create the effect in software
In some cases it may not be possible to get the exact selective focus look you are after in-camera. Try to get the image as close to how you envision it at the time you are taking it, then the image can be finished off with minimal editing. It is much easier to apply a selective focus effect to an image where most of the image is already out of focus, than one where everything is in focus.
The technique behind creating selective focus through software is relatively simple in principle. You simply apply a blur to the areas of the image you want out of focus, while leaving the areas you want in focus untouched. Depending on the image this may in practice be very simple, or very tricky - it all depends on how easy it is to mask out your subject.
Selective focus in ACR / Lightroom
Adobe Camera RAW and Adobe Lightroom are used by many photographers, and both share the same RAW processing engine. This includes the ability to selectively blur parts of the image. For this example I'll be using Adobe Camera RAW, but the process is the same when using Lightroom's Develop module.
We want to selectively apply blur to the image, so we need to use a selective adjustment tool. This could be the adjustment brush, graduated filter, or radial filter. The best one for the job will depend on your photo and the sort of effect you're looking to achieve.

For this particular image, the radial filter will work well. With the tool active, move the clarity and sharpness sliders to -100 each. You'll probably want to leave the feather setting on the default of 50. The feather determines how quickly the effect transitions from the full effect to none at all. For the radial adjustment tool you also want the effect to be set as outside.
I use the tool to draw a circle around the subject, and I'm done. The sharpness and clarity are reduced outside of the circle, while inside the circle the image retains its original sharpness and clarity.

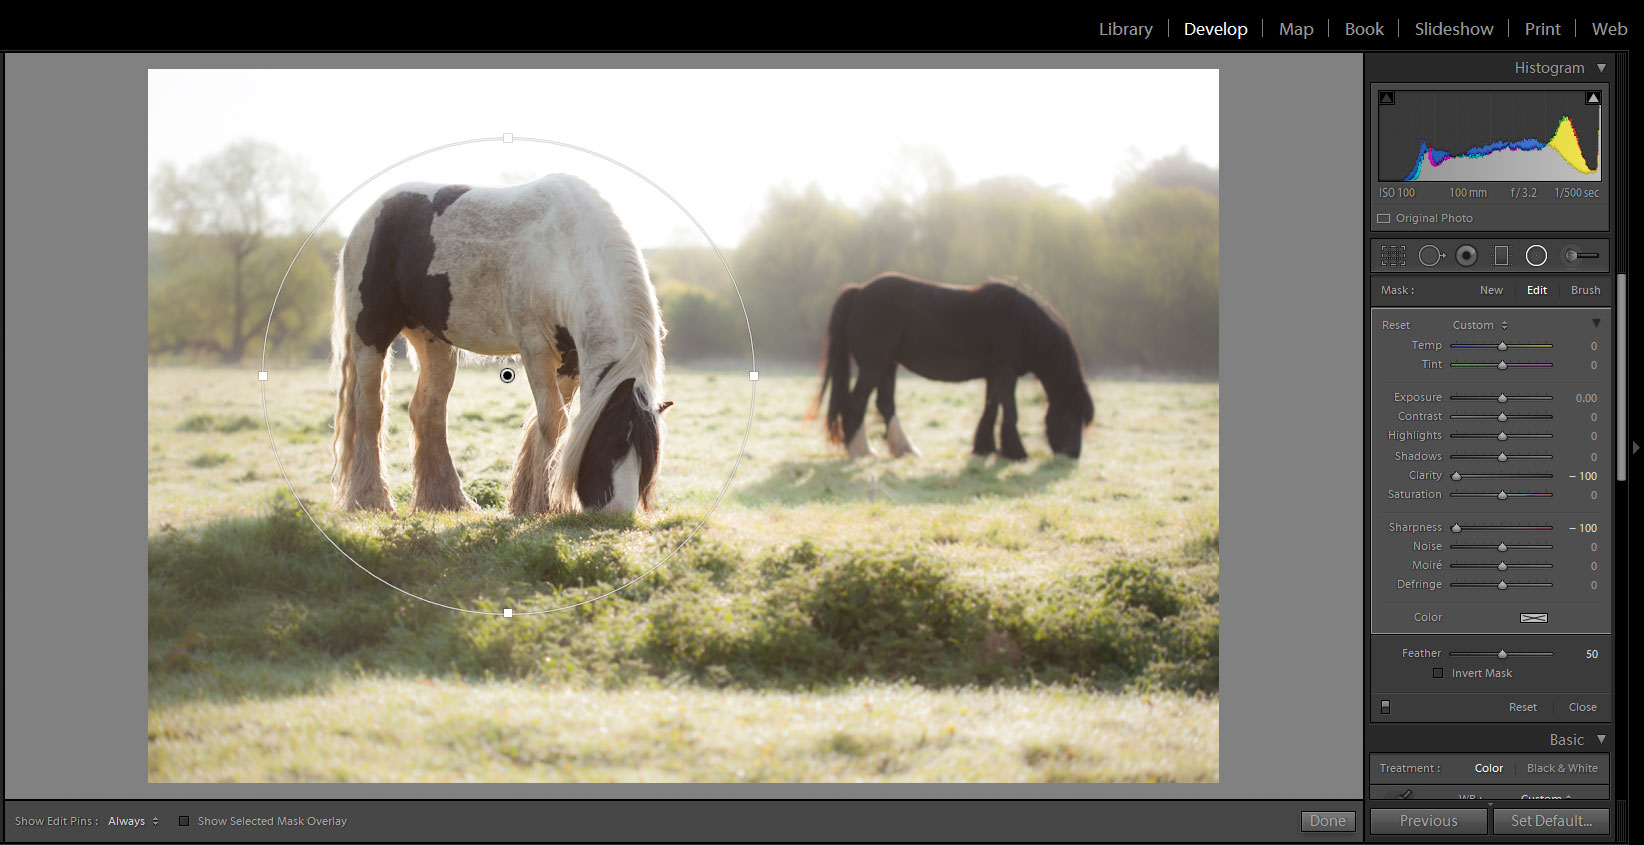
The process in Lightroom is exactly the same
If you're using the adjustment brush, then you'll want the same settings, but to paint over all of the image except where you want it kept sharp. Alternatively you can set the main image settings to -100 sharpness and -100 clarity, then paint back in +100 sharpness and +100 clarity over your subject.
Selective focus in Photoshop / GIMP / etc.
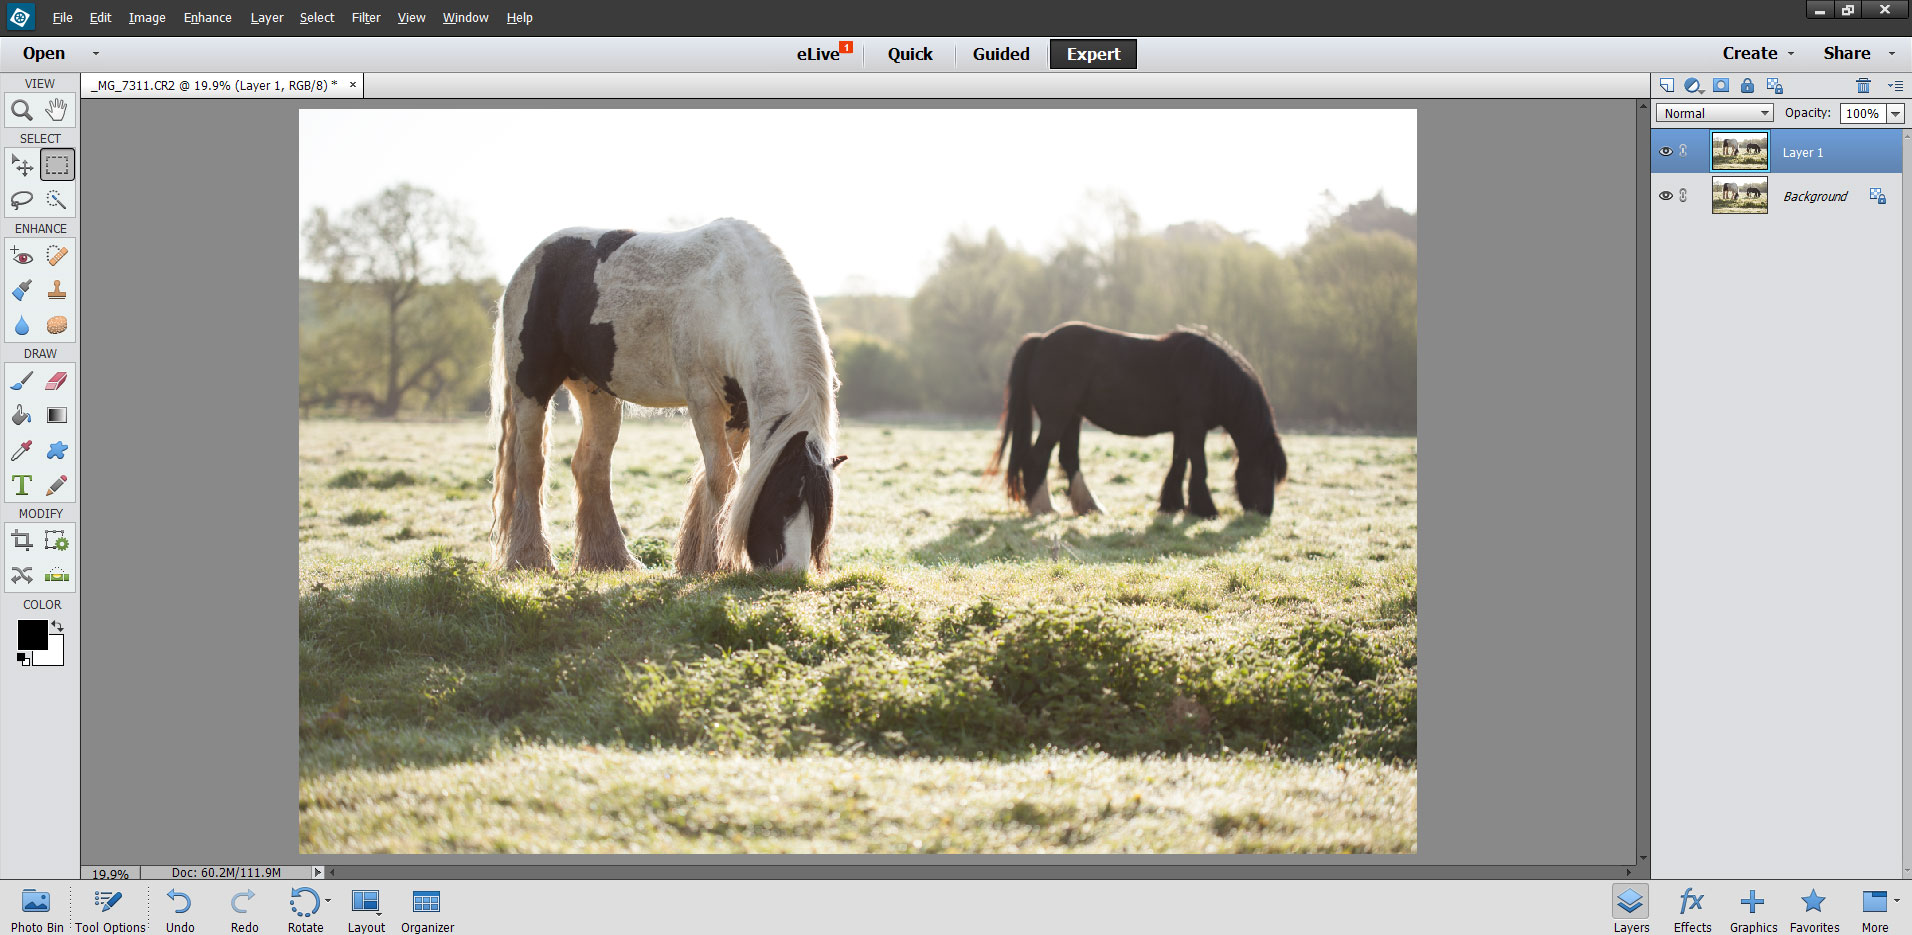
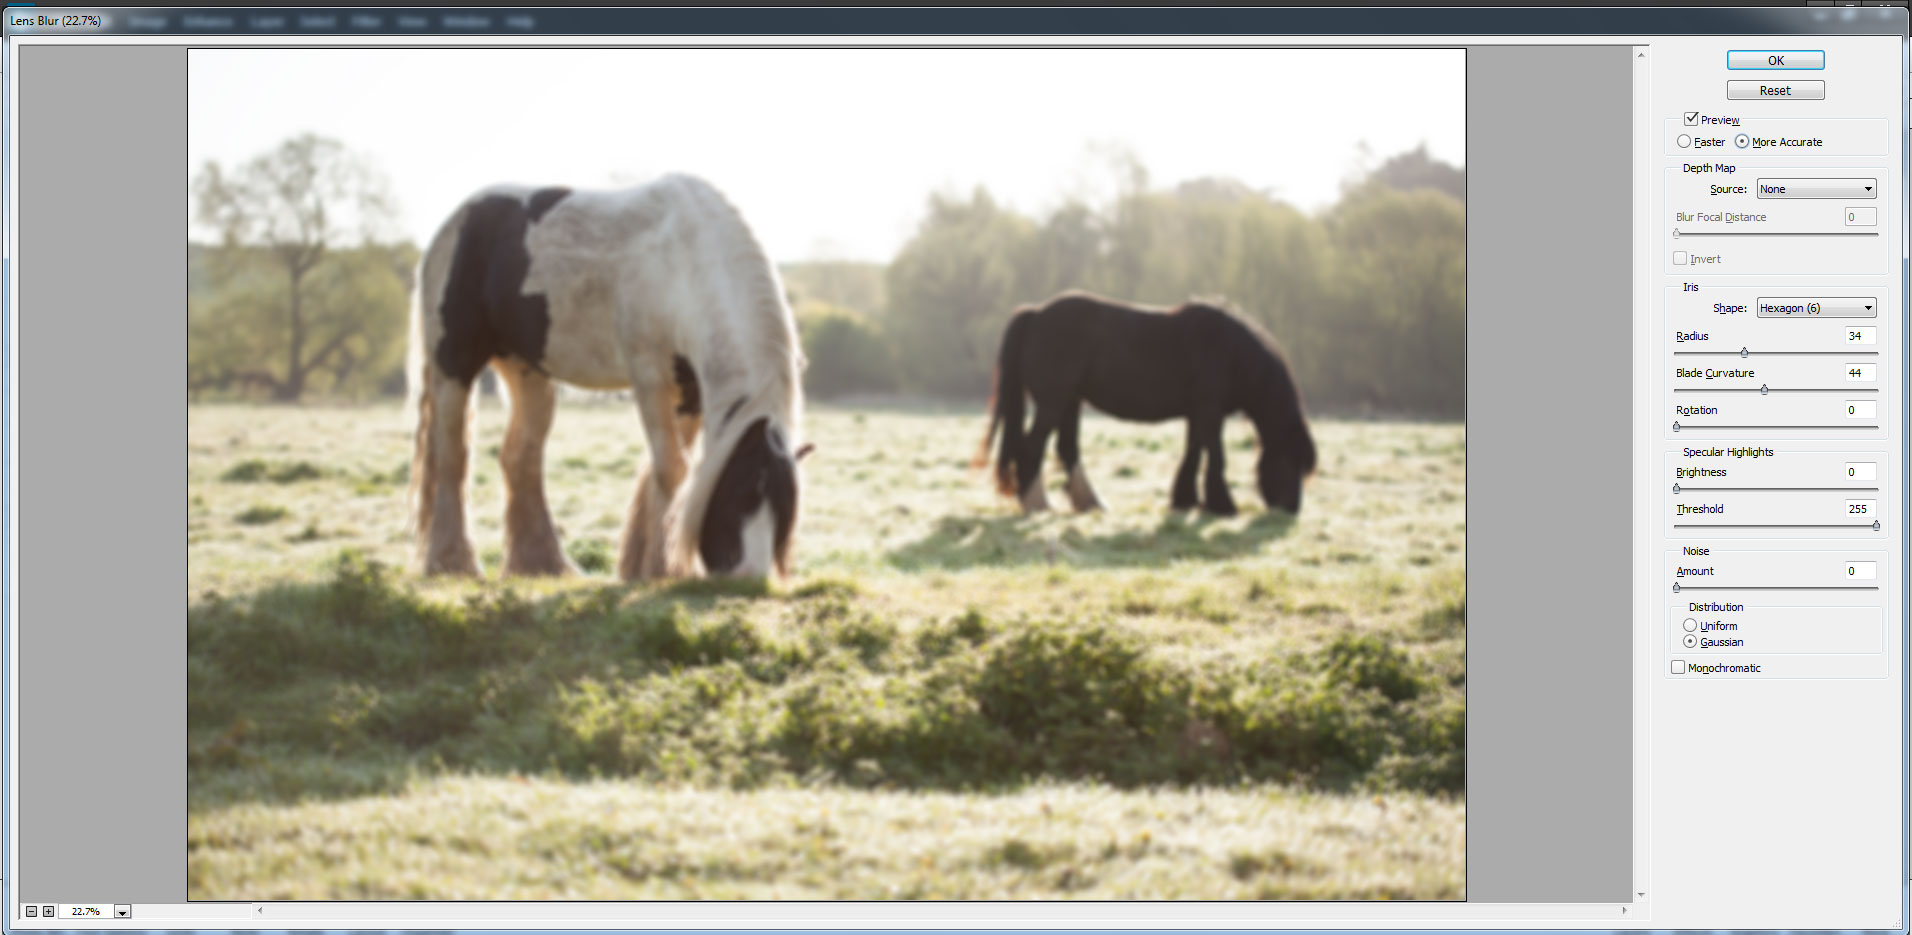
A selective focus effect can also be easily applied from linear editing software that supports layers and has a blur filter. For this example I'll be using Photoshop Elements 11, but the process is basically the same in other software.
Open your image and then create a new layer that is a duplicate of your original. In Photoshop you can select the Background layer in the layer palette then press Ctrl + J (PC) / Cmd + J (Mac).
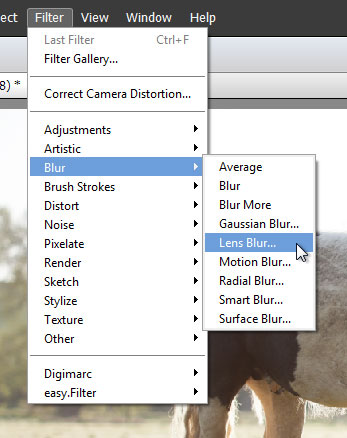
With the new duplicate layer selected in the layer palette, apply a blur filter to this layer. Most image editing software offers quite a range of different blur filters. In Photoshop we can use the Lens blur filter, which offers a blur that looks quite natural. In Photoshop Elements this is accessed by going to Filter > Blur > Lens Blur....
Different blur filters will give different effects. So if you're looking for a more unusual blur effect, you might want to try out some of the other blur filters.
Adjust the blur filter settings until you get a reasonable amount of blur. Don't go overboard with the blur - the stronger the blur you apply, the more difficult it will be to get a realistic looking result.
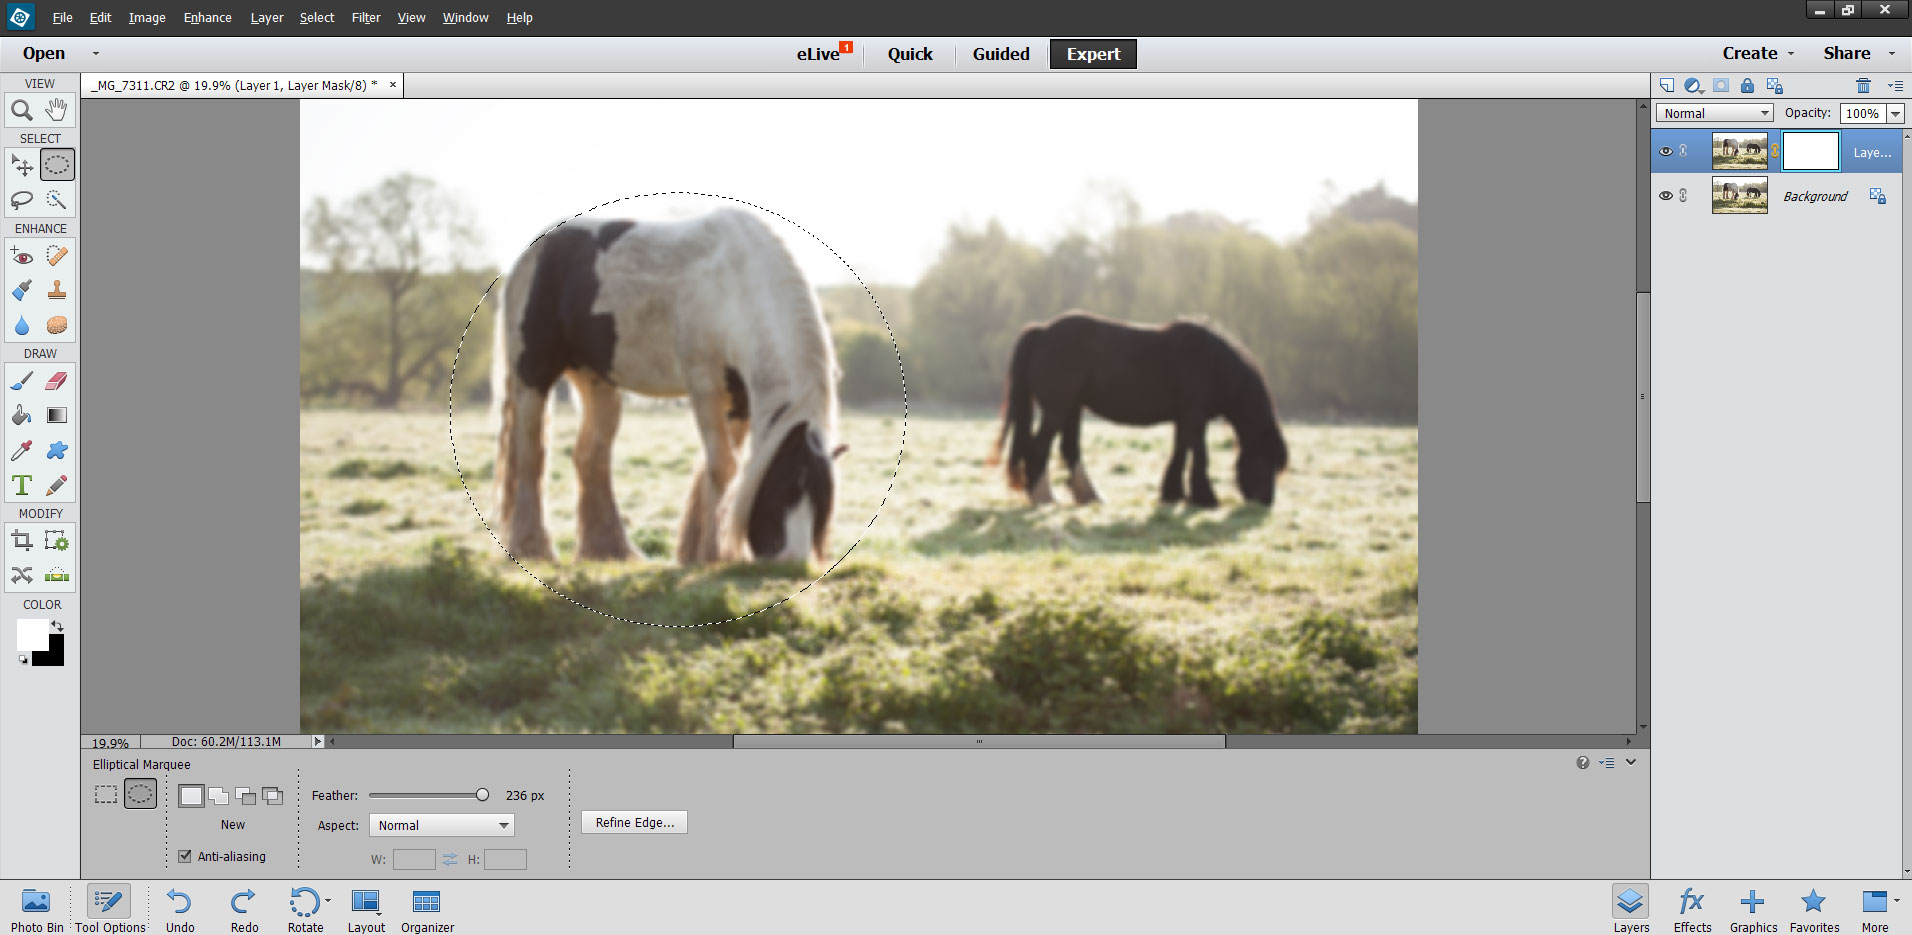
Apply the blur filter, then add a layer mask to your blurred layer.

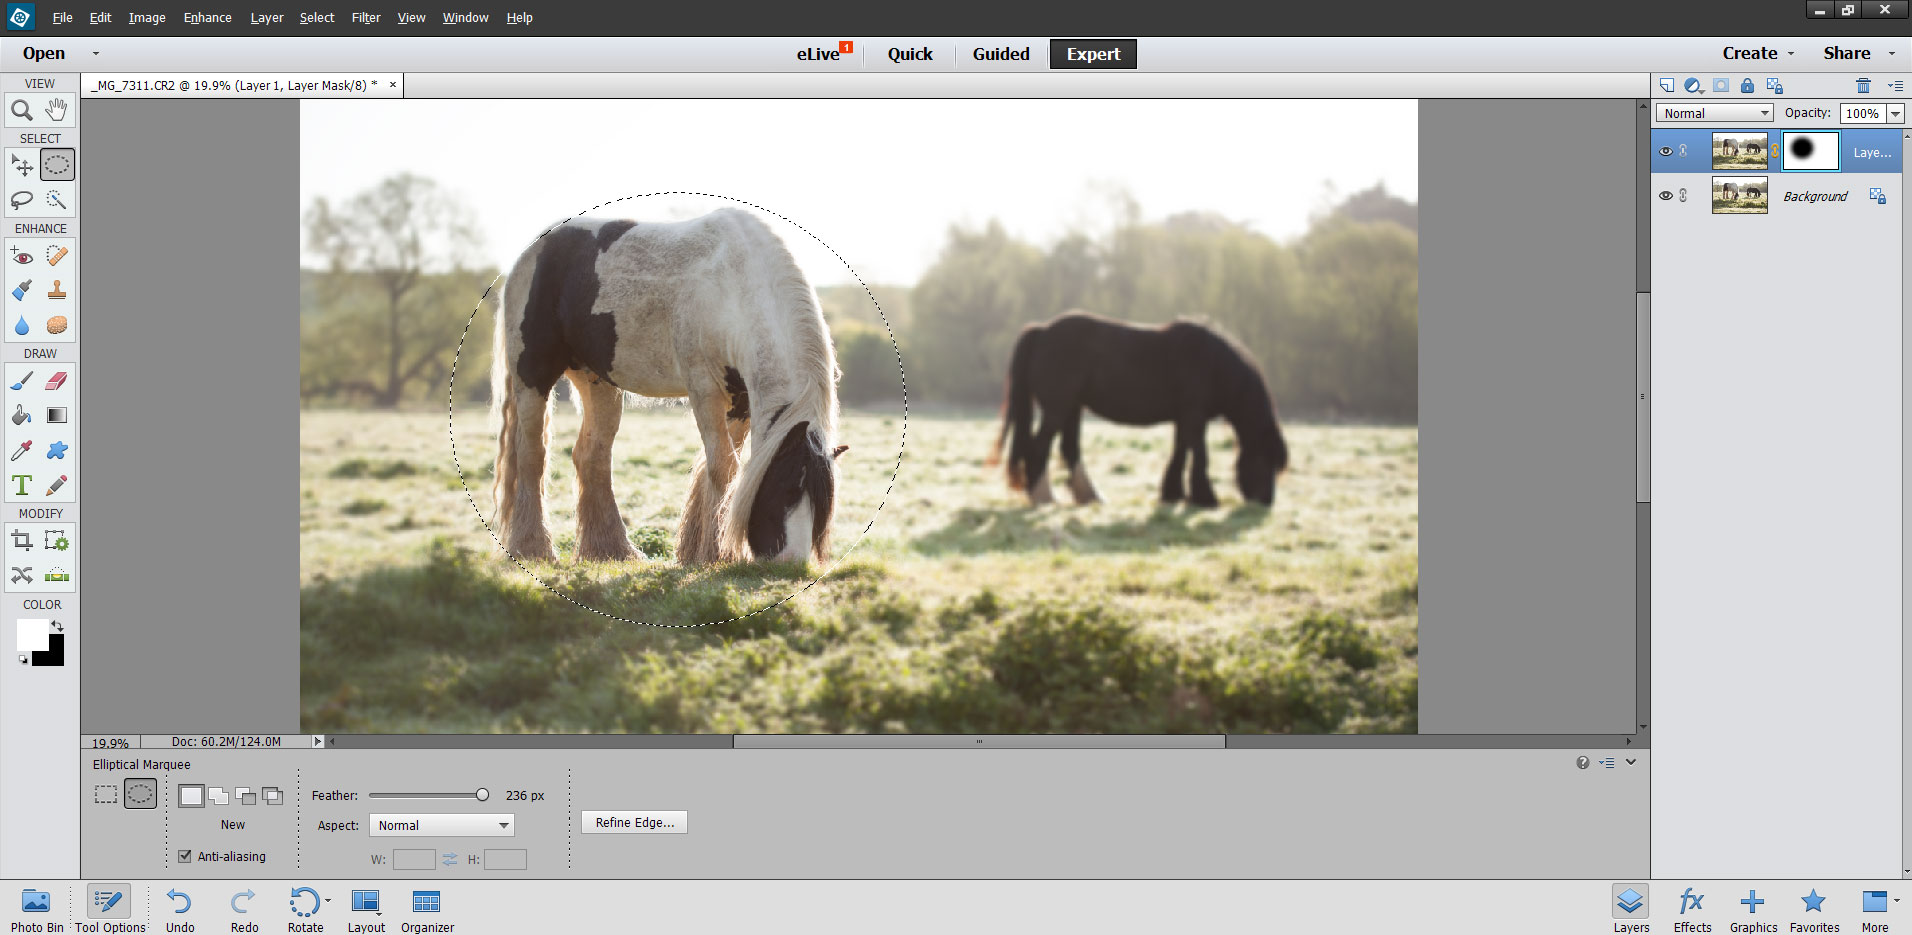
The mask allows you to hide parts of the blurry layer, which will show through to the sharp layer below. On the layer mask, white will show the current (blurred) layer. Black will hide the current layer. Shades of gray will partially show / hide the layer - the nearer to black, the more transparent the layer will be.
You can use whatever tool you like to alter the mask and hide the blurring effect over your subject. You might just choose the paintbrush tool and paint black over your subject in the mask. However, for this image I'll use the circular selection tool.
I select the Marquee tool, and choose the circular selection type. I set a large feather to ensure the transition from blurred to sharp is gradual. Then I drag the selection out over the image to select my subject.
With the layer's layer mask selected in the layers palette, I fill my selection with black paint. As black is my background color, I can just press Ctrl + Backspace (PC) / Cmd + Backspace (Mac) to fill the selection with my background color. This hides the selected area of the blurred layer.
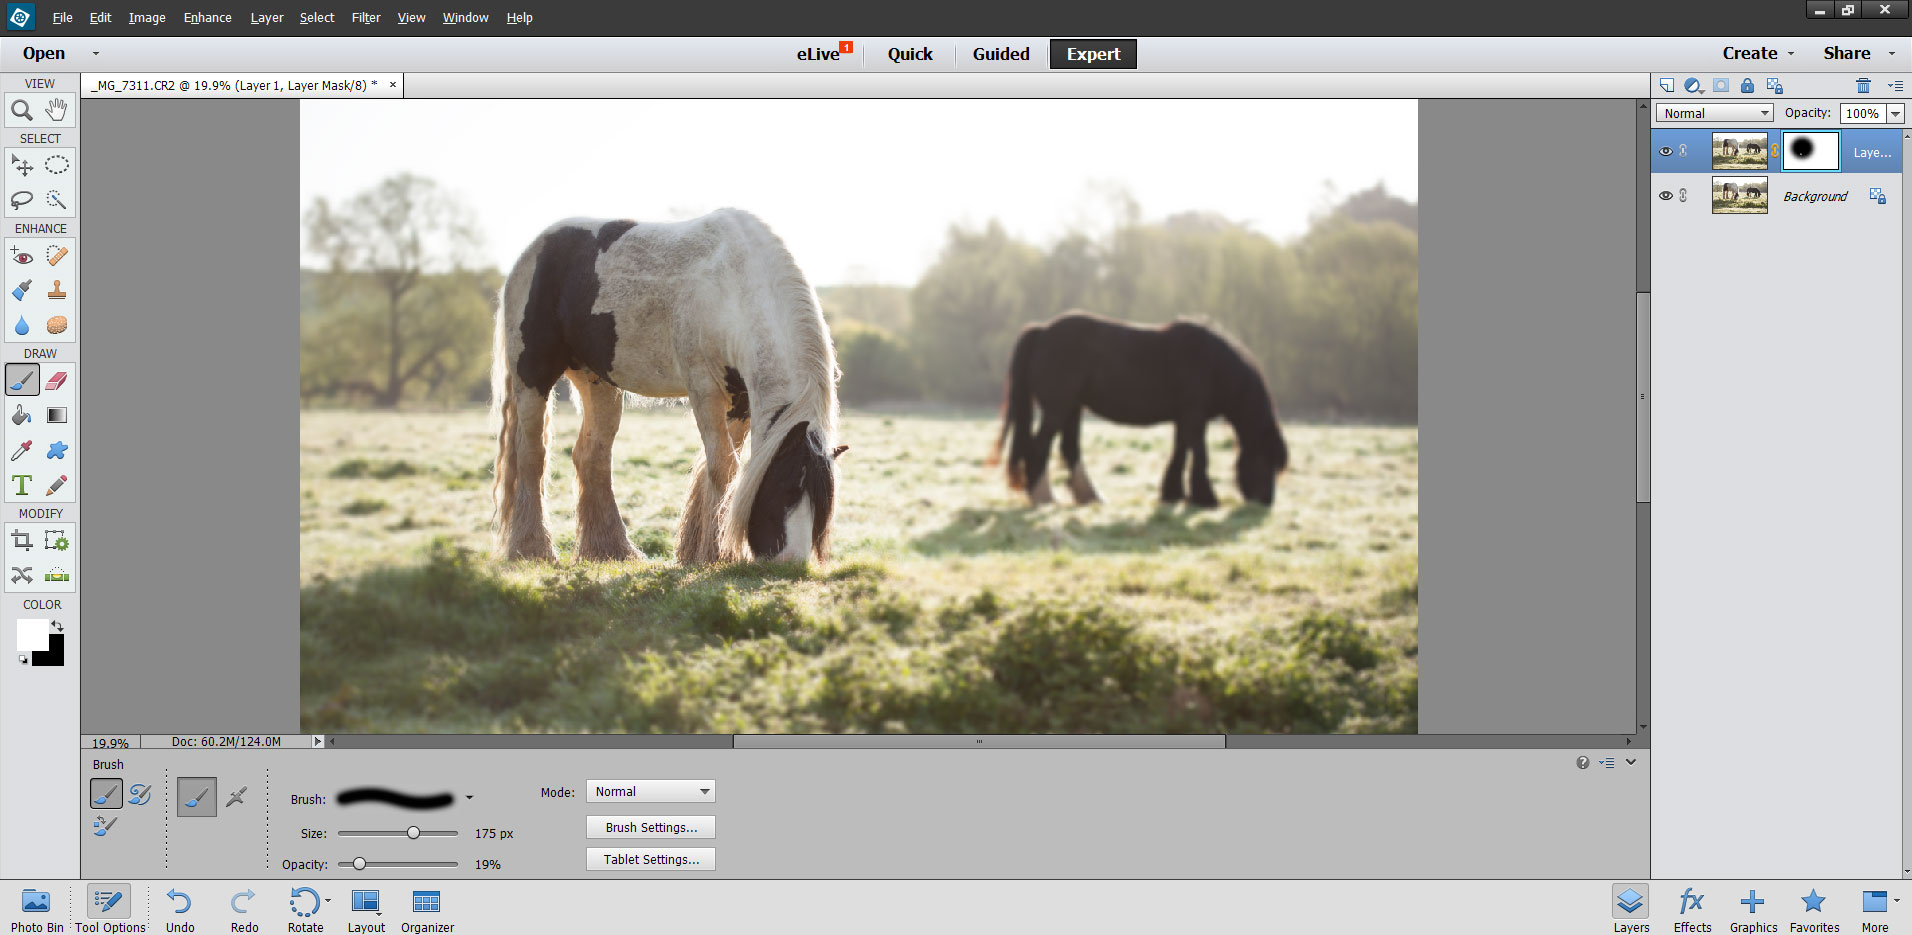
For this image I'll use the brush at a low opacity to add back a bit of slight blur on the grass by the horse's rear legs. It's just a case of using white paint on the layer mask to increase the visibility of the blurred layer in that area. And that's the effect finished.
Using this example image, applying selective focus in software was very easy. However if you have a subject where they are in front of (overlapping) something in the background you want blurred, it becomes more tricky. You'll need to use a brush tool to carefully apply the blurring right up to the 'border' where the background meets the subject.
In more tricky situations you may also need to make several passes at blurring the background, each pass at a slightly different strength, and affecting items further back behind the subject for each pass. Depth of field should drop off gradually behind the subject. If you apply blur so that the area right behind the subject is just as blurry as the extreme distance, then it won't look very realistic.


