Creating a shallow DOF effect using Topaz Lens Effects and onOne FocalPoint 2
In the last two articles we've looked at how to use a shallow depth of field to blur the background using in-camera techniques, and how to replicate the effect using Photoshop or other image editing software. In this article I want to look at a couple of more advanced ways of blurring the background using image editing software.
We'll look at two specialist programs that can replicate the effect of a shallow depth of field, along with a large variety of other lens effects. First we have Lens Effects by Topaz Labs, then we have FocalPoint2 by onOne Software. We'll use the same two images used in the previous article so you can compare the results of each technique against each other.
Using Topaz Lens Effects to blur the background
Topaz Lens Effects is a Photoshop plugin (and also available for use with Adobe Lightroom, Apple Aperture and iPhoto). It has a large range of options, including the ability to simulate the effects of a shallow depth of field on an existing image.
Depending on the image content, it may take some considerable effort to achieve a good result with Topaz Lens Effects. But the results can be more realistic than the other methods discussed in the previous article. It also gives you many more options relating to how much blur is applied to the image, and how that blur appears.
Example 1: Gradual fall-off in focus
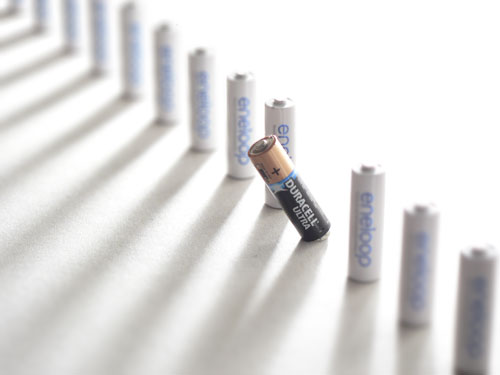
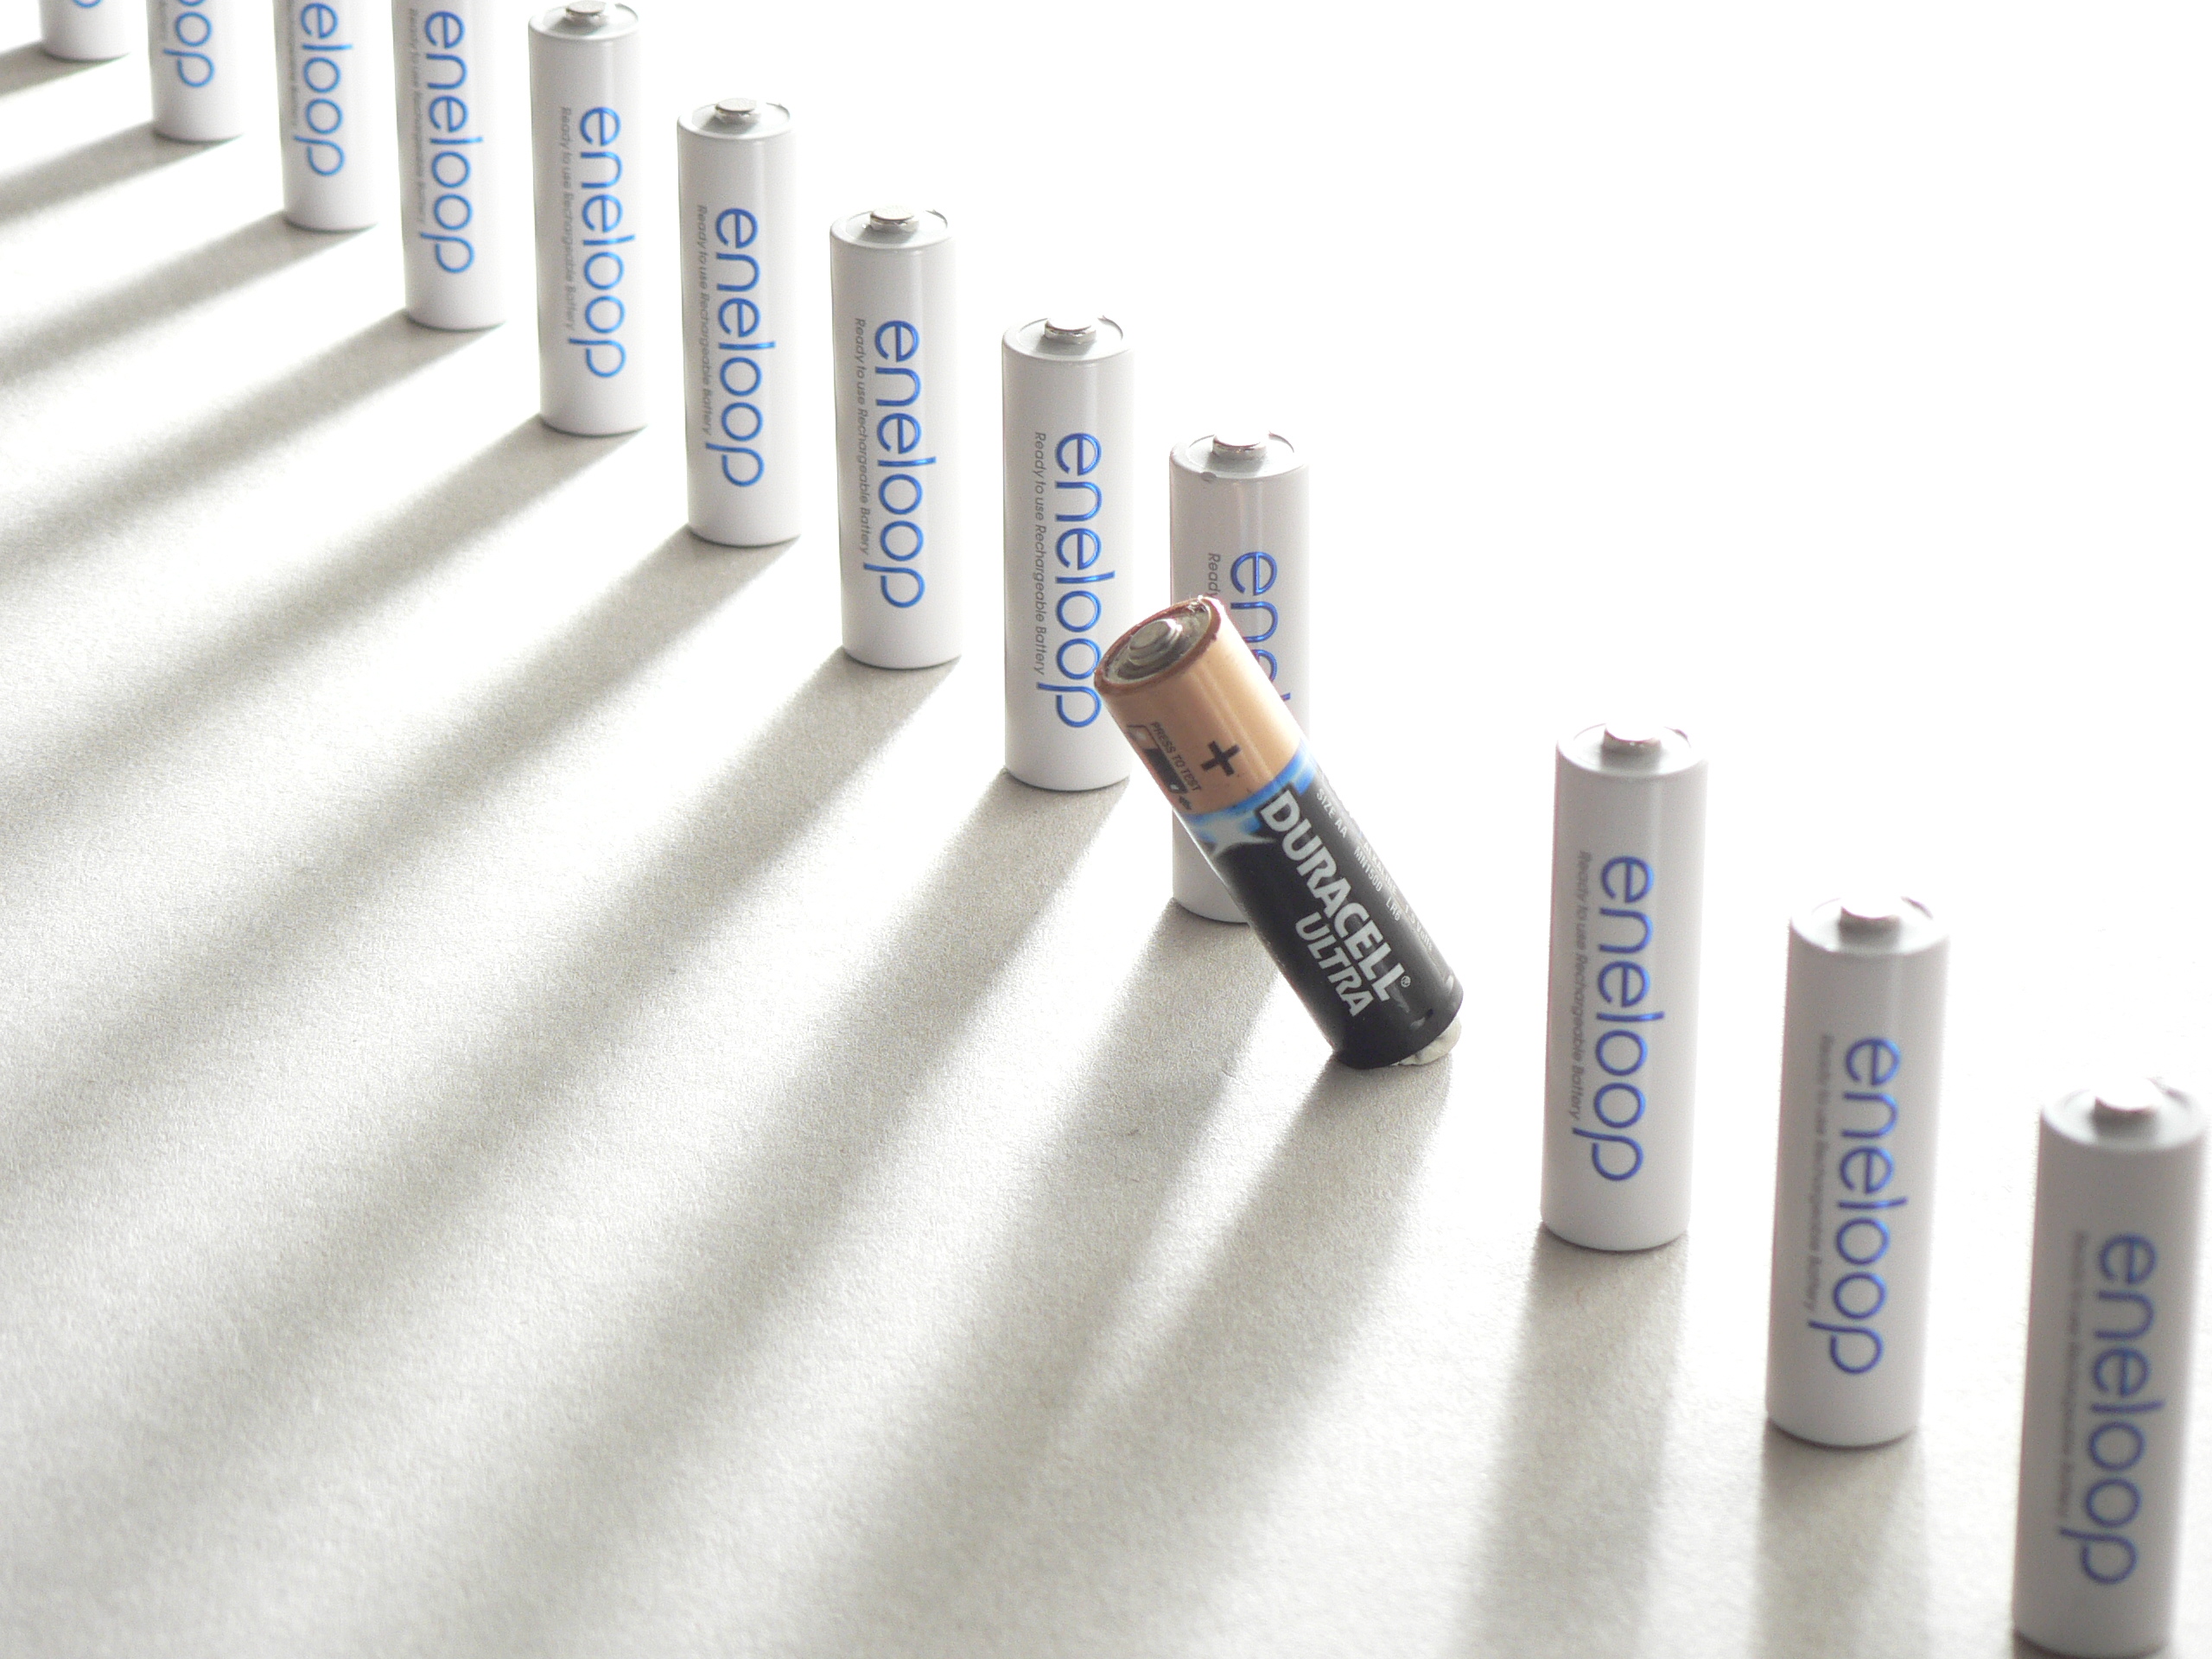
Let's have a look at how it works with the previous image of the batteries. You can install a free 30 day trial of the software from the Topaz website. Enter your email address on the downloads page and they will email you a trial key for the software.
A video demonstrating processing this photo in Topaz Lens Effects can be viewed below:
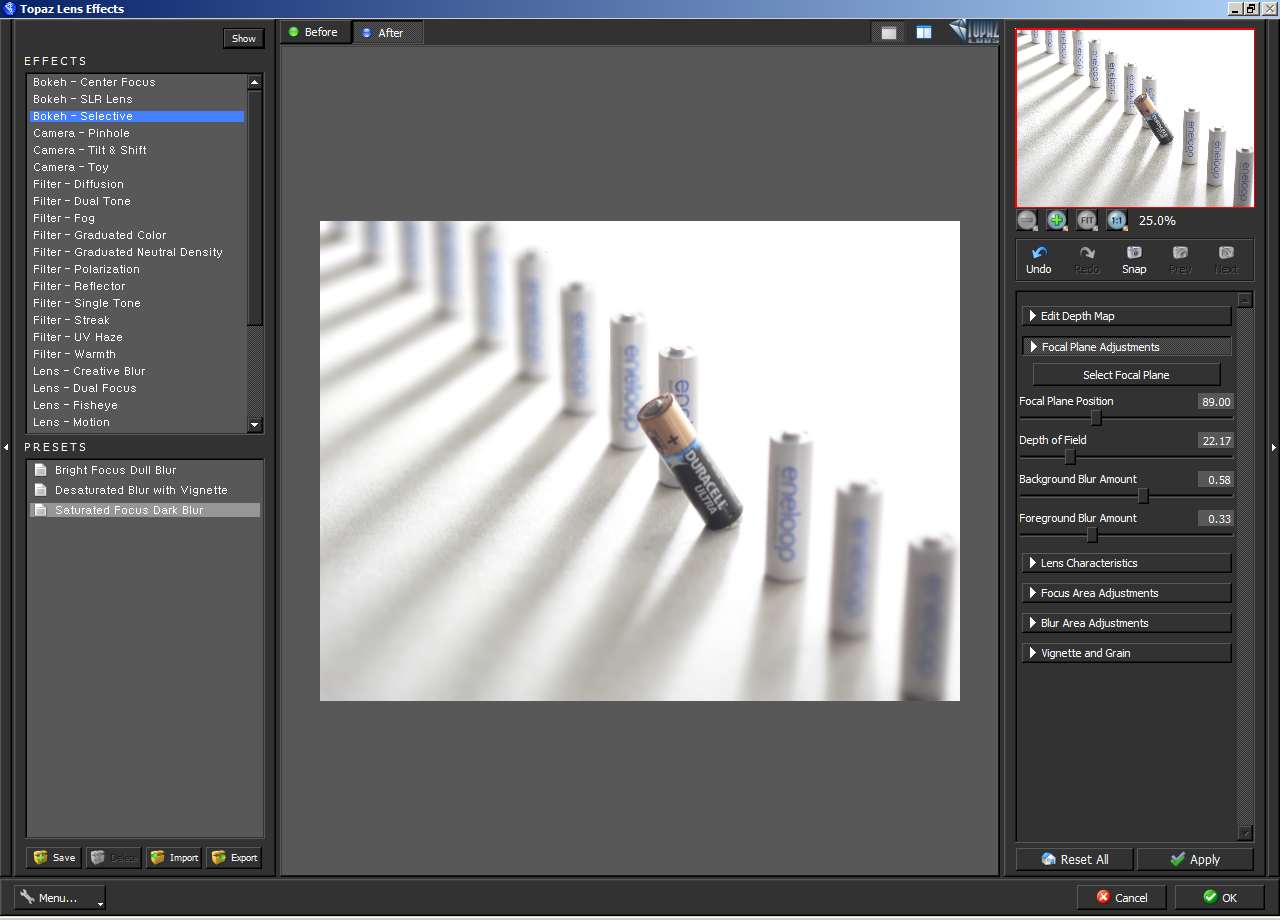
After the software is installed, open the image in Photoshop, duplicate the background layer, then go to Filter > Topaz Labs > Topaz Lens Effects. This will open the Topaz Lens Effects plugin. In the left hand panel you have a range of different effects. For creating a shallow depth of field effect, I have chosen 'Bokeh - Selective'.
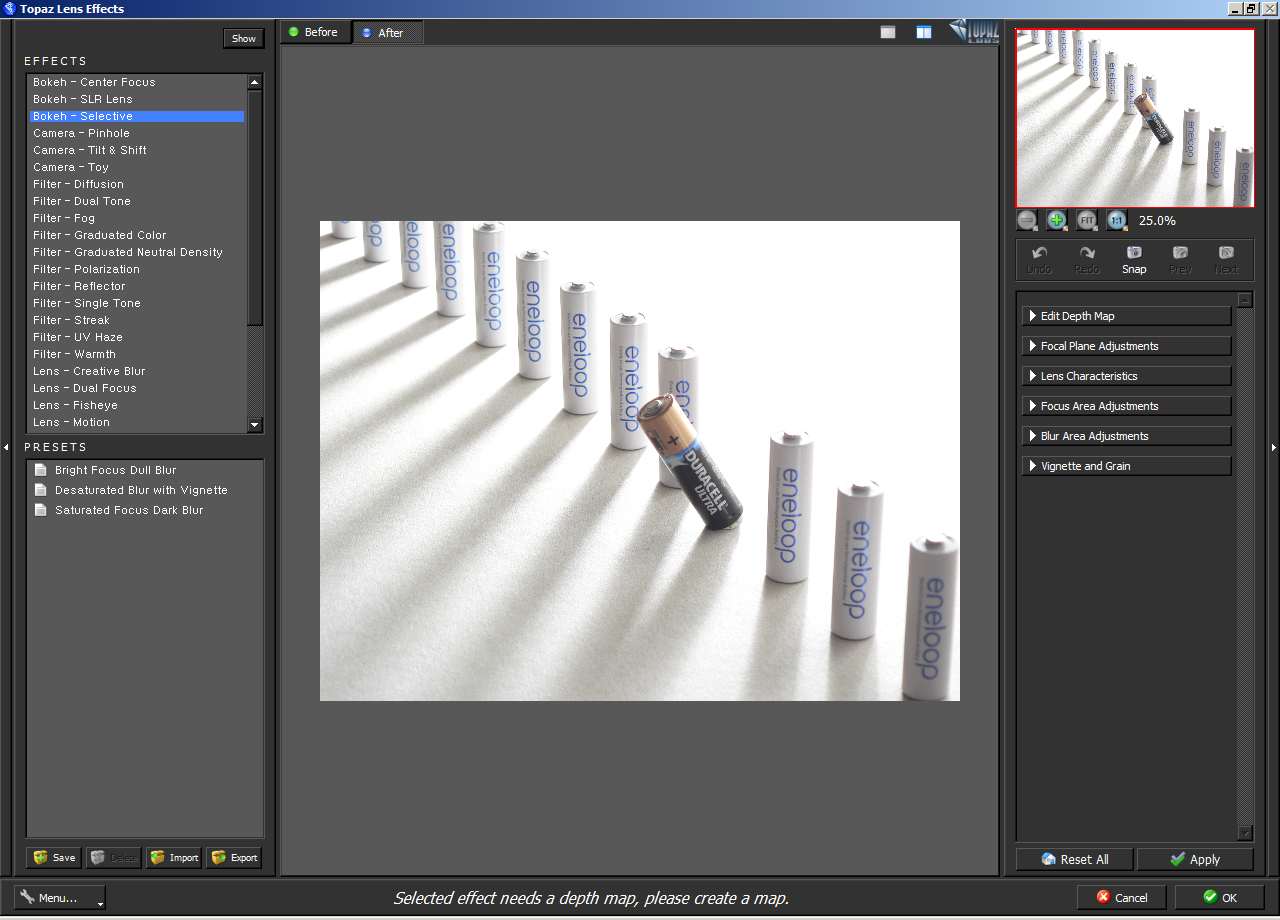
To apply a depth of field effect, Topaz Lens Effects uses a depth map. This is similar to a layer mask. Black on the depth map indicates very close to the camera. White on the map indicates far off in the distance. Then you have all the other shades of gray in between the two.
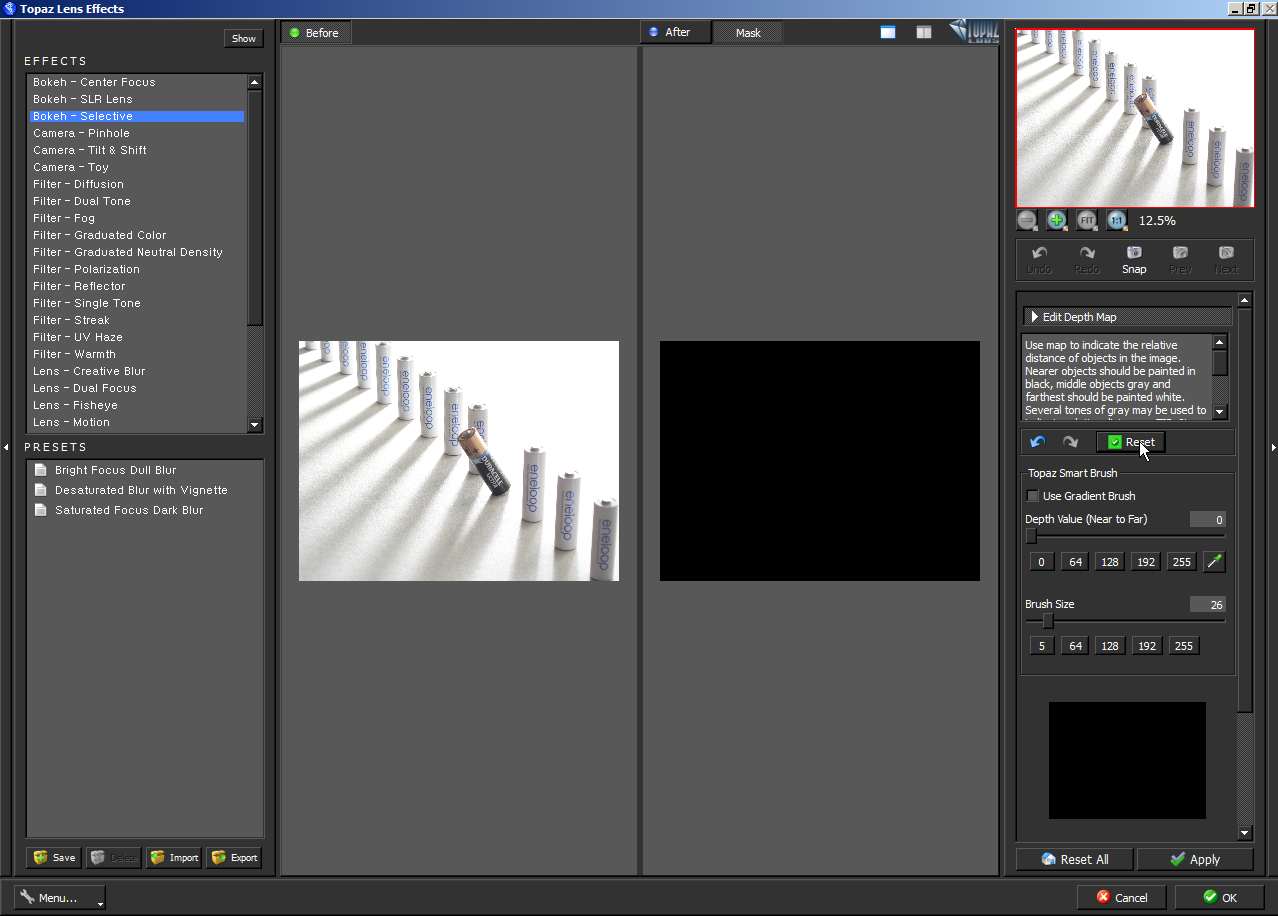
We need to create our depth map so that the software can work out what parts of the image should be in focus, and which parts should be out of focus. Click on 'Edit Depth Map' in the right hand pane, and the screen will change to a split screen view. On the left you have the image, while on the right is the depth map.

The software will try to automatically create a depth map for you. In the case of this image though, the automatic depth map isn't very good. Pressing the green reset button will remove the generated depth map.
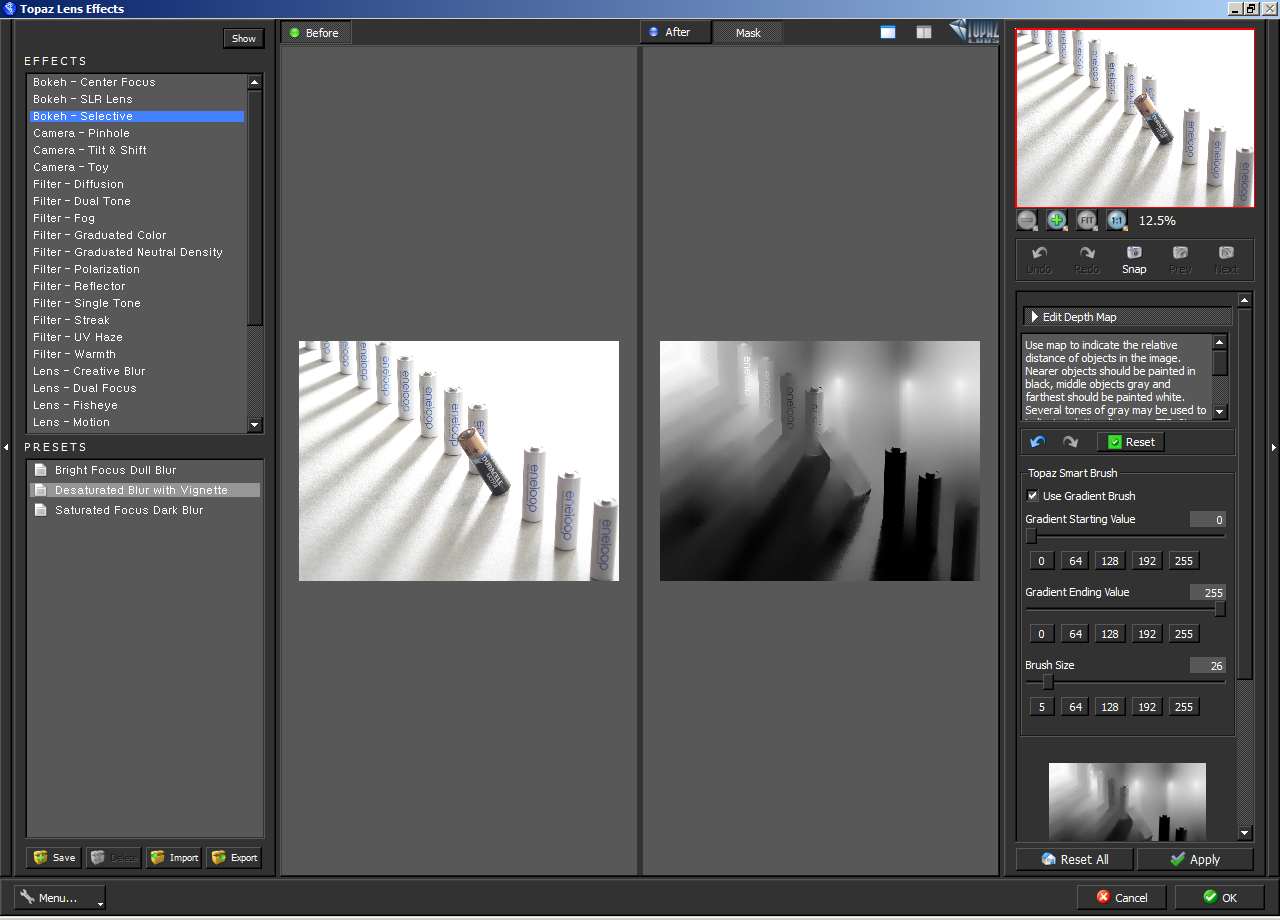
With a blank map, we can start creating our depth map. Often you will want to start by drawing some gradients across the image, to create the depth of near the camera at the bottom of image, to far away from the camera further up the image. To do this, tick the 'Use Gradient Brush' checkbox. Then draw a gradient across the image from bottom to top. (You often need to repeat this several times across the image width). In the case of this image though, this doesn't work very well.
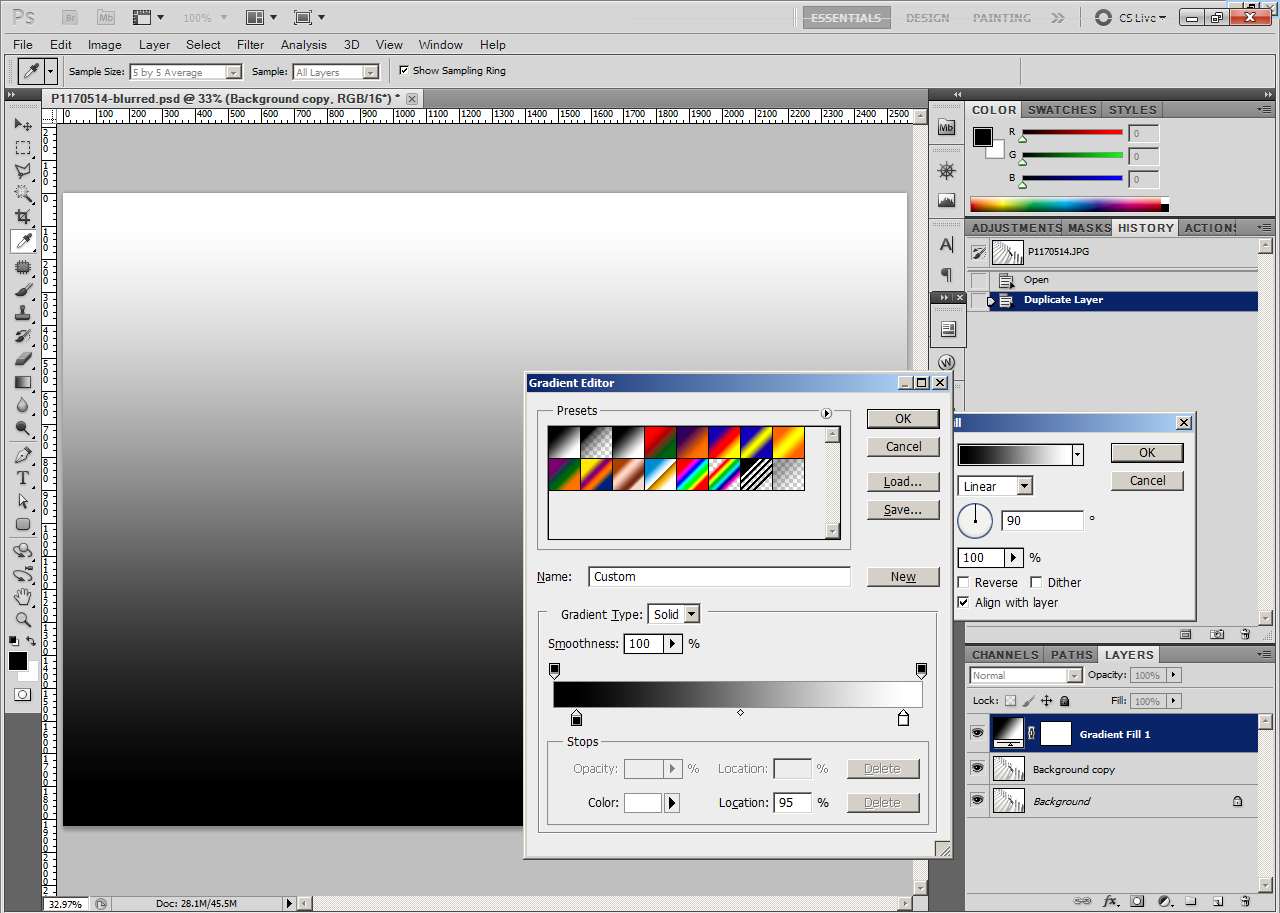
However, Topaz Lens Effects can load depth map images. So you can exit the plugin (Cancel) to get back to Photoshop. Create a new layer and draw a gradient from black to white, going from black near the bottom of the image, to white near the top. Now save this image as a .tif file.
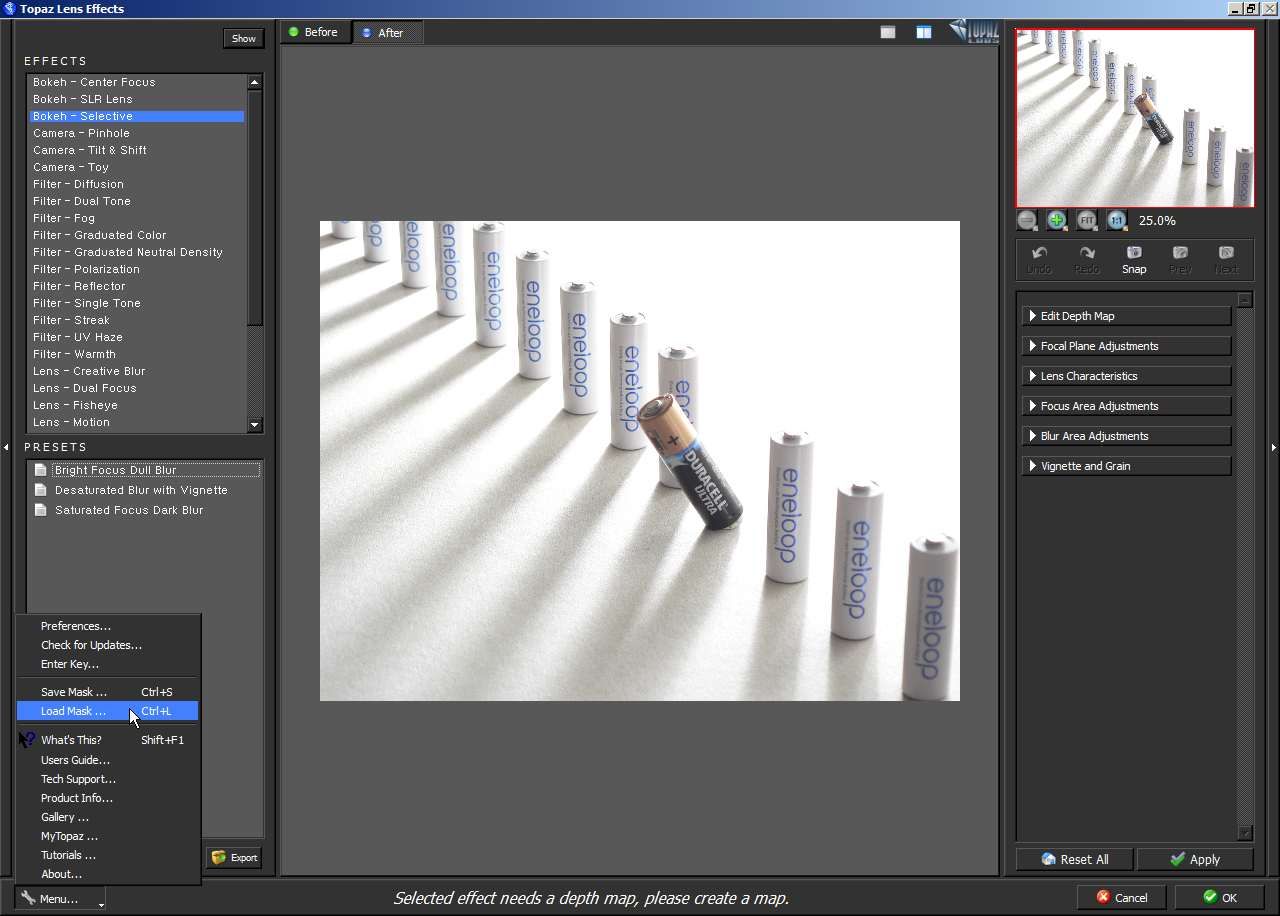
Delete your gradient layer, and select the duplicated background layer again. Open Topaz Lens Effects again. On the menu go to 'Load Mask...' and locate the gradient image you just saved. Press 'open' to open it as the depth map.
Now we can start painting the batteries into the map, as each battery should be at a single depth. With the gradient as it is at the moment, the top of each battery would be at a different focus point to the bottom.
Click on Edit depth map again to get to the depth map view. Click the color dropper tool in the smart brush section, and then click next to the base of the duracell battery. We can now paint the duracell battery to ensure that it is all in the same focus plane.
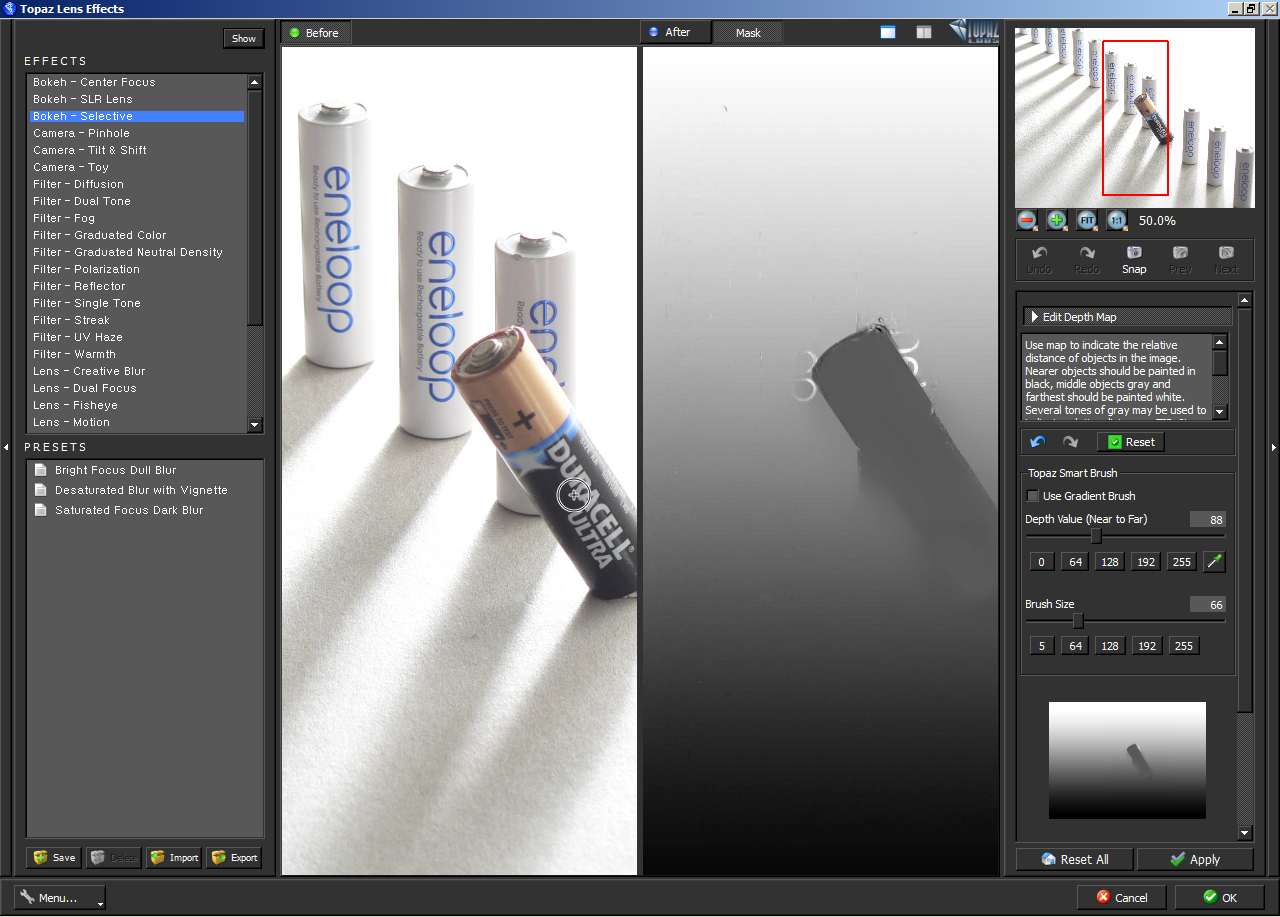
Topaz Lens Effects uses an 'intelligent' brush system, so it will try to automatically fill out the battery to the edges when you paint around the inside of the battery. You can see in the image above it has picked up some of the battery behind as well.
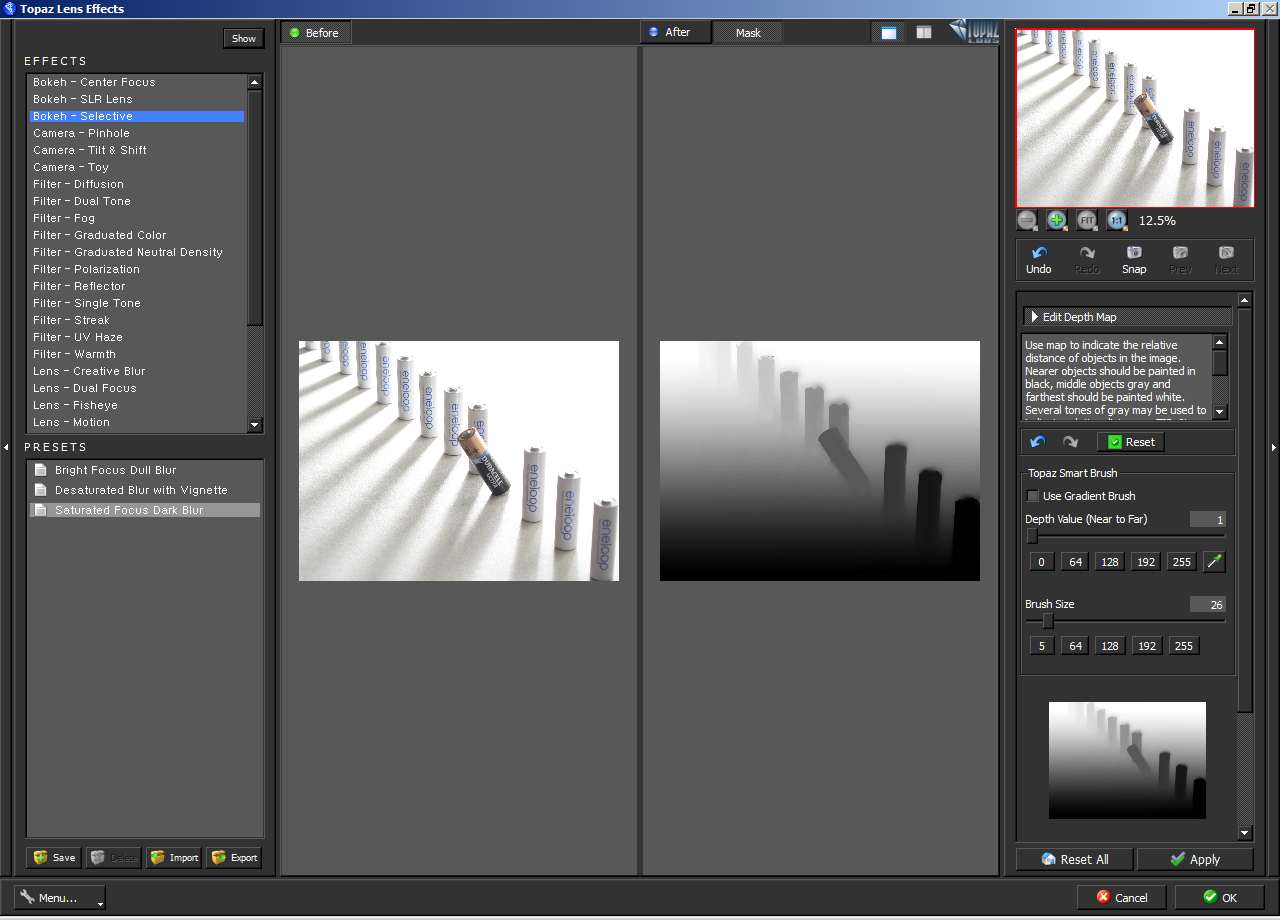
Now repeat the process with the battery behind. Sample the color near the bottom of the battery, then paint the battery this color. Keep repeating until you have all the batteries painted. Remember to change the brush size as necessary for working on more fiddly bits.
Now we have our depth map, we can turn to applying the shallow depth of field effect to blur the background. Click the 'Edit Depth Map' title to hide the depth map controls. Click the 'Focal Plane Adjustments' to show the focus controls.
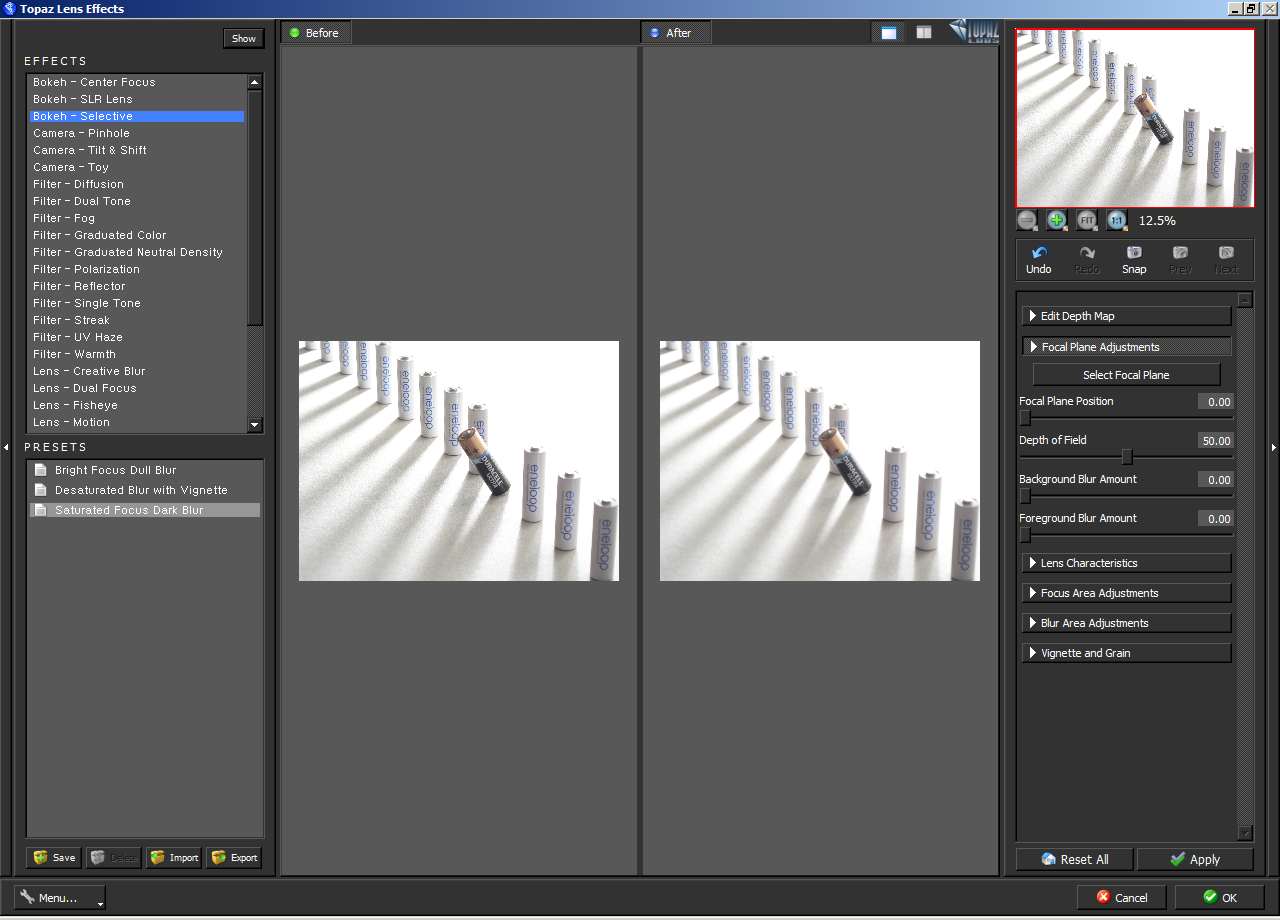
At this point we can switch back to single image view, we don't really need to view before and after images. The controls for split and single screen are near the top of the window, to the left of the image thumbnail and Topaz Labs logo.

Click the 'Select Focal Plane' button, and then click on the item in the image you want in focus. In this case, click on the duracell battery. This will automatically change the 'Focal Plane Position' to the correct setting to be centered where we want it.
Drag up the 'Background blur amount' slider, and you'll see the background becomes defocused. The depth map gives the blur a realistic effect so that the batteries further away from our focus point are more out of focus than those near the focus point. The foreground focus slider works in the same way. The depth of field slider determines how quickly the focus falls away from our focus point.
There are lots of other options available in Topaz Lens Effects, so feel free to play around with the other settings. To apply the effect and go back to Photoshop, just press the OK button at the bottom right corner of the window.
Here is our final image:
Example 2: Quick fall-off in focus
Next let's look at blurring the background of the other photo in Topaz Lens Effects. This image is much simpler to create the depth map for as we don't want a gradual drop-off of focus. Instead we want the subject in focus and the background out of focus, with no in-between.
Thanks to etrenard for licensing this photo with a creative commons license that allows modification of the image. You can click through on the image below to download a larger size image if you'd like to work along with the tutorial.
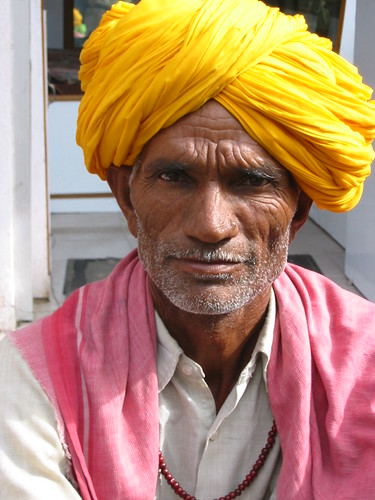
Portrait Inde Rishikesh India by etrenard on flickr (licensed CC-BY-SA)
Again, you can see a video of working on the photo in Topaz Lens Effects below:
This is what the depth map looks like after opening the image in Lens Effects:
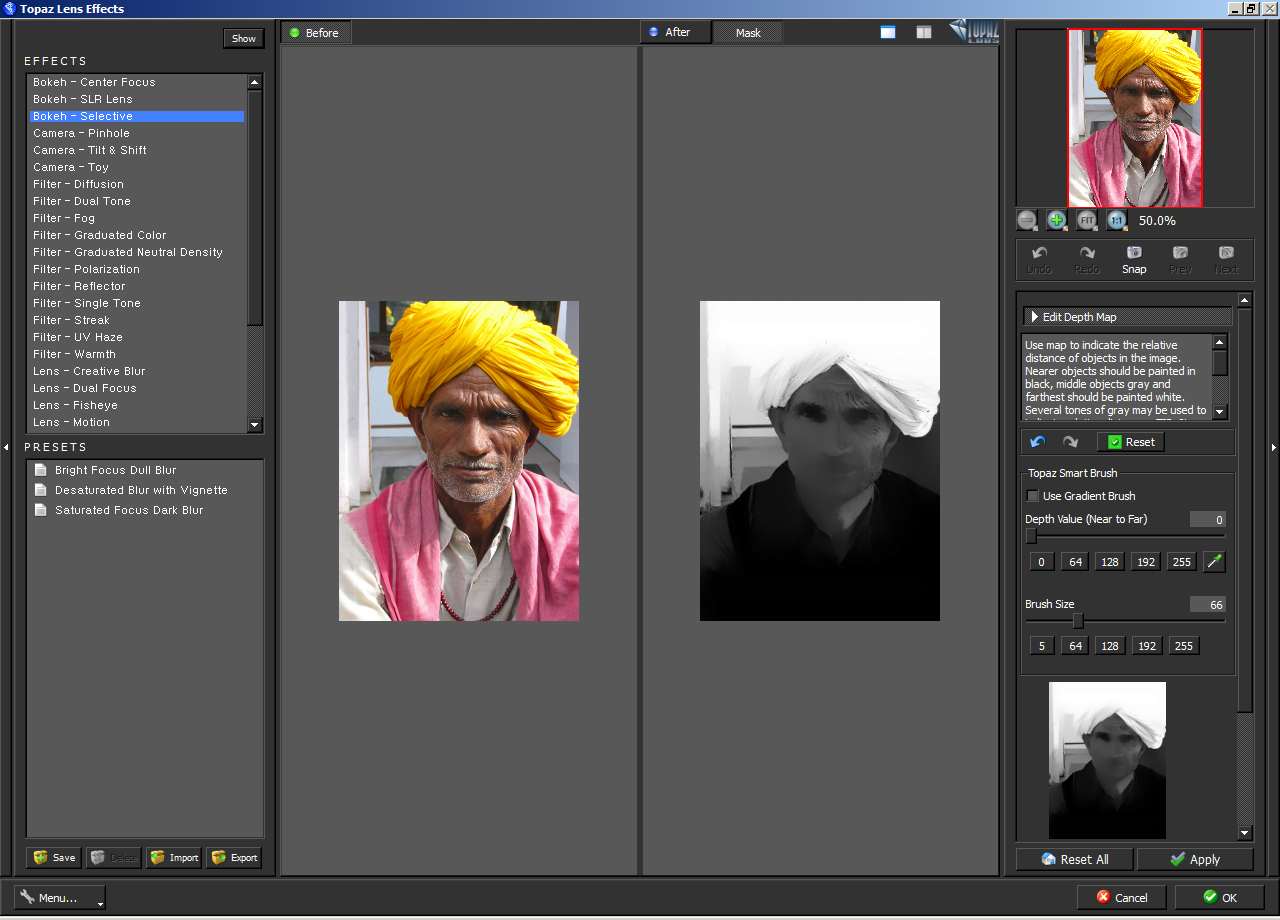
Painting round the inside outline of the subject with a large black brush (depth value of 0) gets us the following:

The Topaz brush intelligently fills in some of the background black for us, even though we want the background to be white. But simply painting over the background with a white brush (depth value of 255) will fix the problem:
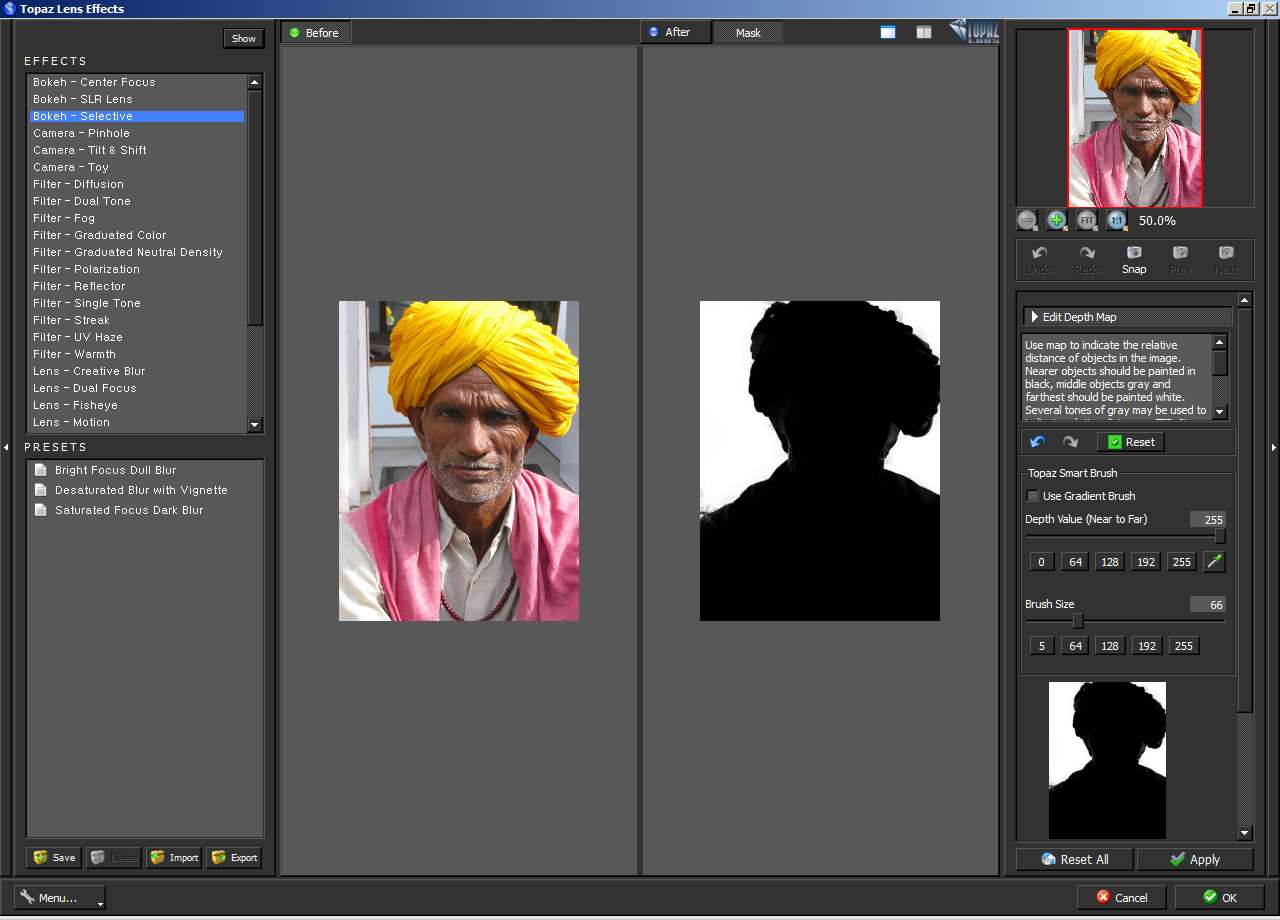
After creating our depth map, we can now move on to the Focal Plane Adjustments to blur the background. We want the Focal Plane Position setting at 0, as this is the color we painted our subject in the depth map.
The Depth of field setting can be left at its default value of 50, and the foreground blur should be set to 0. Increase the background blur slider until you get the desired amount of blur. For this image I think a setting of 0.28 works well.

Applying the effect gives us the final photo:

Using onOne Focal Point to blur the background
Another piece of software that allows you to create a shallow depth of field effect in an existing photo is Focal Point by onOne software. It is available as a plugin for Photoshop, Lightroom, or Aperture, and is also available as a stand-alone application.
The software works through use of 'focus bugs'. These are points that you can place on a point of focus in your photo. You can then control how quickly and in what directions focus falls off from that point. A focus brush is also available for painting in blur or focus manually.
Example 1: Gradual fall-off in focus
You can view a video of this technique below:
As before, let's start by working on the photo of the batteries. After opening the image in Focal Point 2, a focus bug will automatically be added to the center of the image.

In the side panel you can set some of the focus bug options, including whether the bug should have a circular or planar shape. For this image, we'll stick with the round shape.
Move the bug over the point of focus (duracell battery) and increase the feather to 100%. The feather can be adjusted under the FocusBug section of the options panel to the right. Or it can be adjusted by dragging the large handle on the top-right of the focus bug.
Feather means how abrupt the change between the in focus and out of focus areas should be. A large feather means that the change will be quite smooth, which is what we want for this image.

Adjusting the smaller handles at the top and bottom and either side of the bug allows you to resize and rotate the bug. By making the bug longer and rotating it slightly, we can create an effect where the batteries are going out of focus in a linear fashion. That is, the top of each battery is about as out of focus as the bottom of that same battery.
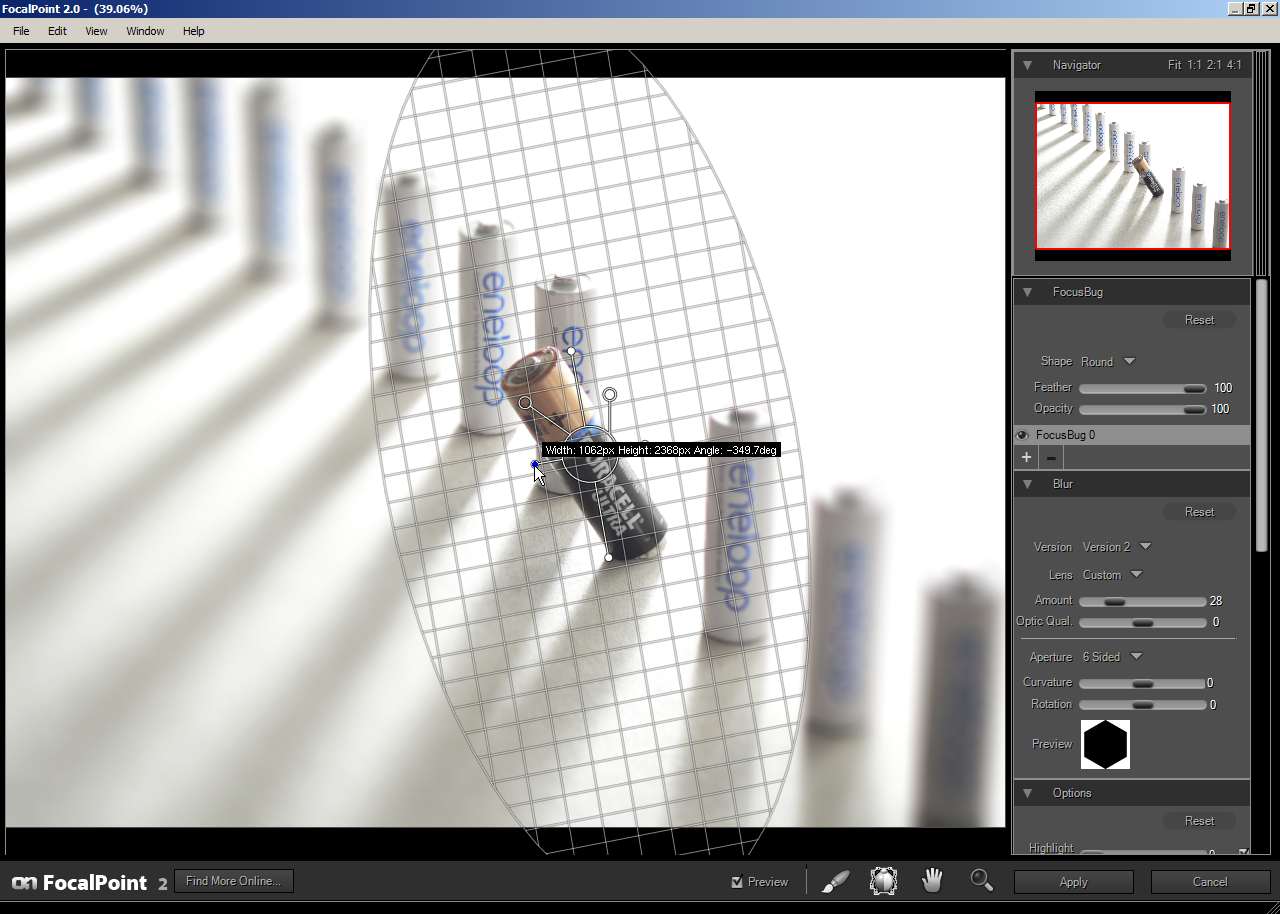
At the moment, the focus is circular and centered around the duracell battery. This is fine, but if we want to make the blur effect a bit more realistic, we can add a second focus bug. Place the bug to the left of the battery, and then stretch it to a long thin shape. This replicates the flat focus plane that you get when taking a photo with a shallow depth of field normally.
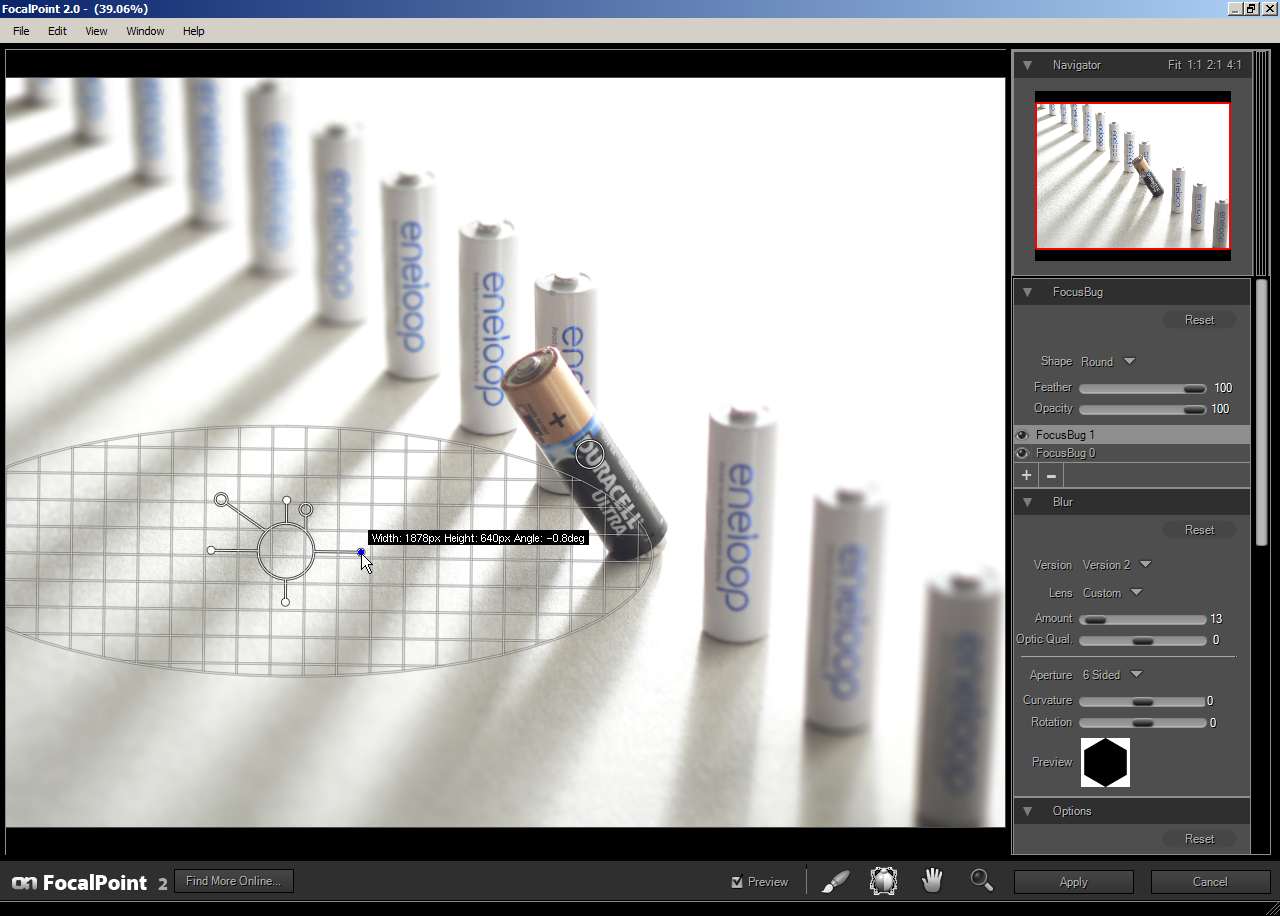
Finally, there is an area near the bottom of the image that is in focus due to the shape of our first focus bug. We can blur this out to help with the illusion of a realistic flat focus plane.
On the brush settings, check that it is sent to 'Paint blur'. You can toggle between 'Paint blur', 'Erase', and 'Paint focus' by clicking on this setting. Using a large brush with a large feather, paint over the area that should be out of focus at the bottom of the image.
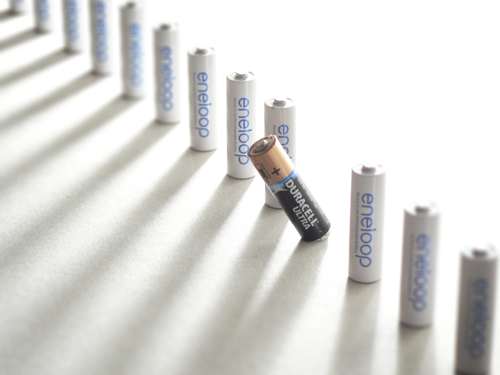
We're now finished! Click on the Apply button, and you will be prompted to save the image (in the standalone version). In the plugin version the changes will be applied and you'll be returned back to the image in the host application. The final image looks like this:
Example 2: Quick fall-off in focus
Now let's look at the portrait photo.
I've recorded a video of creating this effect that you can view below:
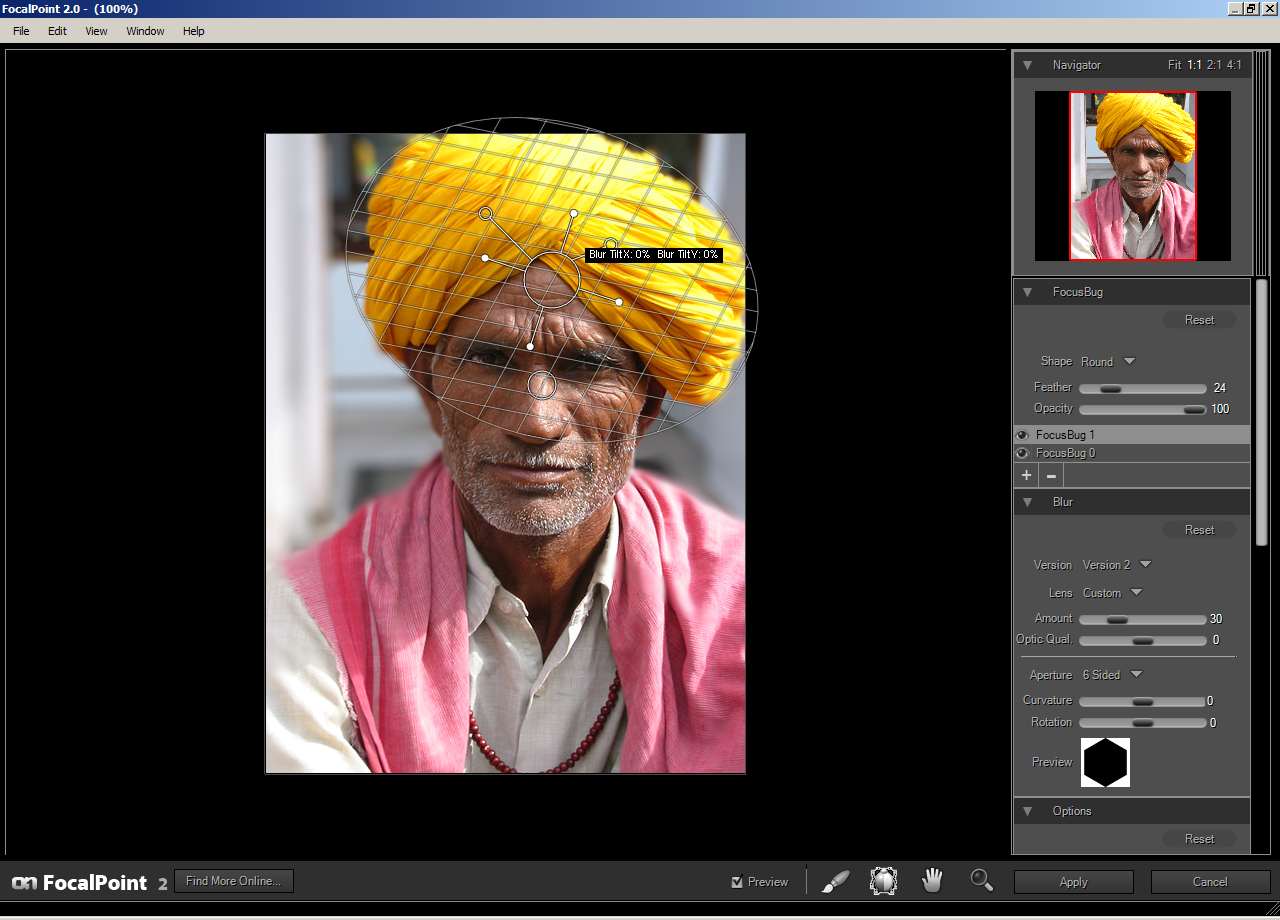
After opening the image in FocalPoint 2 we have the following:

To start, I've moved the focus bug over the face. Then I've painted in focus quite roughly over the subject.

The subject has a blurry halo round him at the moment. Let's try and reduce that through the use of some carefully placed focus bugs. Using a focus bug over the turban, we can get that in focus while keeping most of the background out of focus.
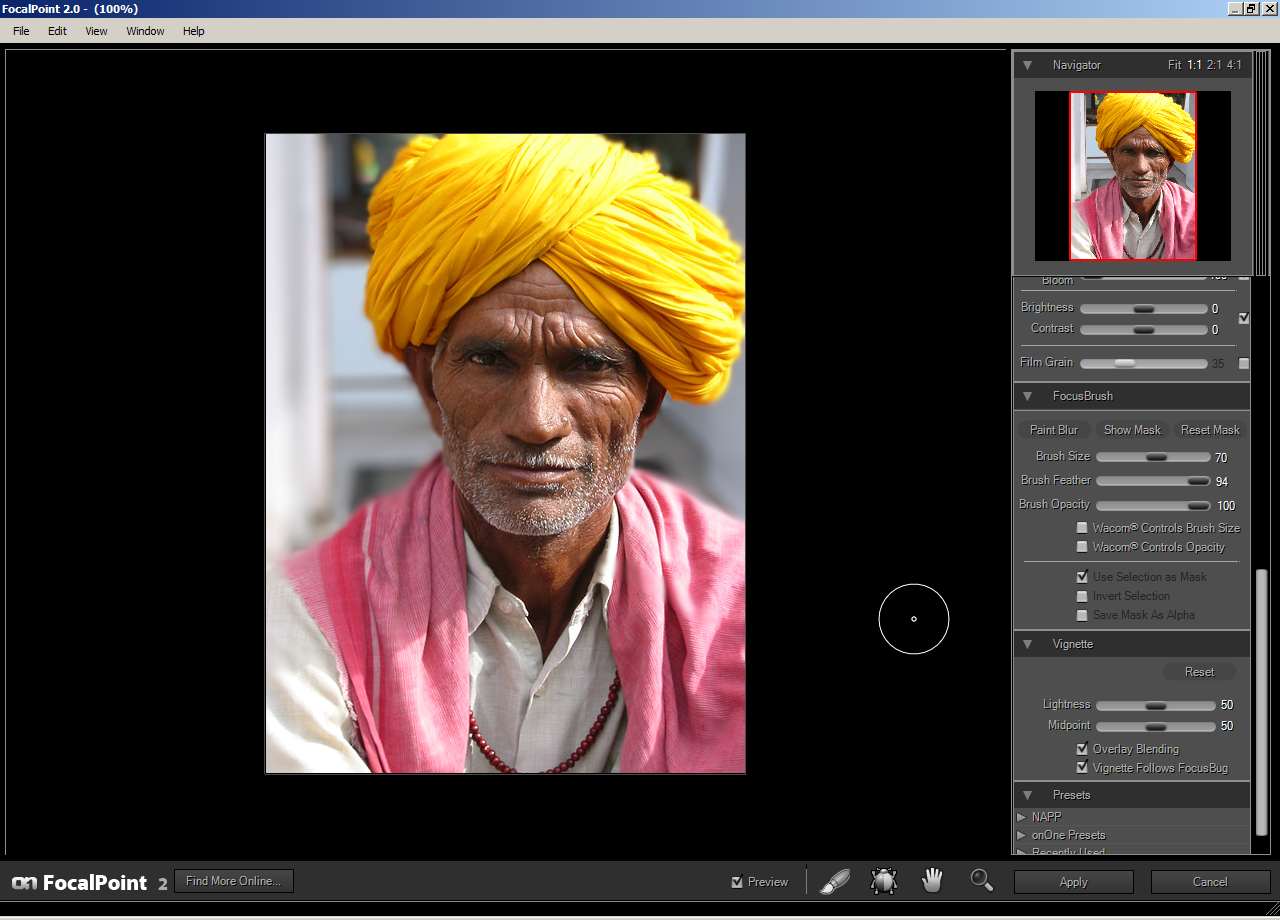
The small bits of background that came into focus from the focus bug can be painted out. Use the focus brush set to paint blur.
To finish off, I've placed a focus bug covering each of the shoulders. I adjusted the feather and position. The difference is just a subtle increase of focus on the shoulders.
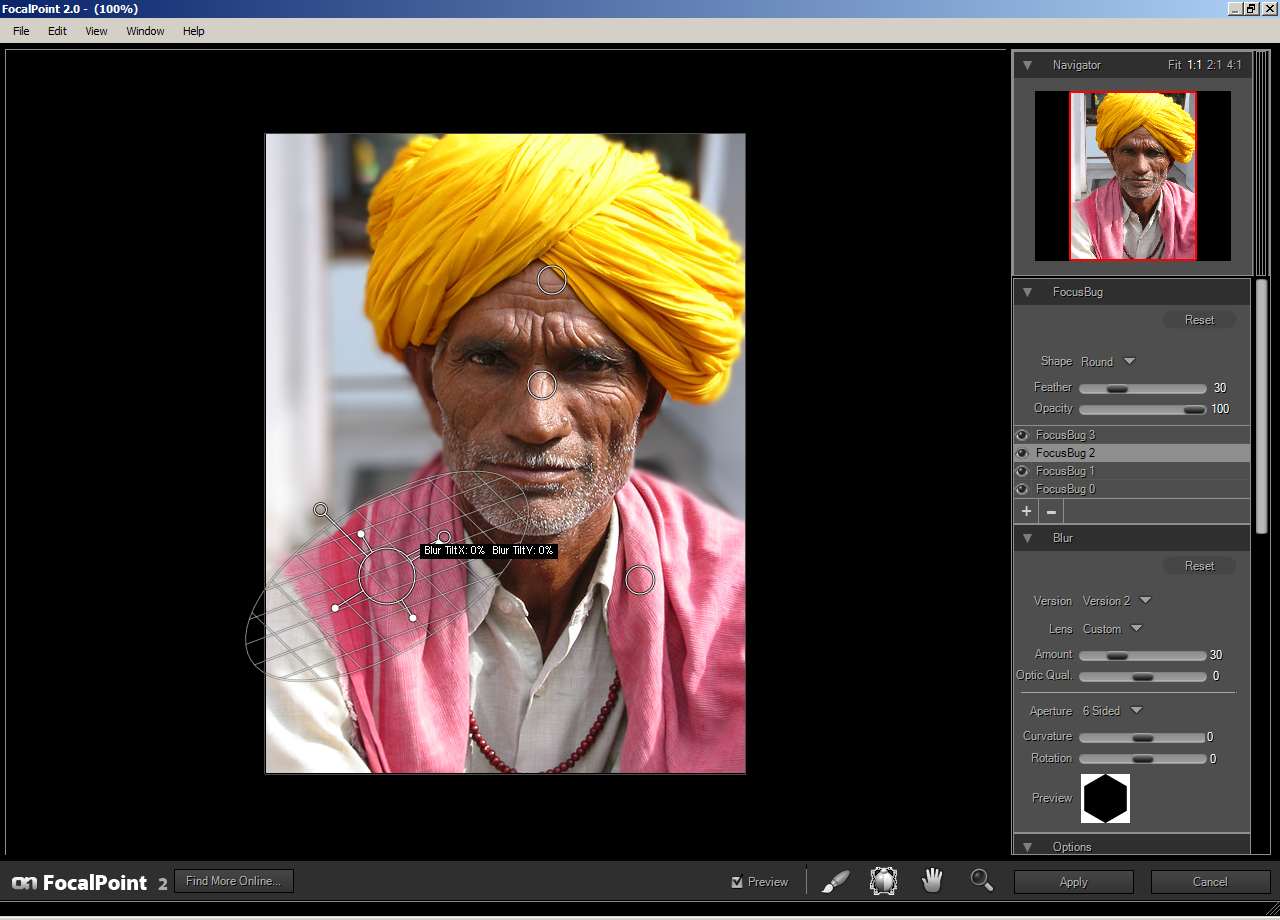
That gives the final image below:

Topaz Lens Effects and onOne FocalPoint 2 can both produce other focus effects, such as tilt-shift and lens baby style selective focus. They also offer much more control over each effect than you can get using basic Photoshop techniques. But of course, they cost quite a bit extra.
It is always best, if possible, to get your image right in-camera. But sometimes it is not possible to get your image exactly how you want it in camera. Maybe your camera just does not give a shallow enough depth of field as you would like. For these cases, I hope the tips for blurring the background to simulate a shallow depth of field effect will come in handy.
The brief tutorials on Topaz Lens Effects and onOne FocalPoint 2 should have given you an idea of what these programs can do, and how they compare to the more basic Photoshop techniques. If they look like they might be useful to you, just try out their free 30 day trials.


